The BEST method for cleaning Iron Relics

Dug

Bronze Member
Feb 18, 2013
1,138
1,263
SC Lowcountry
Detector(s) used
XP Deus/Sovereign GT.
Primary Interest:
Relic Hunting
Thanks, Dug! I will work very carefully with my Dremel because I'm not sure how solid the clasp is. Two more questions: 1) I assume it's OK to put brass in the oven? 2) I'm unfamiliar with Microcrystlline wax. Is it easy to get?

1. I just baked an unloaded 3" Hotchkiss shell that has a brass fuse installed. Baked it for an hour at 350 so I could ensure it was thoroughly dry before treating the iron body with Gempler's rust converter. I wiped any rust converter I got on the brass fuse off as it wanted to turn it dark which I did not want.
2. I bought the microcrystalline wax in blocks off Ebay.

I just used Gempler's for the first time and after two coats still had some brown bleed through on some surface areas. The items had been thoroughly cleaned and only had flash rust on them so I'm a bit confused on why the bleed through. I was debating on applying a third coat of Gemplers but brushed some Ospho on the areas in question instead. Doing that immediately converted the bleed through. It did turn the Gemplers to a grayish color and some areas white, but I had already planned on spray painting with a semigloss black to seal anyway.

I think that with the remainder of the frags I have to do, I am going to seal them with microcrystalline wax instead of a rust converter since I would rather have them dark grey in color instead of black.

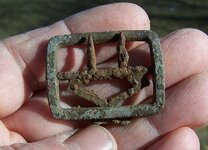
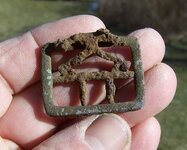
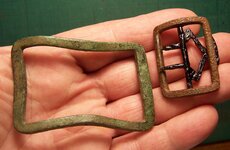
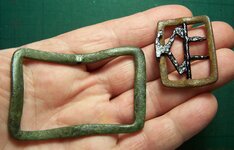
The tough thing with very thin iron such as the tongues on the buckle is how much useable iron is left inside. In some situations you may not have any left so be very careful when using the dremel and I would not leave it in the Evaporust for very long for that reason. You just want to stabilize the tongues from further deterioration.

Here is a pic of the batch showing bleed through after 2 coats. The section of rail was treated with microcrystalline wax instead of Gemplers.

gemplers.jpg
 

Last edited:

Wildcat1750

Gold Member
Nov 18, 2012
5,015
4,105
Western CT
🏆 Honorable Mentions:
4
Detector(s) used
AT PRO/Ace 250w8.5x11" DD Coil/
Garrett Pro-Pointer/Garrett Pro-Pointer AT/
Vibra-Tector 730/
Radio Shack Discovery 1000 (Tracker IV)
Primary Interest:
All Treasure Hunting
After some debating I opted to clean up the Knee Buckle that I found last Sunday by first soaking in Evapo Rust for 24 hours (I didn't read Dug's warning about not leaving it in too long until I was at work after having soaked it over night, but fortunately it turned out OK), then carefully removing the rust with a pick and my Dremel Tool. In between sessions I dipped the buckle in Evapo Rust and let it dry, to keep it stable.

decided on the Rust Converter option because I was nervous about baking the piece, plus I already had Rust Converter an felt I had more control applying it with a tooth piece on a cool metal object. The tongue turned black, as predicted, but it's not a bad look in this case and will stop the tongue from crumbling away, which is my main objective.

For comparison I have included a photo of my intact knee buckle along side a larger but incomplete example that I found a few years ago.

Thanks, BuckleBoy and Dug for your very helpful advice!
 

Attachments

  • 100_9591 - Copy.JPG
    100_9591 - Copy.JPG
    235.1 KB · Views: 216
  • 100_9590 - Copy.JPG
    100_9590 - Copy.JPG
    280.8 KB · Views: 225
  • 100_9765 - Copy.JPG
    100_9765 - Copy.JPG
    518.8 KB · Views: 241
  • 100_9766 - Copy.JPG
    100_9766 - Copy.JPG
    582.6 KB · Views: 251

Dug

Bronze Member
Feb 18, 2013
1,138
1,263
SC Lowcountry
Detector(s) used
XP Deus/Sovereign GT.
Primary Interest:
Relic Hunting
You did a good job, that came out really nice!
 

Dug

Bronze Member
Feb 18, 2013
1,138
1,263
SC Lowcountry
Detector(s) used
XP Deus/Sovereign GT.
Primary Interest:
Relic Hunting
Thought I would post a side by side of two methods of sealing the iron. The one on the left was heat dried and then after it cooled off treated with Ospho. Then after it dried was heated in order to take on microcrystalline wax. The one on the right was heat dried then coated with Gemplers twice. After the Gemplers had dried for 48 hours it was coated with rustoleum semi gloss black spray paint.

I prefer the appearance of the microcrystalline wax treatment.

frag..jpg
 

Dug

Bronze Member
Feb 18, 2013
1,138
1,263
SC Lowcountry
Detector(s) used
XP Deus/Sovereign GT.
Primary Interest:
Relic Hunting
As an experiment I left this small buckle in evaporust for a week. It did no harm to the brass patina. It did leave a yellowish coating that I was able to remove using dremel with a brass wire brush on low rpm with light passes. I heated the buckle up with a torch to dry out the tongue since I don't think there is much metal inside and then applied microcrystalline wax to the buckle. I did darken the brass patina on the tongues crossbar with the torch as seen in the pic so be careful when heating brass patina. Only time will tell if I did enough to halt the oxidation of the tongue.

Just my mad scientist results that I thought I would pass along.

evapo..jpg

evapo1..jpg
 

Wildcat1750

Gold Member
Nov 18, 2012
5,015
4,105
Western CT
🏆 Honorable Mentions:
4
Detector(s) used
AT PRO/Ace 250w8.5x11" DD Coil/
Garrett Pro-Pointer/Garrett Pro-Pointer AT/
Vibra-Tector 730/
Radio Shack Discovery 1000 (Tracker IV)
Primary Interest:
All Treasure Hunting
Thought I would post a side by side of two methods of sealing the iron. The one on the left was heat dried and then after it cooled off treated with Ospho. Then after it dried was heated in order to take on microcrystalline wax. The one on the right was heat dried then coated with Gemplers twice. After the Gemplers had dried for 48 hours it was coated with rustoleum semi gloss black spray paint.

I prefer the appearance of the microcrystalline wax treatment.

View attachment 1414963
Nice job! I prefer the appearance of the microcrystalline wax treatment, as well. :thumbsup:
 

bc5391

Hero Member
Sep 23, 2016
532
763
Southern Arizona
Detector(s) used
Minelab ,XP
Primary Interest:
All Treasure Hunting
I buy and sell a lot of vintage garden tractors, many of the parts are extremely rusted, especially the bolts, and any chrome.many of the parts look as bad as the ones in your photo's. I have found the best method for me is to first use vinegar, then I put the parts in a vibrator tumbler made out of a 5 gallon. bucket, the parts are as good as new after 8 hours in the tumbler.
 

Dug

Bronze Member
Feb 18, 2013
1,138
1,263
SC Lowcountry
Detector(s) used
XP Deus/Sovereign GT.
Primary Interest:
Relic Hunting
I buy and sell a lot of vintage garden tractors, many of the parts are extremely rusted, especially the bolts, and any chrome.many of the parts look as bad as the ones in your photo's. I have found the best method for me is to first use vinegar, then I put the parts in a vibrator tumbler made out of a 5 gallon. bucket, the parts are as good as new after 8 hours in the tumbler.

Wonder if you can kill two birds with one stone by tumbling with vinegar or would there be too much gas buildup?

You build the tumbler? Would like to see pics of it.
 

bc5391

Hero Member
Sep 23, 2016
532
763
Southern Arizona
Detector(s) used
Minelab ,XP
Primary Interest:
All Treasure Hunting
I've never tried that, I just let the vinegar remove the heaver deposits, the tumbler seems to bring the parts to a dull luster, which can be painted, or a wax finish.
 

Dug

Bronze Member
Feb 18, 2013
1,138
1,263
SC Lowcountry
Detector(s) used
XP Deus/Sovereign GT.
Primary Interest:
Relic Hunting
Food for thought with iron.

Recently I dug up some large chunks of iron, and being a courteous digger hauled them out of the field. What caught my attention was how very little rust had developed on these items. The items do have a the tell tale sign of having been exposed to high heat while being rusty leaving a reddish staining not to be confused with red paint as it was not. Some areas of the iron did have rust underway but it was area of where the items had been broken up exposing raw metal. This makes me wonder if once rust is exposed to a very high heat converting it to a reddish color if somehow it becomes resistant to going back to an active state? This would be another reason to consider baking the item to a higher temperature in my thought processes.

Here is a pic of the iron pieces. Not sure what they are as I initially thought they were some sort of plow system, but it has been suggested that they may be part of a forge. They came out of a very rural late 1800s site.

iron..jpg
 

Florida Finder

Bronze Member
Dec 17, 2020
1,718
5,321
Southern States of America
🥇 Banner finds
1
Detector(s) used
AT Max
Primary Interest:
Relic Hunting
UPDATE: I have decided that I greatly prefer Apple Cider Vinegar (ACV) for cleaning iron relics. I do still dip them in EvapoRust afterwards to displace the water, let them air dry (the evaporust keeps them from flash-rusting), then bake in the oven and season while hot with a thin coat of Crisco.

My original post is below, praising Evaporust. I still like the product, but it is just to expensive ($22/gallon for Evaporust vs. $5/gallon for Apple Cider Vinegar)

Regards,

Buck


Original Post:

Hello all,

Put away the rubber gloves, the belt sanders, the toxic chemicals, the risk of shock, dangerous fumes, and expensive copper tubing. I broke down and tried something this week and was quite pleased with the results. The product is called EvapoRust, and it is for sale in most auto parts stores. It has no toxic fumes, is PH neutral, biodegradeable, and removes rust like a champ.

This method is a little more expensive in the long run than electrolysis, at $22/gallon for the product--but the starting cost of a good electrolysis setup is easily twice that amount. Therefore, I would reserve this method for gun locks and pieces, ramrods, trade axes, and relics that are composed of several independent pieces of different metals including iron (iron padlocks with brass key escutcheons, pocketknives with brass, gutta percha, or synthetic sides, guns with brass parts, etc.).

This product will only react with iron oxide (rust). It will not remove good iron (unlike electrolysis, which removes iron as well as rust). The process works slowly, and it needs very little attention from the user--so it is possible to remove a relic if it looks like it is getting thin (didn't have much good metal left in the first place). If you let the product air-dry on the relic, it will keep it from rusting for another week or two, so you have time to think about how far you wish to go.

EvapoRust leaves the metal looking very grey in color (unlike the black look of electrocuted iron). I will be baking these relics with crisco or oil in the oven after using EvapoRust (much like seasoning a cast iron skillet), so they will get a little darker in during that final process.

Iron that is pitted deeply by rust will still show major pitting after using EvapoRust. Iron that has a light layer of rust will come out fairly smooth. But this is no different from electrolysis, which leaves the same pits unless you stop it prematurely and end up with rust spots still coming through.

This is the ONLY way I have found to remove rust from the Insides of gun parts, lock plates, and the handle holes in antique tools. Electrolysis just can't do that.

So, here are the results--followed by a few tips. I tried this on a cast iron stove leg that had a nice design. Before and after photos:


View attachment 440977


View attachment 440978


All of the rust is gone, and it is ready to be "seasoned." I will post another photo after the seasoning is done.


A few tips: You must SUBMERGE the relic in the product. So this means that the large relics will use much more product than the small ones. I used half a gallon on the stove leg. Due to the cost, I have begun grouping my relics by size. The bigger ones better be darned good ones to get the EvapoRust bath. The small ones, not as important decision because they will take less amount of liquid to cover them. Doing large, really rusty relics will be expensive! This is because you will probably have to change the liquid once. A good rule of thumb is 2 times the amount of liquid to cover the relic. I could do two old farm tools with one gallon (likely not worth 10 bucks each), but I could probably do 4 lock plates from muskets with the same amount (Well worth the $5 investment per lock plate). Or I could do a dozen small horse harness buckles or gun tools with that same gallon. You can always figure out how much you'll need by submerging the relics in water and then pouring the water off into a measuring jug and remembering that you'll need twice the amount to finish the job.

Second, the product's effectiveness becomes greatly reduced after it gets totally full of rust and turns black. You can minimize the amount of rust in the product by taking the relic out of the bath periodically and scraping loose rust off and washing it down the drain. This also means that as the very first step you should knock as much rust off the relic as possible before putting it in the bath (provided it isn't fragile).

I have had good luck with ziploc baggies to submerge the items. I have also used marbles to raise the liquid level to cover a relic if my container has a lot of empty space around the relic.

Next tip: the product Does evaporate, so whatever you have the relic bath in should be sealed if possible--even if just with plastic wrap.

Update #1: I tried the product on an iron padlock with a brass keyhole, and the product started removing the rust, yet left the green patina of the brass intact on the face of the lock. So it does not appear to affect any other metal besides rust. (I allowed the lock to soak overnight.) :thumbsup:

One last thing--if you have previously oiled a relic, then EvapoRust will NOT work on it. I have tried to touch up some minor rust spots on items I had already "seasoned"/oiled, and it was not effective. Evidently the oil interferes with the product's ability to remove the rust.

I'd love to know your experiences if you try this. Please post to this thread. Now it's time for me to clean some horse tack. I really like the large "D" buckle. The tongue is frozen in place with rust. I have never had much luck with electrolysis on small buckles like the rectangular one in the photo below. So it'll be interesting to see how it turns out. Starting them today--and the "before photo" is below:

View attachment 440979

Update #2: The small buckles are finished. Now working on the stirrups in the first photo above. The D-shaped buckle's tonuge now turns and slides freely. :headbang: These were originally the same shade of gray as the stove leg "after photo" above. After heating in the oven, applying a thin coat of crisco, and baking for an hour, they look exactly the same as a piece that has undergone electrolysis. :)

View attachment 441855


View attachment 441856


Regards,


Buckleboy
Buckle boy thanks for the great information! I recently found an early musket lock plate. I’m going to give it a try tomorrow!
 

Top Member Reactions

Users who are viewing this thread

Top