ratled
Hero Member
- Feb 18, 2014
- 950
- 2,396
- Primary Interest:
- All Treasure Hunting
Ratled's Highbanker
I had posted this on the old Prospector's Cache forum years ago, as well as other forums, as there always seemed there was someone trying to build a highbanker. With rivets thread http://www.treasurenet.com/forums/dredging-hi-banking/490497-ask-expert.html I thought I would post it here in hopes it helps someone.
ratled
You don’t have to build it as is and just use it to help you with your build. Ok, so here we go on how made my little highbanker. I started with a Keene A52 sluice. You can use another brand or size, just make adjustments as needed.
Closing in the sluice -
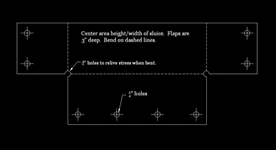
Let’s start with the back of the sluice. Remove the flair it’s easier and lighter. I used 1/8” ABS plastic for this. I started with a basic T shape about 3” larger than the sides and bottom of the sluice to create tabs. I used a ½” drill hole on the inside corners to round them to minimize any cracking. I also rounded all of the sharp corners. I used a heat gun to bend the plastic to get the tabs to wrap around the sides and bottom of the sluice. I went on the outside of the sluice for a good fit. Use a wet rag to cool the plastic once you have shaped. A little looseness won’t hurt. Once your happy with the shape and fit, mark the holes from your sluice (or drill your own if none exists). Few bolts and some 50 year door and window caulk around the edges and it’s all sealed up!!!!

The Hopper ~
It started with Sprinkler control box sometimes called a meter box. These come various sizes and I used a 10” box for mine- I have used the 12” also but found the 10” works best on the A52 when you don’t use the flair.

The picture of the black and green box is what the box looks like when you bring it home. First thing is to lose the green lid. Take a look at what we will call the bottom (this will be looking from the inside towards where the green lid was). You will see a lip running around where the old green lid was resting. You will want to SAVE 2/3’s of this so the bottom of your hopper will rest securely. You will need to remove 1/3 of the lip so all of your material can enter the sluice. I used a saber saw, but a hack saw, coping saw or similar will work. Take your time, and be neat and you can always cut more off or trim with a razor (box) knife. Be sure to remove the little triangle supports from all the around the inside so you can place the bottom in it.
Open one end up so the oversized material can roll out. Make a big T cut in the middle of the end. Start at the bottom and work your way up to the hole in the side. Be sure NOT to cut through all the way. You’ll want to leave the rim for support (reference the pics). On the one I got (it looked JUST like the one shown) there was a little seam at the corners that I used as a guide for how far to cut open the end. I used the heat gun again to straighten out the flaps I just made. The ABS has some memory and it wants to bend back into shape; just work with it and a wet rag really helps to hold into place once you get it right. You’ll have to trim some of the flaps off once you get it into place (later).

The bottom is ABS plastic from TAP Plastics. The have a scrap bin and sell pieces 2 for $0.75 so get a couple of ¼” and 1/8” pieces for the project. I made a cardboard template to figure out the shape of the bottom. I used 2 pieces for the bottom (see pic) so that there is a little drop between the pieces. I did this in case I wanted to put in some ribbed matting or a small piece of miner’s moss (never did). I used small machine screws from the coffee can of bits and pieces to screw down the 2 pieces of the bottom. You can always use a single piece bottom. I did put down a good amount of caulk on the lip, then the bottom piece and screwed it down. I then used a real good amount of caulk to seal all the way around so all of the gold will slide into the box and not into some little crack!
Installing the Hopper ~
Start by trimming the flaps (as mentioned earlier) so that the corner of the box just fits inside the sluice. You can use the upper bolt on the side to also hold the corner of the hopper but I put an additional ¼” hole in the sluice with a bolt to hold the hopper in place. (see pic). You may have to trim to fit.
The front supports are, get this, shelf brackets that I had sitting around. I put in a ¼” hole through the bottom and used the bolts that hold the riffles in to also hold the supports (see pics). I eyeballed the hopper in place so that it looked like the store bought ones and cut the supports to fit. Mine are 15” long. The supports just rest under the rim of the top of the hopper.
The Grizzly ~
The classifier is an old refrigerator shelf that I got free. I went to a place the rebuilds old appliances and asked them if they had shelves they didn’t want. They GAVE me several. Look around, you’ll find them - large apartment complexes, Goodwill, appliance stores etc. The bars are spaced about 1” and work great. A few times I’ve been told I need to have every other bar be loose so rocks won’t jammed in but then it wouldn’t classify and this has never been a problem. Measure the inside of the hopper and cut the shelf to fit a little loose (1/8”) left to right. Try to keep 3 of the factory edges for support. I don’t have access to a welder so the one side is just as I cut it ¼” no extra support and works like a champ. I have seen some custom power sluices with expanded metal as the grizzly. This works too, especially if it’s something you already have.
To mount the classifier I used All Thread, ¼” I think. Run it in one side and out the other. A bolt and washer on each side, both inside and out to hold it all in place. You’ll have to figure out where to put the All Thread by working with the classifier to get the right angel. Remember that the when the unit is setup and working, there is a tilt from the back to the front and the hopper has a tilt in the opposite direction. Try to figure this out as if you running it. To hold the classifier to the All Thread, I used 3 stainless steel (SS) clamps. This allows the classifier to swing up and down for access to the hopper area. Most fridge shelves won’t fit all the way up the hopper. I used some 1/8” punch plate (HVAC air vent I got from somewhere). You can look around, scrap shops, remodelers, salvage yards, or use something else like the remaining fridge shelf or plaster lath to fill the gap. Even a little 1/8” ABS will work no hole required.
Plumbing ~
This is the fun part, it’s simple and it’s the last part. DON’T GLUE ANYTHING TOGETHER UNTIL YOU ARE SURE IT’S JUST RIGHT AND THEN GLUE IT ALL AT THE SAME TIME. Start with a 1 ½” male/slip PVC for the water intake. I put a 1” reducer in the slip side. This is followed by a short piece, about 2”, of 1” schedule 40 (as is all straight pieces). Next, comes a slip/slip 45 degree elbow. This is in there to try and take some of the strain off the plumbing from the weight of the hose and water.
Next you’ll have to figure if want to make this a combo unit or not. If so, you’ll want to make the next step off center to allow for a plunger pole when dredging. If you don’t know what this is, or if you’ll want a combo unit, you can always make set it for a combo unit anyway.
Use about 6” of PVC then a 1/3 way slip Tee and then 6” of PVC. (For a combo unit use a 3” and 9” piece instead of the two 6”pieces. It doesn’t matter which side is offset, so long as one side is.) Continue with a slip to garden hose male PVC adapter. Thread on a garden hose ball valve and a cap. Here you can hook up a 6' garden hose to use for cleanup, washing out buckets etc. It’s really is a nice feature.
Going up from the Tee, use a short piece of PVC followed by a slip/slip 1” ball valve. This allows you to control the water flow to the spray bars. Turn it down to check for color and turn it up to do production when you see all that color!! This is followed by another short piece of PVC and another 1” slip Tee. You’ll have to eyeball a lot of these little PVC pieces to fit your needs and box. Just reference the pic’s to get the jest of things. From the top Tee use another set of 6” PVC (3’ and 9” for the combo setup) to spread out the water flow. Each side gets a 90 degree slip/slip connector. Congratulations, you now have your manifold. On to the spray bars. (DON’T glue anything yet)
I didn’t glue in the spray bars so I could change them out until I found a set I liked and I can also adjust where the spray hits in the hopper. I used SS clamps to hold the bars into the 90 degree elbows (A tip I got from here when I was building it) and never lost one yet. My holes are ¼” and I laid out my holes spaced 1” apart down the length of the bar. I found I liked straight in holes best, although you could angle them towards the center of the hopper if you wanted. On one bar I put my 1st hole 1” from the elbow lip and on the other I started at 1.5” from the elbow. This gives you a staggered and better spray pattern. There is an in “action pic” in the DIY forum under spray bars from when I was doing a test that shows it well. The ends of the spray bars are finished with a slip/ male thread connector and a threaded cap. There will be water still in the spray bar when you’re done and you can undo the cap and drain it or get soaked when you pick it up to move it your choice (another tip from the forum). I had put too many holes down the spray bars and water was spraying out of the hopper. A little duct tape works well to plug the holes you don’t want. I also noticed that the water flow was a little light when I did this so I put in some more holes. These I placed about a ¼”below the 1st set and spaced them in between the existing holes. I used about 6 holes more in each bar and placed them so that they hit in the upper part of the hopper.
Once everything is ready and you’re sure it fits, go ahead and glue up the manifold. Remember not to glue in the bars (of course it’s your choice if you want glue them in).
Let it sit overnight. To secure the plumbing to the hopper I used four 1” metal clamps used to hold EMT/ electrical conduit to walls. I used 1 sheet metal screw to secure the clamp to the hopper and wrapped the rest around the PVC. There is one each at the end of the spray bars and one on each side of the Tee on the manifold. It has some play in it but works just fine. Look at the pic’s to be sure of location
There is a small level on the front and one side. This makes setting up in the field way too easy. With the sluice sitting level glue in place one level to the front of the hopper. Keep it out of the way of the control valve (and pole hole on combo units). This will get you level for left/right with out to much trouble. Now prop the hopper end of the sluice up 3” higher than the front. Be sure to keep it left/right level too (use the level you just installed). Glue on the second level in the level position. Be sure to tape them in place until the glue dries. When you get to the field adjust the legs so both levels are centered. You can have it set up in under a minute this way.
There should be a hole at the front of your hopper about 2” to let pipes in. We need to fill this in. A scrape of ABS works fine. 2 Screw into the rime and some caulk to seal it is all that is needed. If you’re looking at making a combo unit, use a small piece of ribbed matting or similar to cover the hole. Apply some caulk along the top and use 2 screws to secure. This will allow you to use a plugger pole for dredging plug ups.
Now take it for a field test! A nearby creek works best. No need to be gold bearing (but always nice). Set it up, run it, tweak as needed, add things, delete things, whatever it takes to make it yours! Once you get it just right go get some gold. You can use some lead pounded flat as a test. I run mine with a Honda W15 (another tip I got from the forum) with 100’ 1.5” hose.
Closing ~
When building this look at the pic’s. This should be enough to get you through this. You should be able to get all of things you need to buy at any large warehouse store like Lowes or Home Depot. I didn’t use a lot of tools so most of us should be able to do this in a weekend. When I get a chance, I’ll set it up to use it as a 2” dredge combo and share that. There is a really cool homemade suction nozzle made from PVC on the net, I think it’s at the GGPA site (Not GPAA). Let me know what you think, post pic’s if you build it. Post questions if you need help. The 1st one I did took about a total of 3 hours to build without a plan. The last one took and hour (not including drying times).
I was able to do this with the help from everyone here on the forums. If you build one of these it should save hundreds of dollars. Take a couple of those saved dollars and put them to good use New 49ers Legal fund, PLP or similar.
ratled


I had posted this on the old Prospector's Cache forum years ago, as well as other forums, as there always seemed there was someone trying to build a highbanker. With rivets thread http://www.treasurenet.com/forums/dredging-hi-banking/490497-ask-expert.html I thought I would post it here in hopes it helps someone.
ratled
You don’t have to build it as is and just use it to help you with your build. Ok, so here we go on how made my little highbanker. I started with a Keene A52 sluice. You can use another brand or size, just make adjustments as needed.
Closing in the sluice -
Let’s start with the back of the sluice. Remove the flair it’s easier and lighter. I used 1/8” ABS plastic for this. I started with a basic T shape about 3” larger than the sides and bottom of the sluice to create tabs. I used a ½” drill hole on the inside corners to round them to minimize any cracking. I also rounded all of the sharp corners. I used a heat gun to bend the plastic to get the tabs to wrap around the sides and bottom of the sluice. I went on the outside of the sluice for a good fit. Use a wet rag to cool the plastic once you have shaped. A little looseness won’t hurt. Once your happy with the shape and fit, mark the holes from your sluice (or drill your own if none exists). Few bolts and some 50 year door and window caulk around the edges and it’s all sealed up!!!!
The Hopper ~
It started with Sprinkler control box sometimes called a meter box. These come various sizes and I used a 10” box for mine- I have used the 12” also but found the 10” works best on the A52 when you don’t use the flair.
The picture of the black and green box is what the box looks like when you bring it home. First thing is to lose the green lid. Take a look at what we will call the bottom (this will be looking from the inside towards where the green lid was). You will see a lip running around where the old green lid was resting. You will want to SAVE 2/3’s of this so the bottom of your hopper will rest securely. You will need to remove 1/3 of the lip so all of your material can enter the sluice. I used a saber saw, but a hack saw, coping saw or similar will work. Take your time, and be neat and you can always cut more off or trim with a razor (box) knife. Be sure to remove the little triangle supports from all the around the inside so you can place the bottom in it.
Open one end up so the oversized material can roll out. Make a big T cut in the middle of the end. Start at the bottom and work your way up to the hole in the side. Be sure NOT to cut through all the way. You’ll want to leave the rim for support (reference the pics). On the one I got (it looked JUST like the one shown) there was a little seam at the corners that I used as a guide for how far to cut open the end. I used the heat gun again to straighten out the flaps I just made. The ABS has some memory and it wants to bend back into shape; just work with it and a wet rag really helps to hold into place once you get it right. You’ll have to trim some of the flaps off once you get it into place (later).
The bottom is ABS plastic from TAP Plastics. The have a scrap bin and sell pieces 2 for $0.75 so get a couple of ¼” and 1/8” pieces for the project. I made a cardboard template to figure out the shape of the bottom. I used 2 pieces for the bottom (see pic) so that there is a little drop between the pieces. I did this in case I wanted to put in some ribbed matting or a small piece of miner’s moss (never did). I used small machine screws from the coffee can of bits and pieces to screw down the 2 pieces of the bottom. You can always use a single piece bottom. I did put down a good amount of caulk on the lip, then the bottom piece and screwed it down. I then used a real good amount of caulk to seal all the way around so all of the gold will slide into the box and not into some little crack!
Installing the Hopper ~
Start by trimming the flaps (as mentioned earlier) so that the corner of the box just fits inside the sluice. You can use the upper bolt on the side to also hold the corner of the hopper but I put an additional ¼” hole in the sluice with a bolt to hold the hopper in place. (see pic). You may have to trim to fit.
The front supports are, get this, shelf brackets that I had sitting around. I put in a ¼” hole through the bottom and used the bolts that hold the riffles in to also hold the supports (see pics). I eyeballed the hopper in place so that it looked like the store bought ones and cut the supports to fit. Mine are 15” long. The supports just rest under the rim of the top of the hopper.
The Grizzly ~
The classifier is an old refrigerator shelf that I got free. I went to a place the rebuilds old appliances and asked them if they had shelves they didn’t want. They GAVE me several. Look around, you’ll find them - large apartment complexes, Goodwill, appliance stores etc. The bars are spaced about 1” and work great. A few times I’ve been told I need to have every other bar be loose so rocks won’t jammed in but then it wouldn’t classify and this has never been a problem. Measure the inside of the hopper and cut the shelf to fit a little loose (1/8”) left to right. Try to keep 3 of the factory edges for support. I don’t have access to a welder so the one side is just as I cut it ¼” no extra support and works like a champ. I have seen some custom power sluices with expanded metal as the grizzly. This works too, especially if it’s something you already have.
To mount the classifier I used All Thread, ¼” I think. Run it in one side and out the other. A bolt and washer on each side, both inside and out to hold it all in place. You’ll have to figure out where to put the All Thread by working with the classifier to get the right angel. Remember that the when the unit is setup and working, there is a tilt from the back to the front and the hopper has a tilt in the opposite direction. Try to figure this out as if you running it. To hold the classifier to the All Thread, I used 3 stainless steel (SS) clamps. This allows the classifier to swing up and down for access to the hopper area. Most fridge shelves won’t fit all the way up the hopper. I used some 1/8” punch plate (HVAC air vent I got from somewhere). You can look around, scrap shops, remodelers, salvage yards, or use something else like the remaining fridge shelf or plaster lath to fill the gap. Even a little 1/8” ABS will work no hole required.
Plumbing ~
This is the fun part, it’s simple and it’s the last part. DON’T GLUE ANYTHING TOGETHER UNTIL YOU ARE SURE IT’S JUST RIGHT AND THEN GLUE IT ALL AT THE SAME TIME. Start with a 1 ½” male/slip PVC for the water intake. I put a 1” reducer in the slip side. This is followed by a short piece, about 2”, of 1” schedule 40 (as is all straight pieces). Next, comes a slip/slip 45 degree elbow. This is in there to try and take some of the strain off the plumbing from the weight of the hose and water.
Next you’ll have to figure if want to make this a combo unit or not. If so, you’ll want to make the next step off center to allow for a plunger pole when dredging. If you don’t know what this is, or if you’ll want a combo unit, you can always make set it for a combo unit anyway.
Use about 6” of PVC then a 1/3 way slip Tee and then 6” of PVC. (For a combo unit use a 3” and 9” piece instead of the two 6”pieces. It doesn’t matter which side is offset, so long as one side is.) Continue with a slip to garden hose male PVC adapter. Thread on a garden hose ball valve and a cap. Here you can hook up a 6' garden hose to use for cleanup, washing out buckets etc. It’s really is a nice feature.
Going up from the Tee, use a short piece of PVC followed by a slip/slip 1” ball valve. This allows you to control the water flow to the spray bars. Turn it down to check for color and turn it up to do production when you see all that color!! This is followed by another short piece of PVC and another 1” slip Tee. You’ll have to eyeball a lot of these little PVC pieces to fit your needs and box. Just reference the pic’s to get the jest of things. From the top Tee use another set of 6” PVC (3’ and 9” for the combo setup) to spread out the water flow. Each side gets a 90 degree slip/slip connector. Congratulations, you now have your manifold. On to the spray bars. (DON’T glue anything yet)
I didn’t glue in the spray bars so I could change them out until I found a set I liked and I can also adjust where the spray hits in the hopper. I used SS clamps to hold the bars into the 90 degree elbows (A tip I got from here when I was building it) and never lost one yet. My holes are ¼” and I laid out my holes spaced 1” apart down the length of the bar. I found I liked straight in holes best, although you could angle them towards the center of the hopper if you wanted. On one bar I put my 1st hole 1” from the elbow lip and on the other I started at 1.5” from the elbow. This gives you a staggered and better spray pattern. There is an in “action pic” in the DIY forum under spray bars from when I was doing a test that shows it well. The ends of the spray bars are finished with a slip/ male thread connector and a threaded cap. There will be water still in the spray bar when you’re done and you can undo the cap and drain it or get soaked when you pick it up to move it your choice (another tip from the forum). I had put too many holes down the spray bars and water was spraying out of the hopper. A little duct tape works well to plug the holes you don’t want. I also noticed that the water flow was a little light when I did this so I put in some more holes. These I placed about a ¼”below the 1st set and spaced them in between the existing holes. I used about 6 holes more in each bar and placed them so that they hit in the upper part of the hopper.
Once everything is ready and you’re sure it fits, go ahead and glue up the manifold. Remember not to glue in the bars (of course it’s your choice if you want glue them in).
Let it sit overnight. To secure the plumbing to the hopper I used four 1” metal clamps used to hold EMT/ electrical conduit to walls. I used 1 sheet metal screw to secure the clamp to the hopper and wrapped the rest around the PVC. There is one each at the end of the spray bars and one on each side of the Tee on the manifold. It has some play in it but works just fine. Look at the pic’s to be sure of location
There is a small level on the front and one side. This makes setting up in the field way too easy. With the sluice sitting level glue in place one level to the front of the hopper. Keep it out of the way of the control valve (and pole hole on combo units). This will get you level for left/right with out to much trouble. Now prop the hopper end of the sluice up 3” higher than the front. Be sure to keep it left/right level too (use the level you just installed). Glue on the second level in the level position. Be sure to tape them in place until the glue dries. When you get to the field adjust the legs so both levels are centered. You can have it set up in under a minute this way.
There should be a hole at the front of your hopper about 2” to let pipes in. We need to fill this in. A scrape of ABS works fine. 2 Screw into the rime and some caulk to seal it is all that is needed. If you’re looking at making a combo unit, use a small piece of ribbed matting or similar to cover the hole. Apply some caulk along the top and use 2 screws to secure. This will allow you to use a plugger pole for dredging plug ups.
Now take it for a field test! A nearby creek works best. No need to be gold bearing (but always nice). Set it up, run it, tweak as needed, add things, delete things, whatever it takes to make it yours! Once you get it just right go get some gold. You can use some lead pounded flat as a test. I run mine with a Honda W15 (another tip I got from the forum) with 100’ 1.5” hose.
Closing ~
When building this look at the pic’s. This should be enough to get you through this. You should be able to get all of things you need to buy at any large warehouse store like Lowes or Home Depot. I didn’t use a lot of tools so most of us should be able to do this in a weekend. When I get a chance, I’ll set it up to use it as a 2” dredge combo and share that. There is a really cool homemade suction nozzle made from PVC on the net, I think it’s at the GGPA site (Not GPAA). Let me know what you think, post pic’s if you build it. Post questions if you need help. The 1st one I did took about a total of 3 hours to build without a plan. The last one took and hour (not including drying times).
I was able to do this with the help from everyone here on the forums. If you build one of these it should save hundreds of dollars. Take a couple of those saved dollars and put them to good use New 49ers Legal fund, PLP or similar.
ratled
Amazon Forum Fav 👍


Attachments
Last edited:


")