coinman123
Silver Member
Here is a subject brought up quite a bit, it involves cleaning your finds. I like to "restore" finds more than cleaning, it may not sound like a huge difference, but there is. ''Restoring'' a find is the process of removing any matter on the coin, but leaving the patina and trying to bring out the detail. Whereas cleaning is more harsh, most often the surface of the coin will be dramatically changed, sometimes resulting in ugly pitting. When cleaning finds it's important to realize that every find is different and will need different cleaning. For coins, I recommend being more careful in cleaning, and avoiding any abrasives, relics on the other hand can be cleaned a little harsher. Another problem happens when items are "overcleaned", overcleaning usually results with an ugly artificial look.
Copper Coins
When you are dealing with dug copper coins, I recommend avoid using lemon juice, vinegar, or any other acidic substance, using any acidic substance will sometimes destroy the surface of the coin leaving you with a pitted copper slug. Remember, Some coins are just too far gone, and no cleaning will help.
Here are a few processes I recommend using for cleaning copper coins: Hydrogen Peroxide, Olive oil/mineral oil, Q-Tip, Toothpick, a Simple Wet Paper towel compress, and WD-40
Hydrogen Peroxide: I recommend using this on coins that have a far amount of detail showing, I have had mixed results with toasted coppers, but it normal works fine on coppers with decent detail. Here's how to do it: First pour some Hydrogen Peroxide into a small microwave safe container, you only need enough to submerge the coin, but using a little bit more would help because some of it evaporates during boiling. Then put the Hydrogen Peroxide in the Microwave until it boils, remember DO NOT PUT METAL IN THE MICROWAVE. Take the Hydrogen Peroxide out of the microwave, and drop the coin in. You will notice bubbles forming, wait 30 seconds and take the coin out, dry it off and see what you think, if you feel it is necessary repeat the process. Hydrogen Peroxide will dry out the coin, so put the coin in Olive Oil for around a day to moisten it.
Olive Oil/Mineral Oil: This is a great but lengthy method of cleaning all copper coins. The oil will moisten the coin and bring out it's detail. First pour some of the oil in a container, enough to submerge the coin. Then put the coin in the oil and leave it there for anywhere from a week to a year. Remove the coin from the oil when you are done soaking it and remove what ever dirt may still be on it with a toothpick and paper towel. This method is great for bring out the detail on a corroded copper coin.
Q-Tip: This is the first thing you should do on a dug copper. Wet the end of a Q-Tip in hot water, and add some dish soap (dish soap is not necessary, but sometimes helps). Gently swab the surface of the coin with the Q-Tip, you will notice that dirt that you did not even know was there will be on the Q-Tip, rinse the coin and dry it.
Toothpick: You can either wet down the coin or leave the coin dry, I recommend wetting down the coin. Pick the grooves of the coin with the toothpick and rinse, repeat if needed.
Wet Paper Towel Compress (Best on freshly dug copper coins): Wet down a paper towel with warm water, fold up the paper towel around the coin and press it down. When you are done with the do the same thing with a dry paper towel. This method does a good job making dug coppers with a reasonable amount of detail look better.
WD-40: I have not done this method but I heard it works the same as olive oil and mineral oil. First soak the coin in WD-40, after a while remove the coin, rinse it and dry it.
Silver Coins:
These are the most simple coins to clean, other than gold coin. When you find a silver coin never rub it, the coarse dirt will leave tiny hairline scratches on the surface of the coin.
Most silver coins do not require any cleaning but some have a black tarnish and can be cleaned with any silver cleaner or baking soda and vinegar, when you find a silver coin, always rinse away the dirt with out brushing with your hand, for that will leave small hairline scratches.
Nickels and Clad Coins: Nickels almost always some out of the ground looking horrible. There are a couple methods of cleaning nickels. Also, You will never make a nickel look perfect again, they will always be pitted. Navel Jelly (as suggested by Tom in CA): Coat the nickel in Navel Jelly, the Navel Jelly will help take the brown red color off of the coin.
One method it soaking the Nickel in Worcester Sauce for a few hours, then remove it and rinse it with water. Another method is to use steel wool on it, just remember, that is your last resort for it will make the coin look unnatural and make it not worth any money, it's just good for getting a date or IDing a nickel. I have also heard of rubbing your finger on your nose/forehead area and getting grease on your hand, then rubbing the grease on the nickel.
----------------------------------------- ---------------------------------------------------------
Now we are moving on to relics, they are less easy to mess up, but still can be damaged.
Brass Buttons: I recommend using the Hydrogen Peroxide method on all brass buttons, it helps enhance any design, and make backmarks readable. Use the same Hydrogen Peroxide method here as you use on coins, as mentioned above.
Tombac Buttons: Cleaning tombac buttons is usually very easy, two methods are navel or aluminum jelly, or the rough side of a sponge. If you use aluminum or navel jelly coat the coin in the jelly for 20 seconds then rinse it and your button will look brand new, shiny and smooth. If you do not have aluminum jelly, you could use rough side of a sponge. Soak the sponge in warm soapy water, then rub the button on the rough side of the sponge until the button is smooth and shiny.
Gilded or Plated Items (Especially Gilded Buttons): Navel jelly or Aluminum Jelly works best on any plated or gilded item. If you find an item that may have gilding or plated on it coat some Navel Jelly or Aluminum Jelly on it, you will be happy with the results.
Lemon Juice: *Added 4/7/15* Heat some lemon juice in the microwave, when it is hot and almost boiling take it out. Dip a paper towel in the lemon juice until it is wet and wipe the relic with it (you will be amazed on how fast it works).
1902 Medal Cleaned with Lemon Juice Method. (Almost no gilt showed before cleaning)
.jpg")
Brass Relics: I recommend using a soapy brush of some sort (a tooth brush would work) on brass relics
Pewter Buttons/Relics: There is not much you can do on crusty pewter, a lot of times the pewter crumbles with cleaning.
Lead Relics or Bullets: They do not require much, if any cleaning. You can just rinse them or brush them with a soapy tooth brush
Iron Relics: *Added 4/07/15* Electrolysis works best for heavily corroded iron artifacts, such as nails, cannonballs, and other iron relics. It is the best method on those items and works wonders. If an item is thin sheet metal I don't recommend it because the electrolysis can leave small holes in the relic because the rust has compromised the metal and when the rust is gone there is no metal left under. I also don't recommend doing electrolysis on things other than iron, sometimes electrolysis works on some coins. If a coin is already pitted electrolysis is only going to make things was worse and leave you with a toasted
"cookie". Coins with very little to no be pitting can be made nice with electrolysis though, don't do anything with much collector value though because this method can be quite risky and makes copper coins look "unnatural"
Guide on Electrolysis
http://www.metaldetectingworld.com/electrolysis_rust_removal.shtml
Large Iron Relics: *Added 4/07/15* Brute Force (Hammertime") ) I have done this method before on larger iron relics, even on horse shoes. I use it to remove those chunks of corrosion from the surface. Anyways, Put the iron relic on a flat surface. Gently tap it with a hammer. You will see big chunks of corrosion fly off due vibration. When all the big chunks of corrosion are gone you can rinse it off if you would like. From there you could do electrolysis.
) I have done this method before on larger iron relics, even on horse shoes. I use it to remove those chunks of corrosion from the surface. Anyways, Put the iron relic on a flat surface. Gently tap it with a hammer. You will see big chunks of corrosion fly off due vibration. When all the big chunks of corrosion are gone you can rinse it off if you would like. From there you could do electrolysis.
Don't do this method on anything small or thin, rusty iron is very brittle and can shatter with impact. Axe heads are the kind of thing I do that method on.
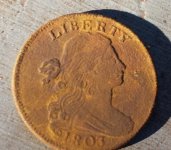
Olive Oil Soak for a day and Q-tip: Before and after on a 1690's Halfpenny
Before:


After:


Well, I'm done with this post, if you have any questions or ideas, post them or ask below.
Thanks for Looking,
Coinman123,
Copper Coins
When you are dealing with dug copper coins, I recommend avoid using lemon juice, vinegar, or any other acidic substance, using any acidic substance will sometimes destroy the surface of the coin leaving you with a pitted copper slug. Remember, Some coins are just too far gone, and no cleaning will help.
Here are a few processes I recommend using for cleaning copper coins: Hydrogen Peroxide, Olive oil/mineral oil, Q-Tip, Toothpick, a Simple Wet Paper towel compress, and WD-40
Hydrogen Peroxide: I recommend using this on coins that have a far amount of detail showing, I have had mixed results with toasted coppers, but it normal works fine on coppers with decent detail. Here's how to do it: First pour some Hydrogen Peroxide into a small microwave safe container, you only need enough to submerge the coin, but using a little bit more would help because some of it evaporates during boiling. Then put the Hydrogen Peroxide in the Microwave until it boils, remember DO NOT PUT METAL IN THE MICROWAVE. Take the Hydrogen Peroxide out of the microwave, and drop the coin in. You will notice bubbles forming, wait 30 seconds and take the coin out, dry it off and see what you think, if you feel it is necessary repeat the process. Hydrogen Peroxide will dry out the coin, so put the coin in Olive Oil for around a day to moisten it.
Olive Oil/Mineral Oil: This is a great but lengthy method of cleaning all copper coins. The oil will moisten the coin and bring out it's detail. First pour some of the oil in a container, enough to submerge the coin. Then put the coin in the oil and leave it there for anywhere from a week to a year. Remove the coin from the oil when you are done soaking it and remove what ever dirt may still be on it with a toothpick and paper towel. This method is great for bring out the detail on a corroded copper coin.
Q-Tip: This is the first thing you should do on a dug copper. Wet the end of a Q-Tip in hot water, and add some dish soap (dish soap is not necessary, but sometimes helps). Gently swab the surface of the coin with the Q-Tip, you will notice that dirt that you did not even know was there will be on the Q-Tip, rinse the coin and dry it.
Toothpick: You can either wet down the coin or leave the coin dry, I recommend wetting down the coin. Pick the grooves of the coin with the toothpick and rinse, repeat if needed.
Wet Paper Towel Compress (Best on freshly dug copper coins): Wet down a paper towel with warm water, fold up the paper towel around the coin and press it down. When you are done with the do the same thing with a dry paper towel. This method does a good job making dug coppers with a reasonable amount of detail look better.
WD-40: I have not done this method but I heard it works the same as olive oil and mineral oil. First soak the coin in WD-40, after a while remove the coin, rinse it and dry it.
Silver Coins:
These are the most simple coins to clean, other than gold coin. When you find a silver coin never rub it, the coarse dirt will leave tiny hairline scratches on the surface of the coin.
Most silver coins do not require any cleaning but some have a black tarnish and can be cleaned with any silver cleaner or baking soda and vinegar, when you find a silver coin, always rinse away the dirt with out brushing with your hand, for that will leave small hairline scratches.
Nickels and Clad Coins: Nickels almost always some out of the ground looking horrible. There are a couple methods of cleaning nickels. Also, You will never make a nickel look perfect again, they will always be pitted. Navel Jelly (as suggested by Tom in CA): Coat the nickel in Navel Jelly, the Navel Jelly will help take the brown red color off of the coin.
One method it soaking the Nickel in Worcester Sauce for a few hours, then remove it and rinse it with water. Another method is to use steel wool on it, just remember, that is your last resort for it will make the coin look unnatural and make it not worth any money, it's just good for getting a date or IDing a nickel. I have also heard of rubbing your finger on your nose/forehead area and getting grease on your hand, then rubbing the grease on the nickel.
----------------------------------------- ---------------------------------------------------------
Now we are moving on to relics, they are less easy to mess up, but still can be damaged.
Brass Buttons: I recommend using the Hydrogen Peroxide method on all brass buttons, it helps enhance any design, and make backmarks readable. Use the same Hydrogen Peroxide method here as you use on coins, as mentioned above.
Tombac Buttons: Cleaning tombac buttons is usually very easy, two methods are navel or aluminum jelly, or the rough side of a sponge. If you use aluminum or navel jelly coat the coin in the jelly for 20 seconds then rinse it and your button will look brand new, shiny and smooth. If you do not have aluminum jelly, you could use rough side of a sponge. Soak the sponge in warm soapy water, then rub the button on the rough side of the sponge until the button is smooth and shiny.
Gilded or Plated Items (Especially Gilded Buttons): Navel jelly or Aluminum Jelly works best on any plated or gilded item. If you find an item that may have gilding or plated on it coat some Navel Jelly or Aluminum Jelly on it, you will be happy with the results.
Lemon Juice: *Added 4/7/15* Heat some lemon juice in the microwave, when it is hot and almost boiling take it out. Dip a paper towel in the lemon juice until it is wet and wipe the relic with it (you will be amazed on how fast it works).
1902 Medal Cleaned with Lemon Juice Method. (Almost no gilt showed before cleaning)
Brass Relics: I recommend using a soapy brush of some sort (a tooth brush would work) on brass relics
Pewter Buttons/Relics: There is not much you can do on crusty pewter, a lot of times the pewter crumbles with cleaning.
Lead Relics or Bullets: They do not require much, if any cleaning. You can just rinse them or brush them with a soapy tooth brush
Iron Relics: *Added 4/07/15* Electrolysis works best for heavily corroded iron artifacts, such as nails, cannonballs, and other iron relics. It is the best method on those items and works wonders. If an item is thin sheet metal I don't recommend it because the electrolysis can leave small holes in the relic because the rust has compromised the metal and when the rust is gone there is no metal left under. I also don't recommend doing electrolysis on things other than iron, sometimes electrolysis works on some coins. If a coin is already pitted electrolysis is only going to make things was worse and leave you with a toasted
"cookie". Coins with very little to no be pitting can be made nice with electrolysis though, don't do anything with much collector value though because this method can be quite risky and makes copper coins look "unnatural"
Guide on Electrolysis
http://www.metaldetectingworld.com/electrolysis_rust_removal.shtml
Large Iron Relics: *Added 4/07/15* Brute Force (Hammertime
) I have done this method before on larger iron relics, even on horse shoes. I use it to remove those chunks of corrosion from the surface. Anyways, Put the iron relic on a flat surface. Gently tap it with a hammer. You will see big chunks of corrosion fly off due vibration. When all the big chunks of corrosion are gone you can rinse it off if you would like. From there you could do electrolysis.Don't do this method on anything small or thin, rusty iron is very brittle and can shatter with impact. Axe heads are the kind of thing I do that method on.
Olive Oil Soak for a day and Q-tip: Before and after on a 1690's Halfpenny
Before:
After:
Well, I'm done with this post, if you have any questions or ideas, post them or ask below.
Thanks for Looking,
Coinman123,


Attachments
Last edited:
")