Dodging And Burning ... A Different (not better) Way To Do It

Chadeaux

Gold Member
Sep 13, 2011
5,512
6,408
Southeast Arkansas
Detector(s) used
Ace 250
Primary Interest:
Cache Hunting
I've always had trouble with dodging (lightening areas of a photo) and burning (darkening areas of a photo). Too dark where it shouldn't be, blown out highlights, etc.

What I discovered that helped me (still a way to go, but getting better) was playing with the dodge and burn blend modes.

For instance, this is the unretouched version of the pic:

DSCN1086_as_shot.JPG

I liked the composition of the image, but the image is too "homogeneous" ... no real contrast to anything. Just doing a "brightness/contrast" adjustment layer ruined the image. Why? Because it affects everything evenly.

Tried the standard way of dodging and burning, but wasn't happy with the results or the time it took me.

This is the same image after a successful dodge and burn operation ... and a "selective focus" adjustment in Paintshop Pro 2018:

DSCN1086_final.JPG

I used two burn layers, one set at 20% opacity (for the tree and leaves) and one set at 15% opacity (for the rodent). I grabbed the paintbrush tool with a slight feather and painted black where I wanted to add some detail. By setting the opacity of the layer, I'm just painting. It gives me a bit more control and I can come back with another burn layer if I need one, or even use the burn tool instead.

I also used the dodge tool with a bright yellow at 10% opacity to add the highlights in the tail and along part of the tree as well as the vegetation between the squirrel and the tree where light was already hitting.

Also, using these blend modes, you're not limited to white for dodging or black for burning. I burned the large leaf with burgundy, two with an orange, and some with a dark green. I also added a "texture" to the original image. I created the texture by using a filter to create a highpass image that was mostly a middle grey with dark and light areas, using the "hard light" blend mode makes it look like the texture is part of the image. Notice the texture on the big leaf.
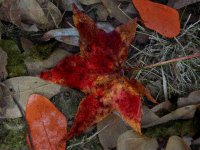
DSCN1282.JPG

Don't be afraid to experiment.
 

Last edited:

Jason in Enid

Gold Member
Oct 10, 2009
9,593
9,229
Primary Interest:
All Treasure Hunting
wow, I never knew any digital software had something like that. Your title grabbed my attention because I remember using those technique on real prints in the darkroom. I never have caught up to the digital age.

Nice work!
 

kcm

Gold Member
Feb 29, 2016
5,790
7,085
NW Minnesota
Detector(s) used
Tesoro Silver uMax
Primary Interest:
Other
You lost me at the thread title. I thought maybe it was about WWII aces playing dodge ball in the air. :laughing7:
 

ronwoodcraft

Bronze Member
Jul 14, 2007
2,138
6,517
Idaho
Great Job!..I struggle with the same issues, and sometimes use the magic wand tool in photoshop elements to select different parts of the picture to darken or brighten. I usie shadows and highlights, or brightness and contrast....Some times even use the clone tool to repair some of the highlights that are completely blown out.
 

OP
OP
Chadeaux

Chadeaux

Gold Member
Sep 13, 2011
5,512
6,408
Southeast Arkansas
Detector(s) used
Ace 250
Primary Interest:
Cache Hunting
Great Job!..I struggle with the same issues, and sometimes use the magic wand tool in photoshop elements to select different parts of the picture to darken or brighten. I usie shadows and highlights, or brightness and contrast....Some times even use the clone tool to repair some of the highlights that are completely blown out.

I was watching a tutorial by Blake Rudis about using the color dodge and color burn blend modes and suddenly realized that if I changed how he was doing it, it might help me improve my dodging and burning. His tutorial is here:


He's a really good teacher, not just doing youtube videos to get likes. I've learned tons, so I subscribed to his channel.
 

tamrock

Gold Member
Jan 16, 2013
14,926
29,740
Colorado
Detector(s) used
Bounty Hunter Tracker IV
Primary Interest:
All Treasure Hunting
Interesting. I've only got crappy editing tools, so looking for the best in every way photo opportunity is so far my only way to get that clear crisp picture. I do have a wish to learn more ways to improve some of the not so not so desirable situations some day.
 

OP
OP
Chadeaux

Chadeaux

Gold Member
Sep 13, 2011
5,512
6,408
Southeast Arkansas
Detector(s) used
Ace 250
Primary Interest:
Cache Hunting
Interesting. I've only got crappy editing tools, so looking for the best in every way photo opportunity is so far my only way to get that clear crisp picture. I do have a wish to learn more ways to improve some of the not so not so desirable situations some day.

Without the clear crisp picture, nothing else works! As for editing tools, one of the very best is free ... it just works a little different. The Gimp is a photo editing program that rivals the best Photoshop has to offer, once you learn how to get around the quirky interface (then again, been a few years since I used it so the interface may have improved).

Photoshop is a service, so I stay away from it.

I've heard good things about Affinity Photo ... but me and Serif Software don't Gee & Haw after they abandoned their "Plus" range of software that I had spent hundreds of dollars on.

I personally prefer Paintshop by Corel. The interface is very familiar if you have any experience with Photoshop. The top version costs about $100 and comes with software especially to handle raw photos that interfaces with the Paintshop software (like photoshop and lightroom) as well as their "Particleshop" plugin, loads of brushes and more. Best of all, if you are a registered user, you can get discounts on new releases. I paid $24.99 for the above mentioned software because previous users get great discounts. They also make a killer video editing program!

EDIT:

While writing this post, received an email from Corel ... Paintshop is $60 right now CLICK HERE
 

Last edited:

Jason in Enid

Gold Member
Oct 10, 2009
9,593
9,229
Primary Interest:
All Treasure Hunting
I LOATHE corel PS. I have PS pro X7 and I have never had a worse interface. I don't understand how to use it and I cant figure it out. Every time I think I find a way to do something I want it stops working that way. I would a full semester class to understand it. The strange thing is that I can do what I want to pics easier with the Corel powerdirector video editor than the PS photo editor.

Sorry, I'll get off my rant now.
 

OP
OP
Chadeaux

Chadeaux

Gold Member
Sep 13, 2011
5,512
6,408
Southeast Arkansas
Detector(s) used
Ace 250
Primary Interest:
Cache Hunting
Most folks stick with the newbie interface (home). Bad idea.

At the top of the program, you have 3 tabs: Home / Manage / Edit. I prefer the edit interface.

Click on the edit tab, then go to File > Preferences > General Program Preferences > Tabs then click on "Set Edit as default". Make sure everything else is unchecked in Tabs, and save.

If you like photoshop, you'll feel right at home.

Next, click on File > Workspace > and check "Complete".

Hope this helps, if not let me know and I'd be happy to chat and help you get it to work as it's designed. Out of the box though, that's for folks who have no idea what they want to do. Problem is, it's practically useless.
 

Jason in Enid

Gold Member
Oct 10, 2009
9,593
9,229
Primary Interest:
All Treasure Hunting
Most folks stick with the newbie interface (home). Bad idea.

At the top of the program, you have 3 tabs: Home / Manage / Edit. I prefer the edit interface.

Click on the edit tab, then go to File > Preferences > General Program Preferences > Tabs then click on "Set Edit as default". Make sure everything else is unchecked in Tabs, and save.

If you like photoshop, you'll feel right at home.

Next, click on File > Workspace > and check "Complete".

Hope this helps, if not let me know and I'd be happy to chat and help you get it to work as it's designed. Out of the box though, that's for folks who have no idea what they want to do. Problem is, it's practically useless.

That is the work area I use. I'm not trying to use filters to make a picture artsy or anything like that. I want to use it to trim, crop, adjust, add pics into pics, cut things out, add words, move them around, etc. Even though there are options to do all that stuff, none of it is simple or intuitive beyond "crop" and "resize"
 

OP
OP
Chadeaux

Chadeaux

Gold Member
Sep 13, 2011
5,512
6,408
Southeast Arkansas
Detector(s) used
Ace 250
Primary Interest:
Cache Hunting
That is the work area I use. I'm not trying to use filters to make a picture artsy or anything like that. I want to use it to trim, crop, adjust, add pics into pics, cut things out, add words, move them around, etc. Even though there are options to do all that stuff, none of it is simple or intuitive beyond "crop" and "resize"

If you need help using the program, I've about 8+ years experience with Paintshop (Version x3 - x9 and 2018) and would be glad to help. PM me if you would like some pointers. You might also want to visit their user to user forum. Corel USER to USER Paintshop Pro

I'm not an expert, but am experienced using the software. It's only in the last year that I've begun to try to do anything more than what you're talking about ("trim, crop, adjust, add pics into pics, cut things out, add words, move them around, etc.").
 

Top Member Reactions

Users who are viewing this thread

Top