StoneWhisper
Hero Member
Sure I know we all could use a bit more practice when taking image of our rocks etc.. and no one is perfect and if they claim to be.. just goes to show you that they prob had their minerals photographed by a professional..
I posted this several years ago, but it's unclear if I removed it or it was removed by others.. maybe it was because several snide remarks afterward that I disapproved of..
So here is the setting..
Several years ago I found this ill formed smokey quartz on my sister in-laws land (Western North Carolina) This part of the state is known for having a large variety of gems and minerals.. I believe one can simply step out her back door and find a field full of unakite.. The in-laws where tilling their field and I was walking behind.. where I discovered the smokey.. Sure I mean nothing out of the ordinary until I cleaned the mud off it.. Revealing something more.
This was at a time when I had just switched cameras and I was unfamiliar with how my Kodak was going to handle this close up. Using an old trick I've learn back in high school.. when one doesn't have an extra light source.. one can use mirrors and a light box.. again.. the nature sun light is acceptable, but tends to washout the images if not taken properly.

Image: You can see that I have one main light source off to the left of the image, and the light box. But to get a bit more light on the opposing side of the quartz I used a mirror.

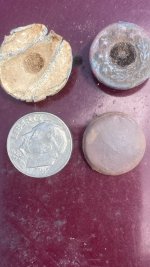
Image: Here is a close up of the image above.. Nothing out of the ordinary.. Image is clear, well illuminated and in focus.. But wait.. what's this (turns the Smokey Quartz over)

Image: Clear indication that a hexagonal shaped mineral had embedded into this smokey.. I'm thinking it could have been Beryl.. Now.. If I could have just found the rest of it while they were tilling the field..
I posted this several years ago, but it's unclear if I removed it or it was removed by others.. maybe it was because several snide remarks afterward that I disapproved of..
So here is the setting..
Several years ago I found this ill formed smokey quartz on my sister in-laws land (Western North Carolina) This part of the state is known for having a large variety of gems and minerals.. I believe one can simply step out her back door and find a field full of unakite.. The in-laws where tilling their field and I was walking behind.. where I discovered the smokey.. Sure I mean nothing out of the ordinary until I cleaned the mud off it.. Revealing something more.
This was at a time when I had just switched cameras and I was unfamiliar with how my Kodak was going to handle this close up. Using an old trick I've learn back in high school.. when one doesn't have an extra light source.. one can use mirrors and a light box.. again.. the nature sun light is acceptable, but tends to washout the images if not taken properly.
Image: You can see that I have one main light source off to the left of the image, and the light box. But to get a bit more light on the opposing side of the quartz I used a mirror.
Image: Here is a close up of the image above.. Nothing out of the ordinary.. Image is clear, well illuminated and in focus.. But wait.. what's this (turns the Smokey Quartz over)
Image: Clear indication that a hexagonal shaped mineral had embedded into this smokey.. I'm thinking it could have been Beryl.. Now.. If I could have just found the rest of it while they were tilling the field..