Ragnor
Sr. Member
- Dec 7, 2015
- 445
- 422
- Primary Interest:
- All Treasure Hunting
This is the design of my first sluice. I came up with this after seeing a single chute design in a wooden box frame in front of the drift mine by the liberty store back in the early 1990's.
The frame is scrap from the seats of an old king county transit bus my dad made into a camper in the 1970's when he moved us into the country. Thanks Dad.
Anyway, It's a pretty simple strait forward design. The original sluice got kind of grown over and forgotten after I bought a fancy one and ended up getting burned when I was burning the grass down around my place a couple years ago.
This is however the original frame and I figured I'd mach it up real quick for you guys. I even have the left over piece of corrugated I bought back in 96.
So here is home made corrugated sluice machII.
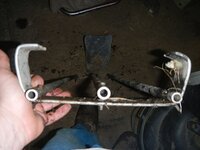
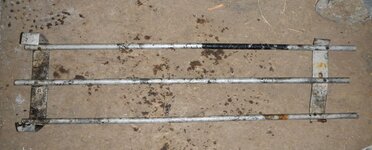
The Frame:
The only real noteworthy thing that is not shown well in the image is that there is a spacer under the center support bar to hold the central ridge elevated to prevent it from collapsing. Also the height and shape of the side arms is fuctional to hold the open pipe in place.

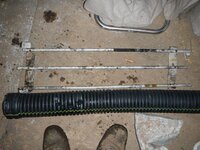
The tube is cut to length and flayed down one side. The first time I used the yellow line as a guide. The tube this time had some small punctures in it so I cut through those and still used the line as a rough guide. I used my favorite kitchen knife for the operation as I dont see my razor knife right now.
***Saftey First**** I highly recommend cutting the pipe in a manner that does not result in eviscerating yourself or slashing your femoral artery, nor puncturing any body parts between those two areas.
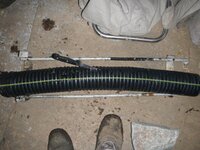
The pipe is then opened up. This part can be difficult to do with precision keeping it in a nice strait orderly line. It so happens that the size of my hands and my manual dexterity from many years of mechanic work allows me to wrap my hands around the pipe gripping the cut lip of the pipe with my fingertips, with my thumbs held together on the rounded outside of the tube. I press each rib inwards and crease them one at a time with a bit of force. Gauging between my fingertips along the cut edge and my thumbs on center on the round side I am able to form a relatively strait line as I go. Flexing in each individual rib.
You might want to think about your ex or politicians who think they can arbitrarily change mining laws for motivation while doing this part of the task.
I had both my hands full and I don't own a go-pro, so no image of that task.
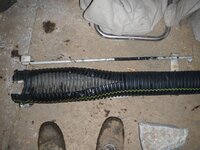
Here is the new sluice crudely clipped in and formed to the frame.
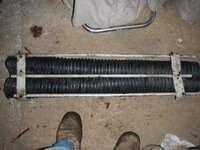
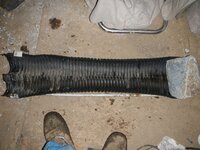
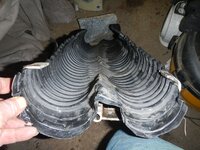
Notice the bent flat stock is just the right size to hold tension on the open pipe and holds it firmly in place. The joining ends of the pipe form a nice little flare at the mouth of the sluice. This one looks a little wonky, but in the original model I was able to remedy this by carefully poking small sets of holes wherever I need to adjust the plastic for angle and bedding on the frame and pull it into form by stringing hay wire through the holes and pulling it all into shape by tying off to the frame tubes. After a few uses it all kind of relaxes and smooths out well anyway. I never had any issues with the side walls wanting to collapse.
Sure it might be possible to lose a random piece of flour gold out from beside the wire once in a while, but as long as no holes are punctured directly in the bedding area of the riffles it's really not ever going to be enough to matter.
This slap together took me about 10 minutes. It might take an hour total if I wired it all into place and made it field ready. Of course building the frame probably took me an hour or so to slap together also the first time. But hey, it's fire proof with a limited lifetime warranty.
It's light also, I don't have a scale right handy but it might weigh 2.5-3 lbs maybe? It wont weigh you down thats for sure.
I hope that clears up any question as to what I have described in the other threads and I hope this helps others get going with a cheap and effective home made sluice. I think anyone who tries it will be very pleased with the results.
***** I just remebered one more thing, that was not actually my first sluice. My first sluice was made of pine boards with wooden slats, just like the old books said to. It was heavy and bulky and after soaking in the creek all day it was just to heavy to pack out of that canyon and I threw it down and left it there, lol.
The frame is scrap from the seats of an old king county transit bus my dad made into a camper in the 1970's when he moved us into the country. Thanks Dad.
Anyway, It's a pretty simple strait forward design. The original sluice got kind of grown over and forgotten after I bought a fancy one and ended up getting burned when I was burning the grass down around my place a couple years ago.
This is however the original frame and I figured I'd mach it up real quick for you guys. I even have the left over piece of corrugated I bought back in 96.
So here is home made corrugated sluice machII.
The Frame:
The only real noteworthy thing that is not shown well in the image is that there is a spacer under the center support bar to hold the central ridge elevated to prevent it from collapsing. Also the height and shape of the side arms is fuctional to hold the open pipe in place.


The tube is cut to length and flayed down one side. The first time I used the yellow line as a guide. The tube this time had some small punctures in it so I cut through those and still used the line as a rough guide. I used my favorite kitchen knife for the operation as I dont see my razor knife right now.
***Saftey First**** I highly recommend cutting the pipe in a manner that does not result in eviscerating yourself or slashing your femoral artery, nor puncturing any body parts between those two areas.


The pipe is then opened up. This part can be difficult to do with precision keeping it in a nice strait orderly line. It so happens that the size of my hands and my manual dexterity from many years of mechanic work allows me to wrap my hands around the pipe gripping the cut lip of the pipe with my fingertips, with my thumbs held together on the rounded outside of the tube. I press each rib inwards and crease them one at a time with a bit of force. Gauging between my fingertips along the cut edge and my thumbs on center on the round side I am able to form a relatively strait line as I go. Flexing in each individual rib.
You might want to think about your ex or politicians who think they can arbitrarily change mining laws for motivation while doing this part of the task.
I had both my hands full and I don't own a go-pro, so no image of that task.

Here is the new sluice crudely clipped in and formed to the frame.


Notice the bent flat stock is just the right size to hold tension on the open pipe and holds it firmly in place. The joining ends of the pipe form a nice little flare at the mouth of the sluice. This one looks a little wonky, but in the original model I was able to remedy this by carefully poking small sets of holes wherever I need to adjust the plastic for angle and bedding on the frame and pull it into form by stringing hay wire through the holes and pulling it all into shape by tying off to the frame tubes. After a few uses it all kind of relaxes and smooths out well anyway. I never had any issues with the side walls wanting to collapse.
Sure it might be possible to lose a random piece of flour gold out from beside the wire once in a while, but as long as no holes are punctured directly in the bedding area of the riffles it's really not ever going to be enough to matter.
This slap together took me about 10 minutes. It might take an hour total if I wired it all into place and made it field ready. Of course building the frame probably took me an hour or so to slap together also the first time. But hey, it's fire proof with a limited lifetime warranty.
It's light also, I don't have a scale right handy but it might weigh 2.5-3 lbs maybe? It wont weigh you down thats for sure.
I hope that clears up any question as to what I have described in the other threads and I hope this helps others get going with a cheap and effective home made sluice. I think anyone who tries it will be very pleased with the results.
***** I just remebered one more thing, that was not actually my first sluice. My first sluice was made of pine boards with wooden slats, just like the old books said to. It was heavy and bulky and after soaking in the creek all day it was just to heavy to pack out of that canyon and I threw it down and left it there, lol.
Last edited:


