How to Make a Battery Pod

F

Floater

Guest
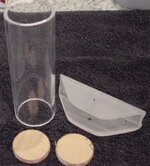
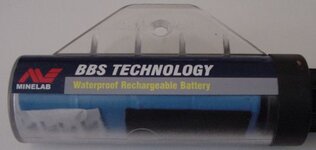
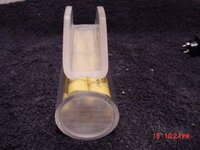
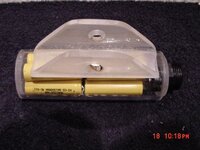
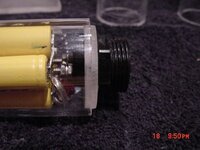
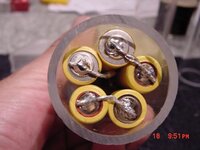
OK these are the parts for the MineLab Excalibur Battery Pod.

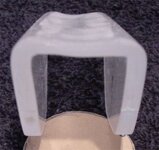
The Plexiglass tube is 1-1/2 " ID , The two flat plexiplugs with the paper on them still and the Actual clip that I molded with plexi gets glued on to the tube,
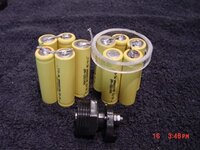
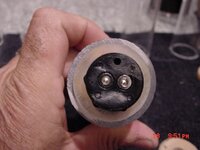
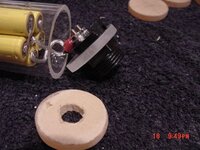
The Lower Pic is the Batterys that I have solderd in series to achieve the output needed. 14.v. Max These are nicad recharchable and the black Ikelite waterproof connector. at the bottom of pic 2.is the exact connector for the excal. This way the factory charger and adapter is used to charge the finished pod.
 

Attachments

  • newpod.2jpg.jpg
    newpod.2jpg.jpg
    36.8 KB · Views: 718
  • batprts.jpg
    batprts.jpg
    38.5 KB · Views: 749
OP
OP
F

Floater

Guest
This is the clip I molded at a different angle. I built a wood mold first to reproduce this piece so it would be an exact fit with the shaft so the pod needs no modifications to fit at all.
The second pic is the original pod so when i am finished all should look the same or close. I will update the finshed pod this week .
total cost so far is 20.60 batterys. 15.00 Ikelite connector and 6.00 plexiglass.= 41.60
 

Attachments

  • excpod.jpg
    excpod.jpg
    19.6 KB · Views: 676
  • moldclip copy.jpg
    moldclip copy.jpg
    25.1 KB · Views: 728

Lee-MI-MI

Jr. Member
Apr 3, 2005
62
1
Midland Michigan
Detector(s) used
White's MXT, Fisher CZ-20/21
What did you do with the two circles for the end plugs? Did you glue them in?

Can you furnish more detail on the end plugs?

Mounting bracket - How did you heat the Plexiglas? Did you just rest in on the wood block and hit it with the heat or do you have to help it along with your hands? How hot do you have to get it to bend nice like that without cracking?
 

Attachments

  • THCodger.gif
    THCodger.gif
    19.1 KB · Views: 949
  • THCodger.gif
    THCodger.gif
    19.1 KB · Views: 1,000
OP
OP
F

Floater

Guest
OK so here we have some assembled parts, the first picture shows the raw end cap with hole and then with the connector assembled and ready to put into the cylinder to seal the pod.

Picture 2 shows the opposite end with the battery pkg assembled. Notice the battery with the wire that dissapears into the center. This is the neg. wire that goes to the corresponding terminal on the plug.

Picture 3 Shows the Plug cap assembled in a dry fit. No cement yet.Notice you can see the terminals inside here also.

Picture 4 shows the Terminal end assembled in the tube.

Ok and the final dry assmled Pod. No cement yet. Pictures 5 & 6
 

Attachments

  • asem5.jpg
    asem5.jpg
    31.1 KB · Views: 652
  • asem6.jpg
    asem6.jpg
    29.9 KB · Views: 684
  • asem3.jpg
    asem3.jpg
    27.4 KB · Views: 685
  • asem4.jpg
    asem4.jpg
    29.1 KB · Views: 654
  • asem2.jpg
    asem2.jpg
    30.8 KB · Views: 691
  • assm1.jpg
    assm1.jpg
    36.5 KB · Views: 700
OP
OP
F

Floater

Guest
C'MON FREE , This is serious stuff here. ROFLMAO. Now ya gotta admit I am one talented kinda guy here? Dont answer that FREE. LOL
 

OP
OP
F

Floater

Guest
Let me know when ya want one of these MineLab. I am making three of them to start but will not assemble the others until I run some testing on my first one. I'm going to sell them for just the cost. Better than the 160.00 bucks they want from ML and Sun out in Nevada there or wherever they are. I am going to try NIMHs too on the next one. I was talking to the guy at the battery store and he said the NI-CAD charger works on NIMH just charges a little slower. ? Don't know if thats true yet still trying to verify that.Also need to get with Rod. So he can see this. Later. HH
 

D

Darod

Guest
Damm FLoater!

Your making one just like factory here! Looks a lot better than the old broom handle hip mount I made! :)

What did you want to ask me? The charger question? As far as the charger working on both NiCad and NiMh I think that guy was wrong. I'll confirm it for you tomorrow,...I'll call the Motorola rep at work, he'll know for sure.

That thing looks great Dave! Let me know how it works out for ya. I'll buy one off of ya for sure.

Rod

$45 beats $85 every time! If that's the final cost.
 

D

Darod

Guest
Dave,

Are you getting any shorting issues between the 2 battery clusters or from the screws on the inside connections?

Rod
 

OP
OP
F

Floater

Guest
No shorting but I guess I should have pointedd that out. I slipped a piece of hard plastic cut out in the same diameter as the tube so when I stacked the cells they would not touch. Good question Rod . Keepin me honest. Thanks for bringing that up.

Hey minelab are you sure the Pod from keelyco is waterproof. I dont think that is the case. Make sure before yoiu go in the water. I believe minlabs spare is water resistant. There is an off Brand and that one is waterproof but I believe its 160.00 Let me know will ya or Rod if you get a chance. Im swamped here right now. It,s all I can do to Post and hunt and work and build battery pods and did I mention Post. LOL HH
 

OP
OP
F

Floater

Guest
Never Mind Guys I saw the Kellyco add. The ML water proof is only 85 bucks Thats a good deal. The one I,m thinking of is the NIMH one from the other manufacturer. Oh well even at my cost I still have it beat. I just have to test it for waterproof. Later.
 

Lee-MI-MI

Jr. Member
Apr 3, 2005
62
1
Midland Michigan
Detector(s) used
White's MXT, Fisher CZ-20/21
AH HA!

That's why I couldn't figure it out. You glue yours together and ML uses an O ring that allows disassembly and replacement of the batteries. Yours ends up being a disposable unit. Well, I guess you could salvage the connector. ::)

If you do decide to use an O ring and do not have the tools to do the groove, there is an easier way for the hobbyist.

Make three disks. Two end ones fit snugly in the tube, the middle disk is undersized for the O ring. Glue them all together. You'll have to make one of the large ones thicker for the set screw.

One word of caution though. The small one's diameter and thickness should be determined when you are selecting the O ring so it fits properly. It will also have to be perfectly round or it will leak.

If this is too confusing, contact me off line and I will try to be more specific - after I get back from Florida.
 

Attachments

  • THCodger.gif
    THCodger.gif
    19.1 KB · Views: 838
  • THCodger.gif
    THCodger.gif
    19.1 KB · Views: 878
OP
OP
F

Floater

Guest
I understand exactly what you said Lee and that is an excellent way to do it. I was tryin g to comform to minelabs size but if I do the Oring on the end cap It would put me over about a 1/4 of an inch. no biggy. The way to replace the batterys in mine is to put it on a drill press and just drill out the end cap with 1-1/2 inch hole sawno pilot bit needed. but you could since the batterys are to the outside so the center is free except fot the wire. Remember also the Oring style cap still requires a set screw on opposite sides to keep it in place. This requires a tap and i dont know if I trust the Plexi threads. will expieriment though. Thanks for the Thought and post. Keep in touch. Drive Safe. HH
 

Lee-MI-MI

Jr. Member
Apr 3, 2005
62
1
Midland Michigan
Detector(s) used
White's MXT, Fisher CZ-20/21
Remember, the threads for the set screws ony have to keep the screw in place. There is no real force on the threads. The function is to act as a set of pins to stop the plug from fallling out while you are transporting it. I think they leave a flange on the outer end to stop it from being pushed in by the water pressure. Jeeze, that would make a 4th disk in the stack.

You could save some length by putting a thinner spacer between the two battery clusters. There is a very thin but strong insulating material available from electrical wholesalers. I think it is called Fish Paper. It is about as thick as cereal box cardboard but very stiff. You frequently see it as a partition in electrical enclosures.

Keep up the good work.

Lee
 

Attachments

  • THCodger.gif
    THCodger.gif
    19.1 KB · Views: 853
  • THCodger.gif
    THCodger.gif
    19.1 KB · Views: 810
OP
OP
F

Floater

Guest
I agree Lee. The screws are just to keep it from moving out of place. The spacer I used was just a thin hard plastic from a display pack. no thicker than about 8 mills.The problem with length is the fact that ML uses a specific battery and I used the AA so the difference is there. Just something to deal with. I have also seen apack made with AAA's this was very nice and small. the difference being that you will not get the duration out of them because of the Milamp hour rating but for a back up it is excellent.I may do one of those also. I am going to post my electrolisis rig later tonight. See ya all later.
 

D

Darod

Guest
It's not I bet! If it were me, I wouldn't trust it as waterproof. Hell, it say's water-resistant right on their site as you've proved!

Rod

Dave, I couldn't get a reply back today on the charger question, I'll get with the guy tomorrow one way or the other.

Rod
 

D

Darod

Guest
Ok,

Dave, here's the answer to the NiCad and NiMh battery question:

First keep in mind that the charger that comes with the Excal is a "wall wort" type charger,....they don't make a rapid charge wall wort charger on the market! Therefore, our chargers and any charger that comes with anyone's Excal 800 or 1000 is going to be a "trickle charger" or slow charger. With that in mind read this statement:

A standard slow or trickle charger as supplied with most radio gear will work with both NiCad and NiMH batteries.

For fast charging, it's best to use a charger which specifies that it is suitable for NiMH. Since the characteristics of NiCad and NiMH cells are slightly different the best chargers have different programs which allow them to terminate the charge in various ways. E.g. for NiCad's it is fine to watch for an actual voltage reduction but the voltage dip is not so pronounced in NiMH cells so it is better to stop fast charging either on a very small reduction in voltage (sometimes called "sensitive mode") or before the voltage drops, when it levels off.

So, if you use the charger that came with your detector you'll be fine. NiMh or NiCad will work fine with our detectors as well. There are differences in the charging characteristics between the NiCad and NiMh BUT, there is not difference in the output voltage if your compair the same outputs of each type,.....for example, 9v is 9v is 9v :)

Hope this clears up that question.


Rod
 

OP
OP
F

Floater

Guest
ALLRIGHT ROD!. Thanks for that little info. I fell better now plus believe it or not the NIMH are actually the samee price adns ometime you get a better deal. The Nicad is becoming Obsolete to a degree so the price is high still. Thanks Again. I am trying to finish them up so I can water test soon.Later
David
 

D

Darod

Guest
Free,

I don't see that link your talking about? Where is it?

Dave,

What's to keep you from making it longer and adding more batteries to get a higher mah output? Say,....twice as long? If you mount it on a hip mount then weight wouldn't really be a factor at all? What do ya think?

Rod
 

OP
OP
F

Floater

Guest
Rod , The Milamps really should not exceed the 1000 mark. remember Minelabs are rated at I think 650 or 850. (dont have the spec in front of me.) but if you go to much over that you could theoretically surge the electronics and blow your machine up. We are talking some delicate circutry here. I would like the smaller just for the wight difference regardless of the hip mount. remember thats 2.5 pounds of battery Pack.

The link Pete was talking about was a guy who stuffed his mom in a freezer for four years and when the police searched his house they found a bunch of bomb making stuff and guns and ammo. He thinks my battery pack looks like a home made device. Wait till its finished Pete.
 

Top Member Reactions

Users who are viewing this thread

Top