Specific programs for Minelab Explorer SE?

Detectingfreak

Gold Member
Apr 26, 2006
5,736
21
Bellevue, WA
Detector(s) used
Minelab Explorer SE, Tesoro TigerShark
I was wondering if there is anyone who can give me a program for the Minelab Explorer SE that only picks up silver coins?

I heard from somewhere that you can make your own programs and have your Minelab Explorer SE detect what you want it to detect. Well, I want to program my detector, so that it can only reconize silver coins. If any of the Minelab owners know a program that will let the Minelab Explorer SE only pick up silver coins then that would be great! :)

Or if anyone knows any good programs that can have the Minelab Explorer SE detect really old coins or really old buttons let me know.

I also was wondering if there was a beach program where I can pick up gold easily with the Minelab Explorer SE.

Please help me out and any Minelab Explorer SE owners please give me programs and let me know what they are for! :)

I really appriciate it! :) Thanks! :)
 

Upvote 0

waseeker

Bronze Member
Dec 20, 2006
1,133
25
Pacific Northwest
Detector(s) used
Whites DFX; Minelab eTrac
Primary Interest:
All Treasure Hunting
I'm still learning my minelab as well, but I don't think there are any "programs" we can give you. You could use the learn/edit mode to teach the SE to accept silver coins and reject everything else. Your manual will tell you how to do this and you'll have to have sample coins of what you want to find. However, the minelab pros tell me that doing this will limit your depth and it is no guarantee that you won't miss silver.
 

Ricardo_NY1

Bronze Member
Oct 24, 2006
1,330
3
Bronx, NY
Detector(s) used
Explorer XS/II & Garrett ACE 250
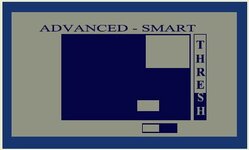
You can do as others here said, you can use the learn/reject options. But I think what you are thinking about is a discrimination pattern or program. If you're familiar with the smartscreen, you will know that all items fall under particular blocks or sections of a screen. Silver coins normally fall very near the top and starting midway and towards the extreme right for quarters. You can pretty much allow that area or certain areas to be blank, while notching out the rest of the blocks or areas of the screen. The problem with this is that targets do not always fall where they are supposed to or initially. Sometimes it takes a while before the cross-hairs move into the position where they actually belong, sometimes that never even happens. I personally DO NOT trust the cross-hairs anymore, let alone the numbers. I go more by the sound, and verify by the width charecteristics of the duration of tone during a sweep, and by the intensity of the targets pin-point response. I know to a very good degree how loud or soft a dime or quarter should sound when being pin-pointed at various depths. I had learned this ability with the ACE 250 and although I never thought with the Explorer, after almost a year, I have. The biggest advantage to using a program like the one you mention is when you are working in a rush and want to move along. But it's not a serious way of using the Explorer in my opinion. You'll find instructions on how to manually create patterns in the manual. Below is a photo of someone's pattern. THis one looks like it allows most coins to come in including nickels, as they've left that area open down the bottom.
 

Attachments

  • pattern.jpg
    pattern.jpg
    10.3 KB · Views: 2,443

Nick A

Hero Member
May 10, 2007
657
153
Columbus Ohio
Detector(s) used
Minelab Explorer SE Pro, Minelab E-Trac, Fisher CZ3D
I used the LEARN feature and took my collection of silver dimes, quarters and halves and made a discrimination pattern. When I get lazy, I use this. Clad still comes in sometimes, as it is in the same range, but if I only dig signals that show halfway or below on the depth meter, it's a pretty good silver discriminator. Silver coins are pretty consistently going to show on the grid at the upper right corner and off the edge.
 

SEAHAWK

Newbie
May 20, 2012
1
2
Primary Interest:
All Treasure Hunting
From the menue go into Advanced settings

Display Smart
>
SELECT. Clear the screen and then scroll down and reject NAILS only.
( This gives you a small area blacked out in top left corner)
AUDIO.
RESPONSE.....................Normal
>
AUDIO.......Sounds.........Ferrous
AUDIO.......TH vol...........10
AUDIO.......Variability...... 6
AUDIO.......Limits............ 6
>
AUDIO.......Volume.........10
AUDIO.......Gain...............8
>
OPTIONS....Recovery......Deep.. On
OPTIONS....Recovery......Fast.... Off
( this can be reversed if in particularly noisy conditions) It is also possible to run with both these off but never both on together.
>
SENSITIVITY....Function.....Manual...(for maximum depth)
SENSITIVITY....Value.........1 - 32......Fix to maintain stability
It is a good idea to start off with manual threshold set in the low twenties initially then raise or lower to suit.
>
Auto Sensitivity can be used if preferred but set at maximum so that the Explorer can search the whole range from 1 - 32. Using Auto may affect maximum depth achieved.
>
THRESHOLD TONE....... Set at a level to suit ( usually just audible)
>
IRON MASK....... If preferred Iron Mask can be used instead of the nails setting above.....Press the Iron mask button and set the value to suit the level you require. I normally set mine on 28 - 29 on the SE which gives a thin narrow black line down the left hand side of the screen.
The thinner the black line the more Iron you will detect but the thicker the line the more good stuff you may discrim out.
>
You can switch between the IRON MASK setting and NAILS by simply hitting the Iron Mask button three times.
>
This programme does not use Variable tones which will help in the learning process because a single tone is less confusing. On detecting a metallic target a good repeatable signal with a solid tone will be heard. You will also have to rely on the cross hair position to help in deciding what type of signal you have.
In general most good non ferrous metals show in the right 2/3rds of the screen, top or bottom. Signals bouncing around with the cross hair tending to show to the left are generally Iron.
------------------------------------------------------------------------------------

VARIABLE TONES PROGRAMME.
(less suitable for beginners because of all the different sounds)
>
Change the following settings to
>
AUDIO.... Response....... Normal........Pitch hold..... Long.... or Smooth
............................(to suit ones preference)
>
AUDIO....TH..Volume.............1
AUDIO....Variability...............10
AUDIO........Limits..................9
>
AUDIO.......Sounds................Conduct......or Ferrous....(to suit)
>
SENSITIVITY, RECOVERY, VOLUMES etc all stay the same as the first programme to suit conditions.
>
>
>
CONDUCT TONES set will give you LOW tones on the bottom of the screen and high tones at the top. By using Conduct sounds Hammered coins for instance will generally give a lower deeper tone depending on their make up off the bottom to middle of the screen. Silver paper or foil will always show with a deep tone, with the cross hair right on or half way under the bottom of the screen.
Similarly an old victorian penny or a Roman silver Denarii will generally show top right of screen and give off a nice high tone.
>
>
>
FERROUS TONES in this programme will still give variability to the sounds but will now alter to show Iron on the left of the screen having the Deep Low tones and anything on the right of the screen having a high tone. This suits some people depending what they are hunting I prefer to have the low tones down on the bottom of the screen where Hammered and bronze Celtic and Romans start to show.
>
>
>
This second programme is probably the best to use if you like Variable tones. It can be altered very quickly in the field from Conduct to Ferrous
or Normal response to say Smooth or Pitch Hold. These are the main settings that alter the way you hear the Explorer. Sensitivity affects the depth but this must be kept at a level to keep things stable
>
>
The Above Programmes are suitable for any scenario. Field, Woods, Beach etc, etc. The first is set to keep things simple the second is for use where Variable tones are preferred and also the ability to change things with the minimum of fuss in the menue easily & quickly whilst in the field detecting.
 

Top Member Reactions

Users who are viewing this thread

Top