Hello All,
I thought I'd share a few tips I've learned over the years on cleaning both one-piece and two-piece buttons.
ONE-PIECE BUTTONS ("FLAT BUTTONS") WITH BACKMARKS
First off, let me talk about flat buttons. There are millions of these underground, and most folks don't give 'em much thought. I love finding them, because I know that I'm on an old site, and I'll probably find old coins and other cool relics.
The lowly flat button can be pretty interesting, though. The backs of them have either a maker's mark (company name) or just a quality mark. Both types of marks on the reverse of buttons are called "backmarks" in general. Quality marks were the manufacturer's way of promoting their product. Typical quality marks are "Extra Rich," "Rich Gold Color (or "Colour"), "Treble Gilt," "Best Orange Gilt," or any combination of those words ("Extra Orange Gilt," for example).
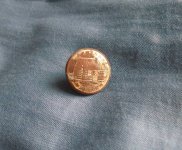
Now the quality marks frequently don't tell us much, but maker's marks can date a site. (I'd recommend the Tice book on buttons for some good info on button manufacturers and dates of manufacture.) The big problem is being able to identify your buttons. I used to use water and a toothbrush on them, and through the years I've realized that this method isn't all that great. Many times, I ended up with something that looked like this:

So here's what I do... First I get a toothpick or wooden skewer. (I prefer wooden shish kebab skewers by far) Then I hold the edge of the skewer flat against the back of the button (as if I were holding a charcoal stick and making a rubbing of the button). Do this cleaning method Without water--the button must be perfectly dry.

What this does is it keeps the patina in the grooves where the backmark is stamped. (A toothbrush removes all of this patina, and you're left with no contrast to aid in reading the backmark!) The finished product looks like this:

View attachment 13096
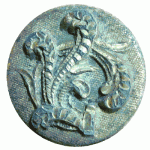
If the backmark/quality mark is Raised rather than stamped in, you'll have to scrape the corrosion off until you start to see the tops of the letters. Don't go any deeper into the corrosion than that--but when you have a rough idea of what it says, you can then work on individual letters as-needed. Afterwards, you can rub the high points with the oil on your fingers to bring out the design even more. Here's an example, with the typical "groove" with its raised quality mark inside:

In some cases, you have to be gentle with the toothpicking--especially if there is still gilding clinging to the grooves of a stamped-in backmark. This last remaining gilding is the only thing left that will allow you to read the mark easily. Here's a "toothpicked" example:

Sometimes civilian flat buttons have other interesting designs, like this button:

(If I'd taken a toothbrush and water to it, I'd have never ended up with such great contrast between the design and the background)
ONE PIECE FLAT BUTTONS WITHOUT BACKMARKS
These are the older flat buttons--colonial types without backmarks, what our British friends refer to as "Dandy" Buttons (Very large flat Colonial-Era buttons), etc.
If you're certain there is no backmark, and the button is one-piece and made of brass--Peroxide method works well.
TOMBAC BUTTONS
Tombac buttons are named for the alloy they're made from--an alloy of copper and zinc. They come out of the ground with a silvery or gun-metal colored shine. Due to their coloration, some detectorists confuse them with pewter buttons or even silver ones. I know of no way (yet!) to remove green corrosion from Tombacs. Aluminum Jelly seems to cure tombac buttons of light tarnish.
Most of the time, Tombacs come up fairly clean--but in Virginia I recall finding some Tombacs that looked like iron...the crusty coating on them resisted toothbrushing--and for a while they sat in a display case with me thinking they were in fact iron buttons...I had to chip the encrustation off with a toothpick, revealing the shiny tombac underneath.
PEWTER BUTTONS
These must be cleaned Very carefully. I usually place them in a Ziploc baggie to keep them moist after finding them, then take them home and soak and gently toothpick them--using care around the edges (which will typically start to flake over time). After cleaning and THOROUGH drying, these must be coated with a thin coat of urethane (painted on and then thinned out across the front of the button) to preserve them and prevent them from continuing to flake away. Some have had good results with painting several coats of a 50/50 mixture of Elmer's Glue and water on them to stabilize the flaking away of the edges of the buttons.
FOR BUTTONS WITH GOLD GILDING
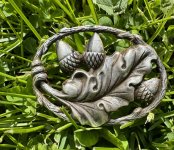
If you find a button that has lots of gold gilding that you'd like to keep, I'd recommend either Aluminum Jelly or Naval Jelly. DO NOT toothbrush these. This holds true for both one-piece AND two-piece buttons with a good bit of gilding remaining. Apply the product to the button. Let it sit for about a minute and gently swirl it around with toothpick. The crust will melt away from the surface of the gold. Use multiple applications until the button's remaining gilding is fully revealed. When it's done it's work, rinse it thoroughly with a little soap to neutralize the acid in the Jelly. (Also do this if you stop work on the button for an extended amount of time.) I hold a cake of soap in my other hand in between the tap and the button, so that the soapy water falls over the button. I don't apply soap directly to the button--just the water run-off.") Important: This process can take a long time--depending on the detail on the button. I have spent several hours on the civilian button below--but I spend comparatively little time with gilded flat buttons. When you swirl with the toothpick, you'll be able to feel the smooth gilding underneath the dirt. Don't push "into" the gilding--just ride the toothpick along on top of it. Also, toothpick from areas with gilding Toward areas without gilding. (That way you don't pull up the gold that is left.) The more patient and gentle you are with the process, the more gilding will be left. Also Important: If you need to see the backmark on the back, and intend to do the front of a gilded button with aluminum jelly, then if the back has no gilding I advise that you do the aluminum jelly work on the front FIRST. Then let the button dry completely before you toothpick the back. Any time you use water, toothpicking runs the risk of losing the backmark.
Important: This process can take a long time--depending on the detail on the button. I have spent several hours on the civilian button below--but I spend comparatively little time with gilded flat buttons. When you swirl with the toothpick, you'll be able to feel the smooth gilding underneath the dirt. Don't push "into" the gilding--just ride the toothpick along on top of it. Also, toothpick from areas with gilding Toward areas without gilding. (That way you don't pull up the gold that is left.) The more patient and gentle you are with the process, the more gilding will be left. Also Important: If you need to see the backmark on the back, and intend to do the front of a gilded button with aluminum jelly, then if the back has no gilding I advise that you do the aluminum jelly work on the front FIRST. Then let the button dry completely before you toothpick the back. Any time you use water, toothpicking runs the risk of losing the backmark.
Used with care and patience, Aluminum or Naval Jelly will give you results like this:
Civil War Federal Artillery Button:

And an 1850s civilian button--first photo is after preliminary cleaning. Second photo is after two hours of off-and-on careful work with aluminum jelly. The secret is to put the jelly on, then gently swirl away the crust:
 View attachment 14174

TWO-PIECE BUTTONS WITHOUT GILDING
First off, DO NOT use olive oil on these buttons!! It will be absorbed into the button, and it will leak out for YEARS. Oil will also make the button more fragile. In some cases, even water can cause a two-piece button to disintegrate--so use your best judgement. I've started using just a dry toothbrush on these--if they have a protective "crust" on them--and I've had good results. I've then touched-up the design with toothpicks and used the oil from my fingers to bring out the design. Here's an example:

Two-piece buttons are all different. I've had the best luck with these methods in cases where there is a protective "crust" over the whole button. Heavy corrosion and rust globules are another matter entirely, and I have no easy answer for you in those cases.
Soil type has a lot to do with it too--as well as the presence or absence of fertilizer. Some buttons are just beyond help, like this crusty CW Eagle dug from a heavily-fertilized field in KY:

Toothpicking will work on most brass items with a designs that you'd like to be able to read. I use the same methods for cleaning up suspender clips that I find. I also use it on wick turners off old oil lanterns and the front of toe taps (where there are frequently patent dates found).
Be sure you try any cleaning method listed here on a less valuable find first. Experimentation is of highest importance before you attempt to clean any button of high value. I swear by all of the methods above, and if used correctly they should at the very least increase the display quality of your buttons. In many cases, proper cleaning must be used to preserve the gold gilding, read the backmarks, etc.
There are buttons out there worth hundreds or thousands of dollars--and some valuable buttons look like normal flat buttons except for the backmark. So knowing what you have is important.
In the photo of the three Civil War buttons below, I used three different cleaning methods. Aluminum Jelly on the Artillery button on the left. Dry toothpicking, and the oil from my fingertips to bring out the raised design on the one in the middle. And I used a dry toothbrush on the one on the right.

There are other examples of my cleaning methods in replies to this post below.
Best of Luck,
Buckleboy
I thought I'd share a few tips I've learned over the years on cleaning both one-piece and two-piece buttons.
ONE-PIECE BUTTONS ("FLAT BUTTONS") WITH BACKMARKS
First off, let me talk about flat buttons. There are millions of these underground, and most folks don't give 'em much thought. I love finding them, because I know that I'm on an old site, and I'll probably find old coins and other cool relics.
The lowly flat button can be pretty interesting, though. The backs of them have either a maker's mark (company name) or just a quality mark. Both types of marks on the reverse of buttons are called "backmarks" in general. Quality marks were the manufacturer's way of promoting their product. Typical quality marks are "Extra Rich," "Rich Gold Color (or "Colour"), "Treble Gilt," "Best Orange Gilt," or any combination of those words ("Extra Orange Gilt," for example).
Now the quality marks frequently don't tell us much, but maker's marks can date a site. (I'd recommend the Tice book on buttons for some good info on button manufacturers and dates of manufacture.) The big problem is being able to identify your buttons. I used to use water and a toothbrush on them, and through the years I've realized that this method isn't all that great. Many times, I ended up with something that looked like this:
So here's what I do... First I get a toothpick or wooden skewer. (I prefer wooden shish kebab skewers by far) Then I hold the edge of the skewer flat against the back of the button (as if I were holding a charcoal stick and making a rubbing of the button). Do this cleaning method Without water--the button must be perfectly dry.
What this does is it keeps the patina in the grooves where the backmark is stamped. (A toothbrush removes all of this patina, and you're left with no contrast to aid in reading the backmark!) The finished product looks like this:
View attachment 13096
If the backmark/quality mark is Raised rather than stamped in, you'll have to scrape the corrosion off until you start to see the tops of the letters. Don't go any deeper into the corrosion than that--but when you have a rough idea of what it says, you can then work on individual letters as-needed. Afterwards, you can rub the high points with the oil on your fingers to bring out the design even more. Here's an example, with the typical "groove" with its raised quality mark inside:
In some cases, you have to be gentle with the toothpicking--especially if there is still gilding clinging to the grooves of a stamped-in backmark. This last remaining gilding is the only thing left that will allow you to read the mark easily. Here's a "toothpicked" example:
Sometimes civilian flat buttons have other interesting designs, like this button:
(If I'd taken a toothbrush and water to it, I'd have never ended up with such great contrast between the design and the background)
ONE PIECE FLAT BUTTONS WITHOUT BACKMARKS
These are the older flat buttons--colonial types without backmarks, what our British friends refer to as "Dandy" Buttons (Very large flat Colonial-Era buttons), etc.
If you're certain there is no backmark, and the button is one-piece and made of brass--Peroxide method works well.
TOMBAC BUTTONS
Tombac buttons are named for the alloy they're made from--an alloy of copper and zinc. They come out of the ground with a silvery or gun-metal colored shine. Due to their coloration, some detectorists confuse them with pewter buttons or even silver ones. I know of no way (yet!) to remove green corrosion from Tombacs. Aluminum Jelly seems to cure tombac buttons of light tarnish.
Most of the time, Tombacs come up fairly clean--but in Virginia I recall finding some Tombacs that looked like iron...the crusty coating on them resisted toothbrushing--and for a while they sat in a display case with me thinking they were in fact iron buttons...I had to chip the encrustation off with a toothpick, revealing the shiny tombac underneath.
PEWTER BUTTONS
These must be cleaned Very carefully. I usually place them in a Ziploc baggie to keep them moist after finding them, then take them home and soak and gently toothpick them--using care around the edges (which will typically start to flake over time). After cleaning and THOROUGH drying, these must be coated with a thin coat of urethane (painted on and then thinned out across the front of the button) to preserve them and prevent them from continuing to flake away. Some have had good results with painting several coats of a 50/50 mixture of Elmer's Glue and water on them to stabilize the flaking away of the edges of the buttons.
FOR BUTTONS WITH GOLD GILDING
If you find a button that has lots of gold gilding that you'd like to keep, I'd recommend either Aluminum Jelly or Naval Jelly. DO NOT toothbrush these. This holds true for both one-piece AND two-piece buttons with a good bit of gilding remaining. Apply the product to the button. Let it sit for about a minute and gently swirl it around with toothpick. The crust will melt away from the surface of the gold. Use multiple applications until the button's remaining gilding is fully revealed. When it's done it's work, rinse it thoroughly with a little soap to neutralize the acid in the Jelly. (Also do this if you stop work on the button for an extended amount of time.) I hold a cake of soap in my other hand in between the tap and the button, so that the soapy water falls over the button. I don't apply soap directly to the button--just the water run-off.
Important: This process can take a long time--depending on the detail on the button. I have spent several hours on the civilian button below--but I spend comparatively little time with gilded flat buttons. When you swirl with the toothpick, you'll be able to feel the smooth gilding underneath the dirt. Don't push "into" the gilding--just ride the toothpick along on top of it. Also, toothpick from areas with gilding Toward areas without gilding. (That way you don't pull up the gold that is left.) The more patient and gentle you are with the process, the more gilding will be left. Also Important: If you need to see the backmark on the back, and intend to do the front of a gilded button with aluminum jelly, then if the back has no gilding I advise that you do the aluminum jelly work on the front FIRST. Then let the button dry completely before you toothpick the back. Any time you use water, toothpicking runs the risk of losing the backmark.Used with care and patience, Aluminum or Naval Jelly will give you results like this:
Civil War Federal Artillery Button:
And an 1850s civilian button--first photo is after preliminary cleaning. Second photo is after two hours of off-and-on careful work with aluminum jelly. The secret is to put the jelly on, then gently swirl away the crust:
View attachment 14174
TWO-PIECE BUTTONS WITHOUT GILDING
First off, DO NOT use olive oil on these buttons!! It will be absorbed into the button, and it will leak out for YEARS. Oil will also make the button more fragile. In some cases, even water can cause a two-piece button to disintegrate--so use your best judgement. I've started using just a dry toothbrush on these--if they have a protective "crust" on them--and I've had good results. I've then touched-up the design with toothpicks and used the oil from my fingers to bring out the design. Here's an example:
Two-piece buttons are all different. I've had the best luck with these methods in cases where there is a protective "crust" over the whole button. Heavy corrosion and rust globules are another matter entirely, and I have no easy answer for you in those cases.
Soil type has a lot to do with it too--as well as the presence or absence of fertilizer. Some buttons are just beyond help, like this crusty CW Eagle dug from a heavily-fertilized field in KY:
Toothpicking will work on most brass items with a designs that you'd like to be able to read. I use the same methods for cleaning up suspender clips that I find. I also use it on wick turners off old oil lanterns and the front of toe taps (where there are frequently patent dates found).
Be sure you try any cleaning method listed here on a less valuable find first. Experimentation is of highest importance before you attempt to clean any button of high value. I swear by all of the methods above, and if used correctly they should at the very least increase the display quality of your buttons. In many cases, proper cleaning must be used to preserve the gold gilding, read the backmarks, etc.
There are buttons out there worth hundreds or thousands of dollars--and some valuable buttons look like normal flat buttons except for the backmark. So knowing what you have is important.
In the photo of the three Civil War buttons below, I used three different cleaning methods. Aluminum Jelly on the Artillery button on the left. Dry toothpicking, and the oil from my fingertips to bring out the raised design on the one in the middle. And I used a dry toothbrush on the one on the right.
There are other examples of my cleaning methods in replies to this post below.
Best of Luck,
Buckleboy


Last edited:


 Great job on that beauty.