treasurepirate1
Sr. Member
- Aug 21, 2010
- 396
- 35
- Detector(s) used
- fisher f75
- Primary Interest:
- All Treasure Hunting
***(FINISHED)***restoring an antique Adirondack (Muskoka) chair
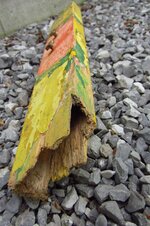
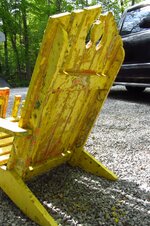
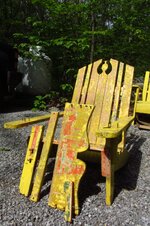
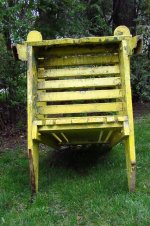
The Adirondack chair or Muskoka chair and commonly called the dock chair is more than just a chair it is a symbol of my local area, dotting the lake shores in there vibrant colors they add a visual sense of relaxation. These chairs are commonly made of wood and growing in popularity a recycled high quality plastic. but the rare ones are the antique ones. usually the wooden ones are improperly maintained or neglected and end up rotting and thrown out. I am lucky to have one from around the 1940s the time around when my family bought a small clapboard cottage on the lake. the chair was one of the lucky ones, it appears to have been lightly used and had multiple layers of paint stating in red than white after that a couple layers of dark green over that a few layers of yellow stating in a dark custard yellow than making it's way to a bright yellow. now the chair has been neglected the past 10 years and as a result the legs have rotted out and the paint started to rapidly chip. i decided it was time to fix the chair or my parents would eventually throw it away. i decided to carve out the rot out the legs and splice a new piece to the bottom of all 4 legs. but the rot was more extensive than i thought so i left the chair alone over the winter months and i have decided to replace the front legs compleatly. here it is, i will try to post picture updates as i'm going if any interest is gained here.
The Adirondack chair or Muskoka chair and commonly called the dock chair is more than just a chair it is a symbol of my local area, dotting the lake shores in there vibrant colors they add a visual sense of relaxation. These chairs are commonly made of wood and growing in popularity a recycled high quality plastic. but the rare ones are the antique ones. usually the wooden ones are improperly maintained or neglected and end up rotting and thrown out. I am lucky to have one from around the 1940s the time around when my family bought a small clapboard cottage on the lake. the chair was one of the lucky ones, it appears to have been lightly used and had multiple layers of paint stating in red than white after that a couple layers of dark green over that a few layers of yellow stating in a dark custard yellow than making it's way to a bright yellow. now the chair has been neglected the past 10 years and as a result the legs have rotted out and the paint started to rapidly chip. i decided it was time to fix the chair or my parents would eventually throw it away. i decided to carve out the rot out the legs and splice a new piece to the bottom of all 4 legs. but the rot was more extensive than i thought so i left the chair alone over the winter months and i have decided to replace the front legs compleatly. here it is, i will try to post picture updates as i'm going if any interest is gained here.


Attachments


Last edited: