OP
OP
craighkzn
Tenderfoot
- Sep 4, 2013
- 8
- 5
- Thread starter
- #21
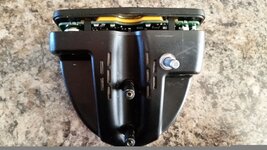
Just a tip..when setting your GB, hold the coil up off the ground, press & hold the pinpoint..now, whilst holding the pinpoint (with a constant tone in your ears), bring the coil down to the ground ( don't touch the ground)....if the tone gets louder, keep pressing the pinpoint, whilst turning the GB, all the while pumping the coil up and down (you don't want the tone to go away...if it does, lift the coil and release & press the pinpoint again)
You will see you will get to a point where the pinpoint tone remains constant, even when close to the ground (pumping coil up & down)......this is now correctly GBd for the site you are searching.
If the tone goes away near the ground, you have negatively gBd, and must turn the knob a little back, lift the coil & release/ press the pinpoint to get a constant tone...
This is the correct way to GB with this mod.


")