piggman1
Silver Member
- Joined
- Apr 7, 2007
- Messages
- 3,120
- Reaction score
- 5
- Golden Thread
- 0
- Location
- Austin, TX
- Detector(s) used
- Whites Eagle Spectrum, Compass X-100, Whites Beach Hunter ID, 2 Whites Spectrum XLT's
- #1
Thread Owner
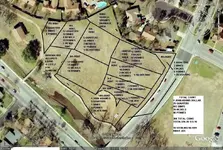
A lot of people ask me how I map out the Ariel view of the places I do. So here is how I do it:
1) Download Google Earth (it's free)
http://earth.google.com/
2) Find the place you are looking for and zoom in as close as you want.
3) Top left corner click on "FILE"
4) Click on "SAVE"
5) Click on "SAVE IMAGE" and choose the name for the file, and where you want to store it, such as "My Documents or My Pictures"
6) Go to Windows "PAINT" program
7) Top left corner click "FILE"
8) Click on "OPEN"
9) Choose the location and file your image is in and open it.
Your image will now be on the screen where you can add text, draw lines, or modify it in any number of ways.
Once you have it modified the way you want it:
10) Top left corner click "FILE"
11) Click on "SAVE AS" and a smaller screen will come up with the original file
12) Click "SAVE" and you will save your modified image.
You can keep coming back to that file in the "PAINT" program and modify it and save it as many times as you like.
It takes some playing around with to get the hang of it, but it is really simple once you figure out how everything works.
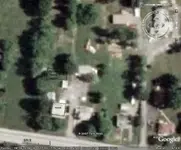
Some examples in the pics.
1) Download Google Earth (it's free)
http://earth.google.com/
2) Find the place you are looking for and zoom in as close as you want.
3) Top left corner click on "FILE"
4) Click on "SAVE"
5) Click on "SAVE IMAGE" and choose the name for the file, and where you want to store it, such as "My Documents or My Pictures"
6) Go to Windows "PAINT" program
7) Top left corner click "FILE"
8) Click on "OPEN"
9) Choose the location and file your image is in and open it.
Your image will now be on the screen where you can add text, draw lines, or modify it in any number of ways.
Once you have it modified the way you want it:
10) Top left corner click "FILE"
11) Click on "SAVE AS" and a smaller screen will come up with the original file
12) Click "SAVE" and you will save your modified image.
You can keep coming back to that file in the "PAINT" program and modify it and save it as many times as you like.
It takes some playing around with to get the hang of it, but it is really simple once you figure out how everything works.
Some examples in the pics.


") ....simple and easy ( once ya know how )
....simple and easy ( once ya know how ) ")