Building a Miller Table

DizzyDigger

Gold Member
Dec 9, 2012
5,840
11,587
Concrete, WA
Detector(s) used
Nokta FoRs Gold, a Gold Cube, 2 Keene Sluices and Lord only knows how many pans....not to mention a load of other gear my wife still doesn't know about!
Primary Interest:
Prospecting
Made a diligent search for a suitable piece of slate or other appropriate stone material
(ie: affordable), but have decided instead to build using a solid wood top and numerous
coats of chalkboard paint.

Poking around my shop I came up with this old table leaf I'd shoved in the back of
my wood stack some years ago. We gave the table away to a young couple, but they
didn't take the extra leaf as there wasn't room in their dining area for the table to be
any larger than it was.

I checked it using a 5' level, and the surface is perfectly flat from end to end and
side to side.

Miller Table - 073113 009-2.jpg

Looks to be solid maple, with a thin layer of hardwood laminate covering the
top. I've since cut it to 16" wide, as there's an area notched along one edge that needed
to be removed, and a 16" width will work just fine. Next step is to sand all that old
stain off, and prepare it for a coat of sealer. (which I'm about done with as I write).

Finished table will be 15-7/8" wide by 43" long.

For a sealer coat I have a full can of Helmsman Spar Urethane, and plan to apply
several coats (to all sides/edges), with sanding between coats to insure a smooth surface.

Pics as it comes along, and as always, I'm completely open to helpful suggestions.
(Just don't get too far ahead of me..8-))
 

Last edited:
Upvote 0
OP
OP
DizzyDigger

DizzyDigger

Gold Member
Dec 9, 2012
5,840
11,587
Concrete, WA
Detector(s) used
Nokta FoRs Gold, a Gold Cube, 2 Keene Sluices and Lord only knows how many pans....not to mention a load of other gear my wife still doesn't know about!
Primary Interest:
Prospecting
Back on track...

Time to get the thread back on track, and caught up..

Weather here was too humid, and it's now changed over to cold,
wet and nasty outside. Bit chilly in the garage, but it was warm
enough so I've done the first and second coats of varnish, and
after one more sanding with 400 & 600 grit it'll be ready for the
chalkboard paint.

Any suggestions out there as to which type/brand to use? The
fellow at Lowes was going to mix me a quart of dark green, but
after I told him what it was for he said I couldn't use that paint,
as it was latex based. ???

Actually, a rattle can would probably be better because of the
better control over how much paint is going on.

Has anyone used the Krylon chalkboard paint? Does it hold up?
 

OP
OP
DizzyDigger

DizzyDigger

Gold Member
Dec 9, 2012
5,840
11,587
Concrete, WA
Detector(s) used
Nokta FoRs Gold, a Gold Cube, 2 Keene Sluices and Lord only knows how many pans....not to mention a load of other gear my wife still doesn't know about!
Primary Interest:
Prospecting
Update time...:occasion14:

Finally found a can of Krylon Green Chalkboard Paint at a local
craft shop ($8.50), and have now done 3 coats of the paint over
the prepped base board.

Only complaint so far is this paint does not sand well, at all, even
with 600 grit. Allowed it to dry in a warm, humidity controlled
room for 24 hrs. between coats, but any attempt at sanding
and the paint would roll up under the sand paper. Still, I was able
to eventually get it super smooth and ready for the next coat, and
tonight I'll add the final coat.

Tonight it dawned on me that the frame boards and back panel would
also need to be sealed. Any lumber I use is most always from my
existing stockpile, but nothing was appropriate for the side boards
so I'm using a 1" x 3" (looks like fir). Wanted a 1x4 for the back panel,
so I dug around in my old stacks and came up with a perfect piece.
Interestingly, it's one of the support stringers from the same dining table
I took the extra leaf from..soon to be my miller table. Solid maple, too..8-)

Soon as the sealer and last coat of paint dry well enough (24 hrs. or more)
then it'll finally be time to assemble all the pieces. Another 24 hrs. of
paint curing (just to be safe) and then it's time to start sweeping the gold up....
americanasmiley.gif
 

wild eyed willey

Full Member
Oct 25, 2012
187
56
Southbridge, MA.
Detector(s) used
bounty hunter, fast tracker
Primary Interest:
Prospecting
I don't think the spray paint idea was too good.. my experience with it on other projects has shown it lacking any durability. I am surprised you were able to sand it at all. I hope I am wrong for your sake. I am following your progress because in the spring I would love to build my own miller table. Please include as much detail and pics as possible especially if you make the table vibrate. Can't wait to see the finished project.
 

OP
OP
DizzyDigger

DizzyDigger

Gold Member
Dec 9, 2012
5,840
11,587
Concrete, WA
Detector(s) used
Nokta FoRs Gold, a Gold Cube, 2 Keene Sluices and Lord only knows how many pans....not to mention a load of other gear my wife still doesn't know about!
Primary Interest:
Prospecting
Willy, if you'll re-read posts #20 and #21, you'll see that
I did ask for some help in choosing the proper paint. Didn't
get any replies, and couldn't find anything on the web to
direct me...so, I bought the Krylon. Just put the 4th
and last coat on, so good, bad, or indifferent it's what
I've got for now.

I do have a small, vibrating motor that can be attached,
and if used it will be mounted underneath the table just
a few inches down from the header box. Jury's still out on
whether or not it gets used.
 

wild eyed willey

Full Member
Oct 25, 2012
187
56
Southbridge, MA.
Detector(s) used
bounty hunter, fast tracker
Primary Interest:
Prospecting
I didn't find the thread till this morning, Sorry it managed to slip by me somehow. I'll keep my eyes open for it from now on. I really look forward to understanding the vibration portion as I think it may be key to success or failure and every bit as important as a good constant slow water flow. I don't know if you know it or not but you can create the miller table effect in your gold pan, it's just much slower.
 

Doitlaynstyle

Hero Member
Feb 21, 2013
683
352
Idaho
Detector(s) used
Rock Nose and sniffer belly
Primary Interest:
Prospecting
:hello: 
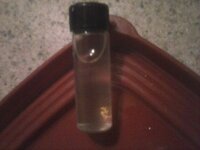
I'm just going to hang out and see how it goes. The gold we get here isn't that fine usually but we do get some and I've been curious as to what if anything I might find in my cons. I could see gold in the cons I saved from my first few times out but every time I would try to pan the gold would float. I then ran them through my gold hog matting and I got almost a gram of superfine powder and the only way I was able to recover was with some leftover "quicksilver" from another recovery. Once you guys get that superfine stuff out how do you manage to capture it into a vial?
 

OP
OP
DizzyDigger

DizzyDigger

Gold Member
Dec 9, 2012
5,840
11,587
Concrete, WA
Detector(s) used
Nokta FoRs Gold, a Gold Cube, 2 Keene Sluices and Lord only knows how many pans....not to mention a load of other gear my wife still doesn't know about!
Primary Interest:
Prospecting
Once you guys get that superfine stuff out how
do you manage to capture it into a vial?

Have no hands-on experience yet, but from what I've seen in the
video's you use a small brush to work the material, and they brushed
the gold into a side area on the table. When done they just sucked
it right into a bottle for collection. At least it looks that easy.

I'm going to try and take a video with my D90 of the assembly and
first test runs. I'm good with still images, but this will be my first
foray into the world of video. (Yeah, I'm a bit of a dinosaur).

Hopefully I can find a way to edit it, as at this point, I'm clueless..
umn.gif
 

russau

Gold Member
May 29, 2005
7,280
6,739
St. Louis, missouri
i dont know why you sanded the paint! it didnt need it! the surface the paint supplied was good enough but not near as good as real slate! i tried both!
 

OP
OP
DizzyDigger

DizzyDigger

Gold Member
Dec 9, 2012
5,840
11,587
Concrete, WA
Detector(s) used
Nokta FoRs Gold, a Gold Cube, 2 Keene Sluices and Lord only knows how many pans....not to mention a load of other gear my wife still doesn't know about!
Primary Interest:
Prospecting
i dont know why you sanded the paint! it didnt need it! the
surface the paint supplied was good enough but not near as good as real slate! i tried
both!

Thanks Russau....I seem to be learning all this "after the fact"..
sSig_aaarggh.gif


Fortunately, I only sanded after the first coat, and there's 3 coats on top that
haven't been sanded at all, so it should be fine. If there's not enough "grit" to it
once I start running, then I can always add additional coats, if needed. Way
it looks right now I think it'll be fine.

Starting assembly tonight (I'm up nights), so we'll know in just a couple
days if it's going to work correctly, or not. Never seen a table operate
except in video's, so I'll be learning the "do's and don'ts" as I go.
 

wild eyed willey

Full Member
Oct 25, 2012
187
56
Southbridge, MA.
Detector(s) used
bounty hunter, fast tracker
Primary Interest:
Prospecting
I think just the texture of the chalk board paint should be enough. Keep working Dizzy and snap some pics when you have time.
 

Jimmydolittle

Sr. Member
Mar 14, 2013
447
473
Hendricksville Indiana
Primary Interest:
Prospecting
Update time...:occasion14:


Only complaint so far is this paint does not sand well, at all, even
with 600 grit. Allowed it to dry in a warm, humidity controlled
room for 24 hrs. between coats, but any attempt at sanding
and the paint would roll up under the sand paper. Still, I was able
to eventually get it super smooth and ready for the next coat, and
tonight I'll add the final coat.

I've never built one, so this is my opinion. I don't believe the chalkboard paint is supposed to be sanded. From what I've read in other places, the chalkboard paint will have little microscopic fingers that will help nab the gold as it passes.
 

OP
OP
DizzyDigger

DizzyDigger

Gold Member
Dec 9, 2012
5,840
11,587
Concrete, WA
Detector(s) used
Nokta FoRs Gold, a Gold Cube, 2 Keene Sluices and Lord only knows how many pans....not to mention a load of other gear my wife still doesn't know about!
Primary Interest:
Prospecting
Got the basic table pieces all fit, drilled and test assembled tonight. Still need
to disassemble and then run a bead of silicone along all edges, then reassemble.
This way I'll have good water protection... not just at the inner edge, but
with the entire seam covered the water can't seep down into the seams.
Hoping this will stop any potential dry rotting (over the next decade)
when not in use.

Miller Table - 110213 035.jpg

Miller Table - 110213 021.jpg

Miller Table - 110213 024.jpg

Miller Table - 110213 032.jpg

The table itself is 15-1/2" wide x 43-1/2 long, so it should be able to work
with a decent amount of material at a time.

Also still need to build the plumbing for the water feed. I'll be using a
258 GPH pump, and a quick trip to the hardware store for the fittings
and that will be done also. Still not sure if I want to use a spray bar,
or use an "overflow" container so the water will gently flow out onto
the table surface. A piece of thin plastic mat (one of the wife's cheap
cutting boards..lol) will sit across the entire width, so the water flowing
from under it will cover the entire width with a level flow.

I'm very pleased with how the table top came out. Yes, I did sand the
initial coat, but followed that with 3 more unsanded coats. Worst case,
if I'm not happy with the performance I'll simply strip it down to bare wood
and start over with another brand of chalkboard paint.
 

Last edited:

juneaupanner

Jr. Member
Sep 28, 2012
72
51
Primary Interest:
All Treasure Hunting
If you want to have the best of plumbing I suggest gravity fed with overflow to reduce bubbles and have a proper flow. You should be able to pump from a lower reservoir to an upper that feeds the table via gravity. Youll want a large enough upper reservoir that you can have a overflow hose Incase the pump supplys too much water to the upper tank.
 

OP
OP
DizzyDigger

DizzyDigger

Gold Member
Dec 9, 2012
5,840
11,587
Concrete, WA
Detector(s) used
Nokta FoRs Gold, a Gold Cube, 2 Keene Sluices and Lord only knows how many pans....not to mention a load of other gear my wife still doesn't know about!
Primary Interest:
Prospecting
If you want to have the best of plumbing I suggest gravity fed with overflow to reduce bubbles
and have a proper flow. You should be able to pump from a lower reservoir to an upper that feeds the table via gravity. You'll want a
large enough upper reservoir that you can have a overflow hose in case the pump supply's too much water to the upper tank.

Just finished putting it all back together with the silicone in the seams, and it
came out real nice. Should not have any leakage issues at all.

Juneau, I've been thinking right along those lines, and have considered
using a large tupperware container and cutting a 1" tall slit lengthwise
down the container. This way the water will flow out of the container
very smoothly, and then it contacts the "flow control" strip that levels
the water flow out it. Simple, but should be efficient.
 

AzViper

Bronze Member
Sep 30, 2012
2,038
2,250
Arizona - Is there any other state worth visiting
Detector(s) used
Fisher Gold Bug Pro, Nokta FORS Gold, Garrett ATX, Sun Ray Gold Pro Headphones, Royal Pick, Etc.
Primary Interest:
Prospecting
Mike are you planning on using a small electric motor to create vibration? I am thinking of a small computer case fan with bearings on the motor that's 120 volt that's easy to mount that you can use a cheap rheostat for a ceiling fan to control the speed. Drill holes in a few of the blades to create an unbalance blade.
 

Last edited:
OP
OP
DizzyDigger

DizzyDigger

Gold Member
Dec 9, 2012
5,840
11,587
Concrete, WA
Detector(s) used
Nokta FoRs Gold, a Gold Cube, 2 Keene Sluices and Lord only knows how many pans....not to mention a load of other gear my wife still doesn't know about!
Primary Interest:
Prospecting
Mike are you planning on using a small electric motor to create vibration?
I am thinking of a small computer case fan with bearings on the motor that's 120 volt that's easy to
mount that you can use a cheap rheostat for a ceiling fan to control the speed. Drill holes in a few of
the blades to create an unbalance blade.

Interesting idea AZ...hadn't considered a computer fan with some offsets
in the blades for vibration...8-)

I do have a small 12v vibration motor that I bought off eBay some time
back, but really hadn't planned to use it unless the table didn't perform
well. Also have a 120v computer fan, and could easily convert it to a
vibrating unit by either punching some holes as you suggest, or another
method would be to simply drill a hole in one blade and add a small screw
with a nut to back it up.

Had intended to run the table for awhile and see how it performs, and
if the material doesn't move well then I'll be looking to add that vibration
to the equation.

Is using a vibration motor on Miller tables a common thing? In your experience
does it make them more efficient?
 

AzViper

Bronze Member
Sep 30, 2012
2,038
2,250
Arizona - Is there any other state worth visiting
Detector(s) used
Fisher Gold Bug Pro, Nokta FORS Gold, Garrett ATX, Sun Ray Gold Pro Headphones, Royal Pick, Etc.
Primary Interest:
Prospecting
Mike, no expereice with the Miller table, but it appears to me having a slight vibration would speed up the process and get the concentate to move down the table. With the computer fan motor mounting would be easy and even a cheap 120v dimmer would work.
 

russau

Gold Member
May 29, 2005
7,280
6,739
St. Louis, missouri
your Miller table looks real nice. the only problem i found with the paint, it dont last very long before its all scratched up.....use the KISS method for this. the vibration is not needed. the slow flow of the water is all youll need.
 

roadrunner

Bronze Member
Jan 28, 2012
1,230
520
Pinal Mountains,Arizona
Detector(s) used
Garrett Groundhog-2012-1st MD.
White's Goldmaster V/Sat-2nd-MD-2013
Tesoro Lobo-2015-3rd
Primary Interest:
Prospecting
DD, here is a pic and video of mine running I just completed last month. Basically like yours.
1X12, 24 inches long. sanded with a jitterbug. Then 3 coats of enamel primer from rustoleum. Sanded between coats.
Then 5 coats of Rustoleum green, sanded between coats.
280 gph Harbor freight pump. No need for a valve, just run it as is.

I received the free thanksgiving cons from doc, panned, and then ran them down my table.
The one pic, is of a piece of sand, about 1/32nd to 1/64 of inch,that came through a screen. The small ones you buy at dollar stores.
So you can see how small that gold is.
Very easy slope,just enough to move the black sands down the table.
1/2 inch cpvc, it is smaller inside diameter than 1/2 inch pvc.

CAM00110.jpg

Since this video I made another spray bar that the holes where better alighned, and less holes. Have to make another vid.
Few more pics.
None of that gold went farther down than 8 inches.

CAM00112.jpg Docs Gold-Miller Table.jpg

I added 2 better videos after I made a new spray bar.


Attachments

  • CAM00114.jpg
    CAM00114.jpg
    58.3 KB · Views: 96
Last edited:

Top Member Reactions

Users who are viewing this thread

Top