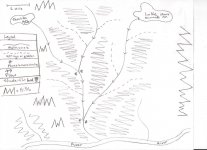
I have received a few emails over the past couple of weeks regarding creek hunting. I sketched out an example of the places I hunt with regards to this. It's not a map. It's a representation. I'll do my best and post this in an understandable way. Any others that would like to add something here, please DO.
A couple of obvious notes first:
1. If Indians weren't there you won't find anything.
2. Please ask for permission. It's not easy sometimes, but, if you offer to give a helping hand occasionally you'll be surprised at the trade-off.
3. Leave it cleaner than you found it.
4. This is my approach and it might be different for any locale.
5. I'm not an English major.
6. Contact me if you have any questions or post here.
7. Be careful and watch out for snakes!
The map:
1. The example I sketched shows a couple of lakes that were man made. These lakes have overflows. Before the lakes were built there was probably a natural run-off or stream there to begin with. When lakes like this are built, the hydraulics of water try to cut the earth to the hardpan as water overflows. As the ground gets harder the stream begins to widen and cut the banks causing erosion. The shaded area on the map relates to semi-flat ground. As the stream picks up speed(from flooding) it erodes the banks and potential campsites along the stream. This is how most points are deposited in the stream.
2. The hash lines(springs) are also important to determine natural water sources. These usually have water flowing just a bit. The people of the day relied on permanent sources of water not only for drinking, but also for game.
3. The confluence of 2 streams is also a great place for a campsite to be. These sites have produced quite a bit of raw chert and pottery(for me at least). If your fortunate enough to get permission to dig, this is a great place to test.
4. The hills above the semi-flat areas were probably campsites too. Below the Fall Line, there are mostly rolling hills and bluffs. In a good area, you'll find material and pottery at the top. These hills create the terrain for these creeks to be formed.
5. Keep an eye on the banks as your walking in the creek. Sometimes, you can actually see the Charcoal line from occupation. I've seen this occupation layer as far as 6-8' below ground level. One time, I actually pulled a point straight from the charcoal. This reinforces what I was saying about the creek eroding outwards from the center as time and floods happen.Points fall in.
6. I ALWAYS walk up the creek first. The reason I do this is the wake from walking down distorts the flow and obscures the visibility in deeper water. I usually walk up looking underwater and then walk down looking on the gravel bars. Points tend to catch or lay with the flow. Walking up you might not see it. Once permission is attained and you have somewhere to go, get a 5 gallon bucket. Cut everything from the bottom except about a 1/2" lip around edge. Get some plexiglass at home depot and cut to fit from inside. Seal with silicone and you now have a viewfinder to see in rough water. I've picked up plenty using the viewfinder.
7. Topography- If the terrain doesn't fall right you'll lack gravel bars. You'll need to determine the fall of the land. This is easy. Topo map. They are available online and are pretty accurate. I look for a fall of between 1-3 ft per 5-10 miles. Google Earth is good for this.
8. When searching the creek you'll want to look for local lithics. Flint chips, quartz chips and curved rocks(i.e. pottery)-some of this can be worn down to almost nothing. Straight lines are the most important thing when I'm looking. South of the Fall Line you'll find Coastal Plains chert.(that translucent red and orange flint). North will be a mix of quartz and darker color flints(lucky dog if you get the crystal quartz). I've seen Coastal plains further, but, it tends to thin out quickly. ANYTHING white I flip or at least expose. Noon is the time of day I prefer to go. Take your time. It will pay.
10. Any others that would like to add something here, please DO.
11. If this helped you please post some of your finds under this thread.
Good luck and HH to all,
Newt
Amazon Forum Fav 👍


Attachments
Upvote
0