sjvalleyhunter
Silver Member
- May 5, 2014
- 3,716
- 2,172
- Detector(s) used
- Minelab E-Trac and Whites MXT
- Primary Interest:
- Metal Detecting
I had initially posted this on "Today's Finds" but I had a few folks ask about the methods I used so I'll post them here. I have to start by saying the obvious: DO NOT clean your coins unless you want to decimate their numismatic value! Yes, the coin I cleaned in this post is a semi-key date. But for me, since I will never sell it I wanted an aesthetically pleasing coin for my collection rather than an ugly, crud covered disk that was almost unrecognizable as a coin.
Also, an artificially toned / tarnished coin should NEVER be passed off or represented as a naturally toned coin. It is not only unethical but can be unlawful if it's fraudulently represented. Plus anyone with any minor knowledge of coins will be able to quicky tell that a coin is cleaned and re-toned. This method should only be used on a coin that you are keeping in your collection that you want to make better looking.
Now that I got that out if the way, this is a 1896-S Barber dime that I dug from the site of where a hotel stood at the turn of the century. Unfortunately I gouged the obverse of the coin when chipping the hard ground out from around it.
The entire coin was covered in a black crud. For this reason I decided to clean it. I didn't take a picture of it before I started the cleaning process, but this is what it looked like after I had started. The black around the edges had covered the whole coin.
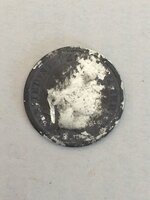
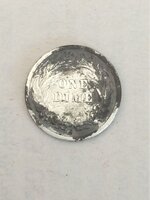
I cleaned it by placing a piece of aluminum foil in a glass bowl. I placed the coin in top of the foil and put some baking soda on top of the coin. Then I poured boiling water on it which results in a chemical reaction that causes it to fizz up. I let the coin soak in this for about five minutes. Once the coin was removed, I rubbed it with a bit of baking soda to get the now loosened crud off. I had to repeat this procedure 4 times to get the coin completely clean.
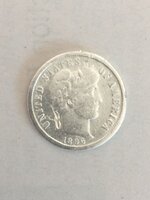
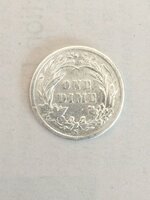
At this point the coin was a bit too shiny for my liking. I wanted a more natural look to it, so I decided to artificially tone it to help bring out lettering and raised portions of the coin. I accomplished this by using an egg. The sulphur in an egg will darken silver.
I boiled and egg for 10 minutes and took it directly from the water and put it in a ziplock bag. I then crushed the egg, shell and all, in the bag. Using a small piece of paper towel, I wrapped the coin and placed it in the bag ensuring that it wasn't touching the egg. I zipped the bag closed and left it for about an hour and a half. This is what it looked like when I removed it from the bag.
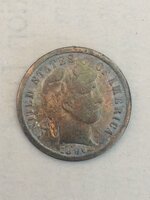
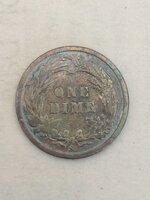
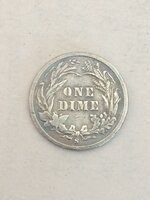
At this point I sprinkled just a pinch of baking soda on each side of the coin and VERY lightly rubbed until I got the desired color. This was the end result which I am happy with.
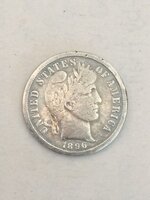
Also, an artificially toned / tarnished coin should NEVER be passed off or represented as a naturally toned coin. It is not only unethical but can be unlawful if it's fraudulently represented. Plus anyone with any minor knowledge of coins will be able to quicky tell that a coin is cleaned and re-toned. This method should only be used on a coin that you are keeping in your collection that you want to make better looking.
Now that I got that out if the way, this is a 1896-S Barber dime that I dug from the site of where a hotel stood at the turn of the century. Unfortunately I gouged the obverse of the coin when chipping the hard ground out from around it.
The entire coin was covered in a black crud. For this reason I decided to clean it. I didn't take a picture of it before I started the cleaning process, but this is what it looked like after I had started. The black around the edges had covered the whole coin.


I cleaned it by placing a piece of aluminum foil in a glass bowl. I placed the coin in top of the foil and put some baking soda on top of the coin. Then I poured boiling water on it which results in a chemical reaction that causes it to fizz up. I let the coin soak in this for about five minutes. Once the coin was removed, I rubbed it with a bit of baking soda to get the now loosened crud off. I had to repeat this procedure 4 times to get the coin completely clean.


At this point the coin was a bit too shiny for my liking. I wanted a more natural look to it, so I decided to artificially tone it to help bring out lettering and raised portions of the coin. I accomplished this by using an egg. The sulphur in an egg will darken silver.
I boiled and egg for 10 minutes and took it directly from the water and put it in a ziplock bag. I then crushed the egg, shell and all, in the bag. Using a small piece of paper towel, I wrapped the coin and placed it in the bag ensuring that it wasn't touching the egg. I zipped the bag closed and left it for about an hour and a half. This is what it looked like when I removed it from the bag.


At this point I sprinkled just a pinch of baking soda on each side of the coin and VERY lightly rubbed until I got the desired color. This was the end result which I am happy with.


Amazon Forum Fav 👍
Last edited:


