You are using an out of date browser. It may not display this or other websites correctly.
You should upgrade or use an alternative browser.
You should upgrade or use an alternative browser.
Garrett ATX Bags a Couple Nuggets
- Thread starter Steve Herschbach
- Start date
DDancer
Bronze Member
- Joined
- Mar 25, 2014
- Messages
- 2,339
- Reaction score
- 2,003
- Golden Thread
- 0
- Location
- Traveling US to work
- Detector(s) used
- Current Equinox 600
Past Whites DFX Garret GTI 2500 and others
Prospecting Minelab GPZ 7000
Past SD 2100 GP 3000 (retired)
- Primary Interest:
- All Treasure Hunting
Nice Bag on those nuggets ") Always good to see desert gold. Thanks.
Always good to see desert gold. Thanks.
Always good to see desert gold. Thanks.- Joined
- May 28, 2010
- Messages
- 20,479
- Reaction score
- 32,674
- Golden Thread
- 1
- Location
- White Plains, New York
- 🥇 Banner finds
- 1
- 🏆 Honorable Mentions:
- 1
- Detector(s) used
- Nokta Makro Legend// Pulsedive// Minelab GPZ 7000// Vanquish 540// Minelab Pro Find 35// Dune Kraken Sandscoop// Grave Digger Tools Tombstone shovel & Sidekick digger// Bunk's Hermit Pick
- Primary Interest:
- Metal Detecting
Great finds - Congrats! 
goldchaser3
Jr. Member
Very nice! Congratulations!
Jim Hemmingway
Hero Member
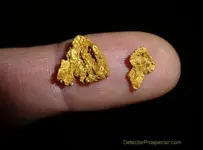
I have been too busy as of late but managed to get out a few hours Saturday with the ATX and put a couple nuggets in the vial. 1.48 grams and 0.45 grams.
Steve… quite enjoyed reading on the other forum about you and Chris heading off for an afternoon’s hunt. I couldn't help but think that both those character nuggets were strikingly handsome, so golden, and of course… the black background to the photograph really does show them to advantage. I’ve never appreciated that you have an artistic acuity... but it must be so.
In the photo below I’ve tried to emulate your idea, but obviously I have no creativity in that regard. Mind you... I've never been able to do much with that piece, it just won't take a good photo under yellow incandescent lighting. In any event... congratulations on the nuggets, a few hours out hunting with Chris is so much better than any alternatives that come to mind.
Jim.
.webp")
Hard Prospector
Hero Member
Steve… quite enjoyed reading on the other forum about you and Chris heading off for an afternoon’s hunt. I couldn't help but think that both those character nuggets were strikingly handsome, so golden, and of course… the black background to the photograph really does show them to advantage. I’ve never appreciated that you have an artistic acuity... but it must be so.
In the photo below I’ve tried to emulate your idea, but obviously I have no creativity in that regard. Mind you... I've never been able to do much with that piece, it just won't take a good photo under yellow incandescent lighting. In any event... congratulations on the nuggets, a few hours out hunting with Chris is so much better than any alternatives that come to mind.
Jim.
That 1.9lbs silver nugget would look good right on my coffee table....Beautiful piece Jim
GoldenNerd
Jr. Member
- Joined
- Apr 25, 2014
- Messages
- 24
- Reaction score
- 7
- Golden Thread
- 0
- Primary Interest:
- All Treasure Hunting
To get the shine you really have to hit it hard and directly to bring out the specular highlights. Your picture has too "broad" of a light (which is usually good for portraits but the spill is killing the speculars.)
You need a couple tiny, hard light sources. Paint the inside of a large box black, with a cutout for the camera. Mount the camera in the cutout and seal against light pollution. Take it outside on a bright, sunny day.
Now the hard part. Take a deep breath and prepare a large bucket of patience (and a few beers.)
Try to poke small holes in the box so that incoming light shafts fall onto the subject. Do not let any fall onto the background. Use electrical tape to cover up mistakes and re-poke. Keep doing this until you get the sparkle you're looking for.
If you need to, use black straws (or straws covered with electrical tape) about 1/4" long to flag the incoming light shafts to keep them narrow and hard (so they don't spread out into a cone too much before they hit the subject.) You could also poke the straws into/through the box itself to help align the incoming light.
Try different positions of the subject, and angles. You'll know you've got it when that thing lights up against the inky-blackness of the box. In the photos you won't see that the lighting is coming in from a whole bunch of small holes, just that your stone is sparkling like ma in the darkness. Bonus points if you can shoot it RAW to play with the white balance later in post.
Jim Hemmingway
Hero Member
Thanks GoldenNerd for the above suggestions... I understand the principle and think it could make for quite an improvement. Glad you took some time and posted your thoughts on the matter. 
Normally, shooting outside is my preference and the results are usually good enough for posting here. After years of using manual settings and various backgrounds with questionable results, nowadays I place the sample on some firewood for a neutral background, use the auto setting... and am generally happier with the more consistent results. The photo below of slabbed high-grade silver, courtesy of Dr. Jim Eckert, Northeastern Ontario, is what influenced me to try firewood a few years ago. There is no eyestrain. I think a black background would also work for that particular shot, but feel it would increase eyestrain.
There are always samples that just won't take a representative photo using my methods, and that piece above is a good example… although that’s about the best I’ve managed to date. So thanks again GoldenNerd… we'll give your ideas the old college try and see what happens.
Jim.
goldchaser3
Jr. Member
Thanks GoldenNerd. That sounds cool. Do you have any pics you could share, as examples? Not the box, but of objects in your box.
AzViper
Bronze Member
- Joined
- Sep 30, 2012
- Messages
- 2,038
- Reaction score
- 2,251
- Golden Thread
- 0
- Detector(s) used
- Fisher Gold Bug Pro, Nokta FORS Gold, Garrett ATX, Sun Ray Gold Pro Headphones, Royal Pick, Etc.
- Primary Interest:
- Prospecting
Steve… quite enjoyed reading on the other forum about you and Chris heading off for an afternoon’s hunt. I couldn't help but think that both those character nuggets were strikingly handsome, so golden, and of course… the black background to the photograph really does show them to advantage. I’ve never appreciated that you have an artistic acuity... but it must be so.
In the photo below I’ve tried to emulate your idea, but obviously I have no creativity in that regard. Mind you... I've never been able to do much with that piece, it just won't take a good photo under yellow incandescent lighting. In any event... congratulations on the nuggets, a few hours out hunting with Chris is so much better than any alternatives that come to mind.
Jim.
Jim you need to build yourself a light box or buy one of the collapsible light boxes. Light boxes work great as you need soft light and there are many ways to direct the light to get the desired lighting on the subject. A light box can be a simple PVC frame and using a white sheet with lights. Click on the link
Light Box
Last edited:
Jim Hemmingway
Hero Member
Thanks AZ... that site is really impressive. There are many options to put different types of light on the subject. I'm intrigued by the use of soft lighting, will have to try it and see how things turn out. Needless to say I've bookmarked that site for future reference.
It is a fact that my current practices of photographing smaller specimens can occasionally make them look better than the reality. I've seen a lot of that sort of thing on various sites with silver for sale. But for the most part my photos... especially on the larger stuff... don't do the samples justice. I’d like to address that shortcoming, such that photos reflect what actually exists.
I’ve also learned that the same piece… regardless of size or shape… can look quite different depending on the angle of the shot, the lighting, camera settings etc. The silver often is light and silvery… not that much different from the background calcite / dolomite to the camera… or it can be covered in a micron-thin layer of gray or black silver sulfides, sulfosalts, or whatever else might be present in the ores. Depending on how the shot is taken, you can lose sight of lighter silver, or unrealistically emphasize the darker silver. The first two shots below of the same piece illustrate this fairly well. The first shot is incandescent lighting, the second is an outdoors cloudy day shot that… I think you’ll agree… looks quite different. There is no shine evident in the second shot.
.webp")
.webp")
This is just one reason why I wouldn’t sell silver based on internet photos. People could easily be disappointed, or conversely… it’s almost impossible to reproduce an attractive sample with a perfectly representative photo. That especially applies to elongated pieces… impossible to get close enough to show realistic detail.
By comparison, the third shot below is a good example of a handsome larger silver ore I’ve been working on lately. Just removed an additional half-lb of surface calcite with a selective HCl bath… unfortunately there’s been a net loss of visible surface silver, but I judge the overall result to be an improvement. Acid baths are a risky business that I generally prefer to avoid. This piece takes a good photo under direct incandescent light…that frankly… only matters to me in the winter when I can’t get outside. But regardless whether it’s an inside or outside specimen shot… I never really know what to expect until I see the result. For most samples, both techniques leave a lot of room for improvement.
Jim.

It is a fact that my current practices of photographing smaller specimens can occasionally make them look better than the reality. I've seen a lot of that sort of thing on various sites with silver for sale. But for the most part my photos... especially on the larger stuff... don't do the samples justice. I’d like to address that shortcoming, such that photos reflect what actually exists.
I’ve also learned that the same piece… regardless of size or shape… can look quite different depending on the angle of the shot, the lighting, camera settings etc. The silver often is light and silvery… not that much different from the background calcite / dolomite to the camera… or it can be covered in a micron-thin layer of gray or black silver sulfides, sulfosalts, or whatever else might be present in the ores. Depending on how the shot is taken, you can lose sight of lighter silver, or unrealistically emphasize the darker silver. The first two shots below of the same piece illustrate this fairly well. The first shot is incandescent lighting, the second is an outdoors cloudy day shot that… I think you’ll agree… looks quite different. There is no shine evident in the second shot.
This is just one reason why I wouldn’t sell silver based on internet photos. People could easily be disappointed, or conversely… it’s almost impossible to reproduce an attractive sample with a perfectly representative photo. That especially applies to elongated pieces… impossible to get close enough to show realistic detail.
By comparison, the third shot below is a good example of a handsome larger silver ore I’ve been working on lately. Just removed an additional half-lb of surface calcite with a selective HCl bath… unfortunately there’s been a net loss of visible surface silver, but I judge the overall result to be an improvement. Acid baths are a risky business that I generally prefer to avoid. This piece takes a good photo under direct incandescent light…that frankly… only matters to me in the winter when I can’t get outside. But regardless whether it’s an inside or outside specimen shot… I never really know what to expect until I see the result. For most samples, both techniques leave a lot of room for improvement.
Jim.
AzViper
Bronze Member
- Joined
- Sep 30, 2012
- Messages
- 2,038
- Reaction score
- 2,251
- Golden Thread
- 0
- Detector(s) used
- Fisher Gold Bug Pro, Nokta FORS Gold, Garrett ATX, Sun Ray Gold Pro Headphones, Royal Pick, Etc.
- Primary Interest:
- Prospecting
Thanks AZ... that site is really impressive. There are many options to put different types of light on the subject. I'm intrigued by the use of soft lighting, will have to try it and see how things turn out. Needless to say I've bookmarked that site for future reference.
It is a fact that my current practices of photographing smaller specimens can occasionally make them look better than the reality. I've seen a lot of that sort of thing on various sites with silver for sale. But for the most part my photos... especially on the larger stuff... don't do the samples justice. I’d like to address that shortcoming, such that photos reflect what actually exists.
I’ve also learned that the same piece… regardless of size or shape… can look quite different depending on the angle of the shot, the lighting, camera settings etc. The silver often is light and silvery… not that much different from the background calcite / dolomite to the camera… or it can be covered in a micron-thin layer of gray or black silver sulfides, sulfosalts, or whatever else might be present in the ores. Depending on how the shot is taken, you can lose sight of lighter silver, or unrealistically emphasize the darker silver. The first two shots below of the same piece illustrate this fairly well. The first shot is incandescent lighting, the second is an outdoors cloudy day shot that… I think you’ll agree… looks quite different. There is no shine evident in the second shot.
This is just one reason why I wouldn’t sell silver based on internet photos. People could easily be disappointed, or conversely… it’s almost impossible to reproduce an attractive sample with a perfectly representative photo. That especially applies to elongated pieces… impossible to get close enough to show realistic detail.
By comparison, the third shot below is a good example of a handsome larger silver ore I’ve been working on lately. Just removed an additional half-lb of surface calcite with a selective HCl bath… unfortunately there’s been a net loss of visible surface silver, but I judge the overall result to be an improvement. Acid baths are a risky business that I generally prefer to avoid. This piece takes a good photo under direct incandescent light…that frankly… only matters to me in the winter when I can’t get outside. But regardless whether it’s an inside or outside specimen shot… I never really know what to expect until I see the result. For most samples, both techniques leave a lot of room for improvement.
Jim.
Jim your photos will benefit from the use of a light box. Years ago I had a photography business. Still have all my Hasselblad gear even though its all film based but there is not a better camera made or lenses. With digital you can see the results on the fly in positioning the lighting on the subject.
Jim Hemmingway
Hero Member
AZ... I used to do weddings, plus a lot of wildlife and underwater photography (in a waterproof housing that permitted adjustments to both the aperture and exposure... focus was always preset for underwater shots) in past years using my trusty old Minolta SLR completely manual film camera. I seem to recollect the Hasselblad had a much larger negative size... I think my former boss used one for his studio work. You obviously know your business, I'm especially pleased to learn this background information about you and for your helpful expertise. We just never know what hidden talents exist with our associates on this forum... thanks very much. I'll take your input far more seriously...
Jim.
Jim.
AzViper
Bronze Member
- Joined
- Sep 30, 2012
- Messages
- 2,038
- Reaction score
- 2,251
- Golden Thread
- 0
- Detector(s) used
- Fisher Gold Bug Pro, Nokta FORS Gold, Garrett ATX, Sun Ray Gold Pro Headphones, Royal Pick, Etc.
- Primary Interest:
- Prospecting
AZ... I used to do weddings, plus a lot of wildlife and underwater photography (in a waterproof housing that permitted adjustments to both the aperture and exposure... focus was always preset for underwater shots) in past years using my trusty old Minolta SLR completely manual film camera. I seem to recollect the Hasselblad had a much larger negative size... I think my former boss used one for his studio work. You obviously know your business, I'm especially pleased to learn this background information about you and for your helpful expertise. We just never know what hidden talents exist with our associates on this forum... thanks very much. I'll take your input far more seriously...
Jim.
Jim been there done that with weddings, I once got a call from some gal at 8AM asking if I could do her wedding, I said when, "She said at noon" I had a wedding at 5PM. Two weddings in one day brought the end of my wedding photography. Yes the Hasselblads are 2.250" x 2.250" square negative. I can buy a digital back for the Hasselblads but I do not want to spend $18,000.00 for a 50 Mega Pixel digital back, but the images are extraordinary for studio or outdoor. You can purchase on of these popup photography boxes for under $40.00. Some of these have a zipper front with just an opening for the lens to poke through. Different colored backgrounds attach with Velcro.


Last edited:
Similar threads
- Replies
- 21
- Views
- 1K
Users who are viewing this thread
Total: 1 (members: 0, guests: 1)

Latest Discussions
-
-

-

-
 Naturallly Occuring Formation OR Manmade Treasure Marker/Sign?
- Latest: Crosse De Sign
-
