mastereagle22
Silver Member
- Joined
- May 15, 2007
- Messages
- 4,909
- Reaction score
- 31
- Golden Thread
- 0
- Location
- Southeast Missouri
- Detector(s) used
- E-trac, Explorer II, Xterra30, Whites Prizm IV
- #1
Thread Owner
Well I finally got the Kydex and got my nerve up to experiment.
Now let me say a few things here first:
1. I am not an artisan or a craftsman.
2. I have two left thumbs.
3. I have a minimal tool set with which to work.
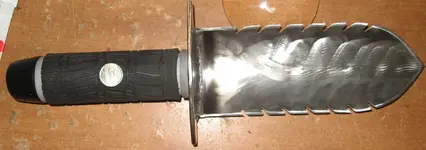
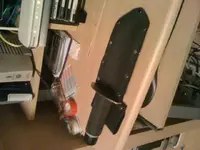
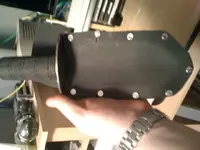
Here are some picutres I took of the finished product.
It might not look like much, it took me an hour of labor to achieve what you see here and I learned some tricks working with the Kydex. While I am not saying I have the best looking finished product it works and it protects the blade, also it makes it easy to cary. I did drill a few extra holes in the back at the very bottom to allow water to drain out and left one hole to fill with something decorative I'm working on.
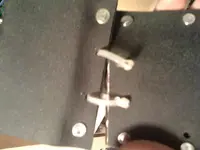
The zip/cable ties are for proof of concept only. I'm trying to figure out a way to mount the belt loop to the Kydex sheath (first lesson learned should have made the belt loop first and mounted it before shaping the Kydex.
Anyway I will gladly answer any questions you may have.
After being asked for the steps I took by numerous people I will post them here.
1. Cut Kydex sheet into two equal pieces.
2. Cut 1 half of kydex sheet for front of blade making sure to leave approx 1.5 - 2 inches extra material (material shrinks a little when heated)
This is where I messed up and would do it differently if I could go back
3. Heat the back piece of kydex bending a belt loop into the material and drill holes and rivet.
4. Take the two pieces of kydex and rivet them at the bottom of the sheath.
5. Heat the kydex using heat gun or toaster oven, I prefer the heat gun method.
6. Place blade inside the heated material and use whatever you are going to use for a press and hold until Kydex cools.
I used a really flimsy car window heat blocker for my press material and my hands. As you can see it turned out pretty good and I was happy with the results.
7. Drill the kydex and place the rivets. WARNING WARNING WARNING be very careful where you place the rivets. After I tightened my rivets up good I could NOT pull the blade out very easily. I will reheat the Kydex and reshape it a little to eliminate that problem.
8. Once you have it riveted, use a band saw or jig saw and remove excess material.
9. Use a piece of sandpaper, grinder, dremel to to finish up the edges . You SHOULD wear a mask when doing this as this stuff can be very nasty and you need to protect your lungs.
Now let me say a few things here first:
1. I am not an artisan or a craftsman.
2. I have two left thumbs.
3. I have a minimal tool set with which to work.
Here are some picutres I took of the finished product.
It might not look like much, it took me an hour of labor to achieve what you see here and I learned some tricks working with the Kydex. While I am not saying I have the best looking finished product it works and it protects the blade, also it makes it easy to cary. I did drill a few extra holes in the back at the very bottom to allow water to drain out and left one hole to fill with something decorative I'm working on.
The zip/cable ties are for proof of concept only. I'm trying to figure out a way to mount the belt loop to the Kydex sheath (first lesson learned should have made the belt loop first and mounted it before shaping the Kydex.
Anyway I will gladly answer any questions you may have.
After being asked for the steps I took by numerous people I will post them here.
1. Cut Kydex sheet into two equal pieces.
2. Cut 1 half of kydex sheet for front of blade making sure to leave approx 1.5 - 2 inches extra material (material shrinks a little when heated)
This is where I messed up and would do it differently if I could go back
3. Heat the back piece of kydex bending a belt loop into the material and drill holes and rivet.
4. Take the two pieces of kydex and rivet them at the bottom of the sheath.
5. Heat the kydex using heat gun or toaster oven, I prefer the heat gun method.
6. Place blade inside the heated material and use whatever you are going to use for a press and hold until Kydex cools.
I used a really flimsy car window heat blocker for my press material and my hands. As you can see it turned out pretty good and I was happy with the results.
7. Drill the kydex and place the rivets. WARNING WARNING WARNING be very careful where you place the rivets. After I tightened my rivets up good I could NOT pull the blade out very easily. I will reheat the Kydex and reshape it a little to eliminate that problem.
8. Once you have it riveted, use a band saw or jig saw and remove excess material.
9. Use a piece of sandpaper, grinder, dremel to to finish up the edges . You SHOULD wear a mask when doing this as this stuff can be very nasty and you need to protect your lungs.


 in camo and different colors even?! I can see I am going to have to find out more about this! I would love to have a sheath for mine! Somehow I doubt it comes in pink and purple camo with sparkles but I am sure I could come up with something...even camo would be neat! lol