Ricardo_NY1
Bronze Member
- #1
Thread Owner
Parts Used.........
Radio Shack Goldseries Volume Control Model #42-2559
Radioshack Goldseries Headphone Extension Cord Model #42-2560
Black Electrical Tape
Cost $21.22
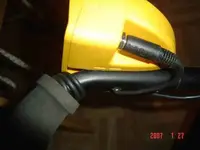
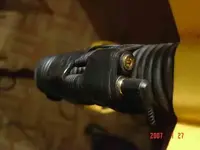
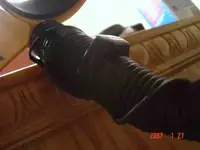
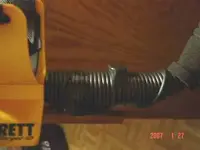
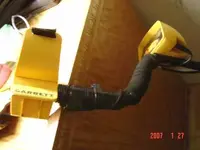
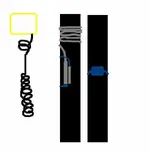
I recently got myself a set of Sony Headphones, unfortunately, no volume control. The 250 is loud and I've been thinking of a simple solution. While at it, I might as well think of something to move the audio plug to the back, where it is really better off. I could've drilled a few holes into the tube, even shortened the length of the extension cord, but instead decided to wind it around the tube. Anyhow, this is how I did it, Remove the foam grip from the tube completely and connect the extension cord's plug to the console as shown in the first photo. Give it 2-3 winds in the area right before where the foam grip begins. Pass the rest of the cord through the foam grip and carefully insert the foam grip into the tube. This will be a little tougher than normal, as there is now the extra friction of the cord. Once the foam grip is back in position, start winding the cord carefully. You'll have enough cord to reach the elbow rest and back to the foam grip, so you will have two layers of the cord wrapped around this part of the tube. When you have about 5 inches left, position the audio input as shown in the photos and wrap a few turns of electrical tape around it. Place the volume control's audio input side to side with the extension cable's audio input and wrap a couple more turns around both inputs. Bring the volume control's cable around and over the tube and connect the plug to the extension cable. Hold the volume control knob in place on the opposite side of the tube with some more wraps of electrical tape. You'll probably come up with a different configuration than mine............the bottom line here is that this holds up very well, looks neater in person that the photos, and can be taken apart in a snap if desired without f*&*'ing with the detector itself. It works as it should and the input in the back works alot better in not getting tangled up. Field tested it today. Feel free to suggest or comment.
Radio Shack Goldseries Volume Control Model #42-2559
Radioshack Goldseries Headphone Extension Cord Model #42-2560
Black Electrical Tape
Cost $21.22
I recently got myself a set of Sony Headphones, unfortunately, no volume control. The 250 is loud and I've been thinking of a simple solution. While at it, I might as well think of something to move the audio plug to the back, where it is really better off. I could've drilled a few holes into the tube, even shortened the length of the extension cord, but instead decided to wind it around the tube. Anyhow, this is how I did it, Remove the foam grip from the tube completely and connect the extension cord's plug to the console as shown in the first photo. Give it 2-3 winds in the area right before where the foam grip begins. Pass the rest of the cord through the foam grip and carefully insert the foam grip into the tube. This will be a little tougher than normal, as there is now the extra friction of the cord. Once the foam grip is back in position, start winding the cord carefully. You'll have enough cord to reach the elbow rest and back to the foam grip, so you will have two layers of the cord wrapped around this part of the tube. When you have about 5 inches left, position the audio input as shown in the photos and wrap a few turns of electrical tape around it. Place the volume control's audio input side to side with the extension cable's audio input and wrap a couple more turns around both inputs. Bring the volume control's cable around and over the tube and connect the plug to the extension cable. Hold the volume control knob in place on the opposite side of the tube with some more wraps of electrical tape. You'll probably come up with a different configuration than mine............the bottom line here is that this holds up very well, looks neater in person that the photos, and can be taken apart in a snap if desired without f*&*'ing with the detector itself. It works as it should and the input in the back works alot better in not getting tangled up. Field tested it today. Feel free to suggest or comment.