How to Clean Buttons

RPG

Bronze Member
Jan 10, 2009
2,204
92
Alabama
Detector(s) used
Silver Umax, Compadre, Vaquero
OK guys. I need a little help here.

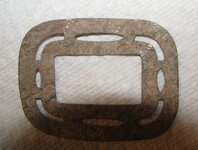
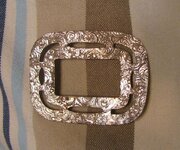
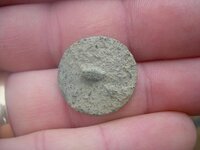
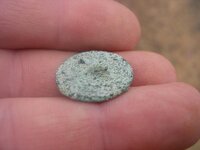
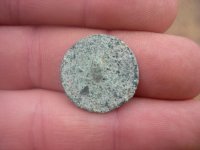
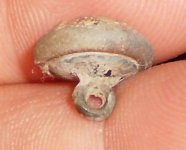
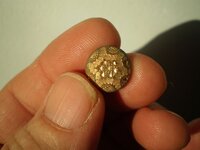
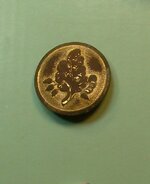
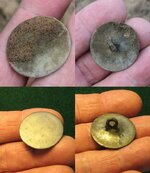
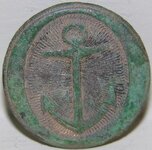
I found this button in the hay field last weekend quite a ways from the homesite. It was in a place that stays very wet during the winter and very dry during the summer and very deep. The dirt is like concrete on it. Toothpick wore down to a nub and didn't even scratch the crud. Today I boiled it in peroxide for four hours hoping to see a backmark. The first pic is before and the last two are after the peroxide. As you can see, there is still a lot of the concrete like stuff still on it. should I keep boiling it or is it a lost cause that I should just leave as is? I'm pretty sure it's brass as the front has a dark green patina. It also looks like it is cast. What do you think? :help:
 

Attachments

  • buttoncleaning 003.JPG
    buttoncleaning 003.JPG
    52.7 KB · Views: 1,844
  • buttoncleaning 006.JPG
    buttoncleaning 006.JPG
    40.4 KB · Views: 1,840
  • buttoncleaning 005.JPG
    buttoncleaning 005.JPG
    50.3 KB · Views: 1,835

Iron Patch

Gold Member
Sep 28, 2007
19,254
8,730
Dirtyville
🥇 Banner finds
3
Detector(s) used
Deus
Primary Interest:
All Treasure Hunting
Sent you a message. That sure is a crusty one! Reminds me of a copper I've had for several years which I planned to slowly clean, but never got started on it.
 

OP
OP
BuckleBoy

BuckleBoy

Gold Member
Jun 12, 2006
18,124
9,688
Moonlight and Magnolias
🥇 Banner finds
4
🏆 Honorable Mentions:
2
Detector(s) used
Fisher F75, Whites DualField PI, Fisher 1266-X and Tesoro Silver uMax
Primary Interest:
All Treasure Hunting
RPG,

To be honest, I have no experience with a button this encased. In the past when I have found buttons with concretions on them, there was a chink in their armor, so to speak. And I was able to get in under and pick off the crud after some hard work. So my advice is this: if the front is partly exposed, start there, and work your way around the edges to the back. You might also want to try boiling then cooling in an icy bath immediately, back and forth several times to see if the crud will loosen. Then right after the last ice cold bath, try tapping it with a cutlery handle to see if any of it will chip off. There is no risk to the shank at this point since it appears to be broken off.

Keep me posted on how the cleaning is going.


Regards,


Buckles
 

West Jersey Detecting

Gold Member
Oct 23, 2006
5,241
1,058
Philadelphia Area
🥇 Banner finds
1
🏆 Honorable Mentions:
1
Detector(s) used
Nokta Legend, Excalibur 1000/II (hybrid) , Teknetics T2 SE
Primary Interest:
Other
I dug this early civilian two piece button today. The aluminum jelly worked like magic!

The photos do not do this one justice! It looks much better in person.
 

Attachments

  • P3270001_01.JPG
    P3270001_01.JPG
    19 KB · Views: 1,671
  • P3280001.JPG
    P3280001.JPG
    47.9 KB · Views: 1,687
OP
OP
BuckleBoy

BuckleBoy

Gold Member
Jun 12, 2006
18,124
9,688
Moonlight and Magnolias
🥇 Banner finds
4
🏆 Honorable Mentions:
2
Detector(s) used
Fisher F75, Whites DualField PI, Fisher 1266-X and Tesoro Silver uMax
Primary Interest:
All Treasure Hunting
Neil in West Jersey said:
I dug this early civilian two piece button today. The aluminum jelly worked like magic!

The photos do not do this one justice! It looks much better in person.

That's a beauty of a button. Well done! I have a cool flower button and two gold plated wedding bands to add to this thread. Also aluminum jelly jobs...


-Buckles
 

OP
OP
BuckleBoy

BuckleBoy

Gold Member
Jun 12, 2006
18,124
9,688
Moonlight and Magnolias
🥇 Banner finds
4
🏆 Honorable Mentions:
2
Detector(s) used
Fisher F75, Whites DualField PI, Fisher 1266-X and Tesoro Silver uMax
Primary Interest:
All Treasure Hunting
Here's another before/after. Aluminum Jelly and some patient, slow work:


6.jpg


6.jpg


Best Wishes,


Buckles
 

Attachments

  • 7.jpg
    7.jpg
    57.2 KB · Views: 1,570

West Jersey Detecting

Gold Member
Oct 23, 2006
5,241
1,058
Philadelphia Area
🥇 Banner finds
1
🏆 Honorable Mentions:
1
Detector(s) used
Nokta Legend, Excalibur 1000/II (hybrid) , Teknetics T2 SE
Primary Interest:
Other
Another beauty of a button!.

It recently occurred to me that many more buttons still have gilt than you would think. I know try aluminum jelly on nearly every decent button I dig. I wonder how many of the thousands found that I may have ruined with peroxide over the years. :'(
 

Don in SJ

Silver Member
May 20, 2005
4,931
832
Detector(s) used
MINELAB SE Pro
Primary Interest:
All Treasure Hunting
Neil in West Jersey said:
Another beauty of a button!.

It recently occurred to me that many more buttons still have gilt than you would think. I know try aluminum jelly on nearly every decent button I dig. I wonder how many of the thousands found that I may have ruined with peroxide over the years. :'(

Have no idea what you are talking about peroxide ruining a gilt button, it works great on gilt buttons............................

The only buttons you should not try peroxide on are the fragile, disintegrating pewter buttons, solid ones can be done in peroxide if you are careful and know what you are doing.

Don
 

Attachments

  • 34mmbuttonbeforeafter.jpg
    34mmbuttonbeforeafter.jpg
    162.8 KB · Views: 1,576
  • TombacBefAft.jpg
    TombacBefAft.jpg
    58.9 KB · Views: 1,545
  • Irisbutton.gif
    Irisbutton.gif
    32.5 KB · Views: 1,824
  • 34mmbuttonbeforeafter.jpg
    34mmbuttonbeforeafter.jpg
    162.8 KB · Views: 1,578
  • Irisbutton.gif
    Irisbutton.gif
    32.5 KB · Views: 1,836
  • TombacBefAft.jpg
    TombacBefAft.jpg
    58.9 KB · Views: 1,559

Iron Patch

Gold Member
Sep 28, 2007
19,254
8,730
Dirtyville
🥇 Banner finds
3
Detector(s) used
Deus
Primary Interest:
All Treasure Hunting
Neil in West Jersey said:
Another beauty of a button!.

It recently occurred to me that many more buttons still have gilt than you would think. I know try aluminum jelly on nearly every decent button I dig. I wonder how many of the thousands found that I may have ruined with peroxide over the years. :'(


Peroxide is actually the safe way to test for gilt because if there's none, you can pop it out and keep the green patina. That was exactly the case when the Patriot was here and dug this 1700s Navy... it was impossible to tell if there was any gilt left, or how much, and if I had gone straight to something like the jelly you would now be looking at a dark ugly button with only traces of gilt. It's the jelly that's the risk not peroxide!
 

Attachments

  • Anchor.jpg
    Anchor.jpg
    32.1 KB · Views: 1,958
OP
OP
BuckleBoy

BuckleBoy

Gold Member
Jun 12, 2006
18,124
9,688
Moonlight and Magnolias
🥇 Banner finds
4
🏆 Honorable Mentions:
2
Detector(s) used
Fisher F75, Whites DualField PI, Fisher 1266-X and Tesoro Silver uMax
Primary Interest:
All Treasure Hunting
I agree with IP and Don. If the button is not one where I have to see the backmark to determine if it is CW era or not, valuable or not, I use peroxide to remove the dirt and get to the gilding, and then aluminum jelly to brighten that gilding. I still try not to dip my 2 pieces in anything liquid if they are compromised or torn by the plow. So a combination of both methods works well. If the backmark is something that I have to see to learn about the button, I still use aluminum jelly first, then after the back is dry I toothpick the back.

Regards,


Buckles
 

West Jersey Detecting

Gold Member
Oct 23, 2006
5,241
1,058
Philadelphia Area
🥇 Banner finds
1
🏆 Honorable Mentions:
1
Detector(s) used
Nokta Legend, Excalibur 1000/II (hybrid) , Teknetics T2 SE
Primary Interest:
Other
BuckleBoy said:
I agree with IP and Don. If the button is not one where I have to see the backmark to determine if it is CW era or not, valuable or not, I use peroxide to remove the dirt and get to the gilding, and then aluminum jelly to brighten that gilding. I still try not to dip my 2 pieces in anything liquid if they are compromised or torn by the plow. So a combination of both methods works well. If the backmark is something that I have to see to learn about the button, I still use aluminum jelly first, then after the back is dry I toothpick the back.

Regards,


Buckles

Thanks for the tips guys! I guess I have just gotten lucky lately, finding buttons with gilt left. I found very few in the past.

On another note, I tried to clean this CW Scovill Navy button that I found on Saturday. The dirt is like concrete on this one. Do you think I am better off leaving it as is, or would repeat treatments of aluminum help?
P4250004.JPG
 

Iron Patch

Gold Member
Sep 28, 2007
19,254
8,730
Dirtyville
🥇 Banner finds
3
Detector(s) used
Deus
Primary Interest:
All Treasure Hunting
Neil in West Jersey said:
BuckleBoy said:
I agree with IP and Don. If the button is not one where I have to see the backmark to determine if it is CW era or not, valuable or not, I use peroxide to remove the dirt and get to the gilding, and then aluminum jelly to brighten that gilding. I still try not to dip my 2 pieces in anything liquid if they are compromised or torn by the plow. So a combination of both methods works well. If the backmark is something that I have to see to learn about the button, I still use aluminum jelly first, then after the back is dry I toothpick the back.

Regards,


Buckles

Thanks for the tips guys! I guess I have just gotten lucky lately, finding buttons with gilt left. I found very few in the past.

On another note, I tried to clean this CW Scovill Navy button that I found on Saturday. The dirt is like concrete on this one. Do you think I am better off leaving it as is, or would repeat treatments of aluminum help?
P4250004.JPG


Lemon juice will cut through the crud pretty good. I might do some of the work with peroxide first just to cut down the soak time... but it does look like it has lots of gilt so should be fine. That's one I would definitely clean.
 

OP
OP
BuckleBoy

BuckleBoy

Gold Member
Jun 12, 2006
18,124
9,688
Moonlight and Magnolias
🥇 Banner finds
4
🏆 Honorable Mentions:
2
Detector(s) used
Fisher F75, Whites DualField PI, Fisher 1266-X and Tesoro Silver uMax
Primary Interest:
All Treasure Hunting
I would clean that one as well--and IP is on the right track. It will take some soaking to loosen the crud, and some gentle persistence. Lemon juice is a possibility. Make sure you check on it frequently if you leave it in. But the gilding looks intact, so it should clean up just fine.

-Buckles
 

West Jersey Detecting

Gold Member
Oct 23, 2006
5,241
1,058
Philadelphia Area
🥇 Banner finds
1
🏆 Honorable Mentions:
1
Detector(s) used
Nokta Legend, Excalibur 1000/II (hybrid) , Teknetics T2 SE
Primary Interest:
Other
Here is another beauty; a flat button cleaned using the toothpick method. A good example of the cleaning on a great early 1800's back mark!

P5040001a.JPG
 

OP
OP
BuckleBoy

BuckleBoy

Gold Member
Jun 12, 2006
18,124
9,688
Moonlight and Magnolias
🥇 Banner finds
4
🏆 Honorable Mentions:
2
Detector(s) used
Fisher F75, Whites DualField PI, Fisher 1266-X and Tesoro Silver uMax
Primary Interest:
All Treasure Hunting
Neil in West Jersey said:
Here is another beauty; a flat button cleaned using the toothpick method. A good example of the cleaning on a great early 1800's back mark!

P5040001a.JPG

Great photo of that backmark, and an excellent job toothpicking that button! We'd gotten on a bit of an aluminum jelly kick recently, and it's nice to see a good toothpicked example posted. That backmark would be faint or even impossible to see if you'd used water on it. Nice work!

Toothpicking works on just about anything that is brass with a design on it. I even used it on a powder flask with excellent results.


Best Wishes,


Buckles
 

VERDI-CHEMIST

Jr. Member
May 20, 2010
22
0
OHIO
I'm glad I joined this forum! There's some excellent information in this thread. I'm a chemist/coin collector, I specialize in copper corrosion/verdigris conservation.....but only for coins. I never gave thought to all the folks that conserve other copper/brass items. This button thread is an eye-opener for me!

I'm currently writing a book called Copper Coin Verdigris that explores all the chemical aspects of copper corrosion, including conservation techniques. I hope to contribute to the forum and share my knowledge. 8)
 

OP
OP
BuckleBoy

BuckleBoy

Gold Member
Jun 12, 2006
18,124
9,688
Moonlight and Magnolias
🥇 Banner finds
4
🏆 Honorable Mentions:
2
Detector(s) used
Fisher F75, Whites DualField PI, Fisher 1266-X and Tesoro Silver uMax
Primary Interest:
All Treasure Hunting
VERDI-CHEMIST said:
I'm glad I joined this forum! There's some excellent information in this thread. I'm a chemist/coin collector, I specialize in copper corrosion/verdigris conservation.....but only for coins. I never gave thought to all the folks that conserve other copper/brass items. This button thread is an eye-opener for me!

I'm currently writing a book called Copper Coin Verdigris that explores all the chemical aspects of copper corrosion, including conservation techniques. I hope to contribute to the forum and share my knowledge. 8)

It's a pleasure to hear from you. I look forward to your posts. :thumbsup: And WELCOME to TREASURENET :hello2:
 

nyiangelo

Hero Member
Feb 19, 2007
639
22
The Lone Star State
Detector(s) used
ace 250/ Minelab SE Pro
Here's my attempt at Naval Jelley. It really cleaned this shoe buckle up. Maybe to much, because in person it looks brand new.
 

Attachments

  • IMG_2293.JPG
    IMG_2293.JPG
    54.9 KB · Views: 1,431
  • IMG_2306.JPG
    IMG_2306.JPG
    95 KB · Views: 1,442

Iron Patch

Gold Member
Sep 28, 2007
19,254
8,730
Dirtyville
🥇 Banner finds
3
Detector(s) used
Deus
Primary Interest:
All Treasure Hunting
nyiangelo said:
Here's my attempt at Naval Jelley. It really cleaned this shoe buckle up. Maybe to much, because in person it looks brand new.


As long as that's gilt or silver plate it's good. :thumbsup: There's no in between for that condition... it's either leave it as is, or clean it so it shines.
 

Top Member Reactions

Users who are viewing this thread

Top