DeepseekerADS
Gold Member
- Mar 3, 2013
- 14,880
- 21,727
- Detector(s) used
- CTX, Excal II, EQ800, Fisher 1260X, Tesoro Royal Sabre, Tejon, Garrett ADSIII, Carrot, Stealth 920iX, Keene A52
- Primary Interest:
- Other
The 4 Fastest Survival Shelters When You?re Stranded | Off The Grid News
Written by: Patrick G. Whalen Extreme Survival May 19, 2014
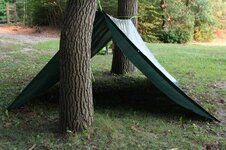
Tarp shelter.

When lost, stranded, or injured in the outdoors, aside from adequate water, shelter is of the utmost concern. Shade from the sun or an escape from wind, rain and cold may often be taken for granted in our daily lives, but when disaster strikes, this essential cannot be overlooked. Thankfully, shelters can be as simple or as complex as one wants to make them.
Here, we are going to give an overview of four different types of simple shelters that can be set up rather quickly.
1. Tarp Shelters
When preparing to venture into the outdoors, it is highly recommended that some type of tarp and a few feet of rope or cord be included in your gear. The reason for this is that a tarp can be used to build simple yet effective shelter with very limited effort. Whether you are stranded in a heavily wooded area, or one that has relatively few trees or shrubs, the versatile tarp could very well aid in your survival. A tarp can be spread over rope tied tightly between two trees in order to form either a lean-to or an A-frame. Guy lines anchored at each corner will pull the shelter tight. The closer to the ground, the more it will provide protection from wind and rain.
There are some outdoors enthusiasts who pack along a sturdy poncho that can double as a tarp for shelter in an emergency. It is my opinion that it is important to carry both items.
A tarp or poncho shelter can be very effective in protection from the elements, but neither of them will accomplish this goal completely. The tarp is meant for shelter and the poncho is meant for the body, meaning that a person wearing a poncho and protected by a tarp shelter is much more likely to remain warmer and drier than one of these items alone.
2. Debris Hut

To build a debris hut, it is essential to locate it in a site that is safe from flooding and falling limbs and within an area that has plenty of leaves. Once the area has been identified, clear the ground of all debris, leaving a flat area of dirt a foot longer that your height and about twice as wide as your shoulders.
Find two branches that are about three feet long and lash them on one end at a 45 degree angle. Next, find a longer branch that is at least two feet longer than your height. Place one end in the X formed by the lashed branches and the other end on the ground in the direction of the prevailing wind. Construct the walls by leaning branches against the ridge pole until the entire length on both sides is filled in. Collect piles of leaves and other small debris that can be piled on top of the structure. The thicker the layer of debris, the more water and wind resistant it will be and the more it will retain your body heat.
For added protection, lash together a U-shaped structure and place it at the opening of the shelter. Continue to pile debris on this form which will decrease the size of the opening, further improving the protection of the design.
3. Lean-to shelter

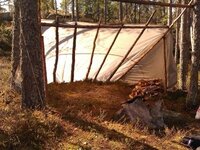
A lean-to, as previously mentioned, can be constructed with the aid of a tarp, but in the absence of this material, the same structure can be built with branches, sticks and twigs. The soundest lean-to is constructed by first placing a log horizontally between two trees, about three feet high. These can be supported by branches or lashed securely. The wall for the lean-to should be placed on the windward side in order to adequately protect from wind and rain. The length of the wall-supporting branches should be approximately 8 to 10 feet long, but they should all be the same length. Lean six or seven of these branches against the support beam.
Next, the wall can be constructed using branches long enough to span the distance between any two of the wall supports. This “roofing” material should be stacked or lashed to the supports from the ground to the top. Once the entire wall support is covered, further insulation can be made by piling grass or leaves over the structure.
To add warmth and comfort to a lean-to, built up a stone or wood wall three feet from the open side of the structure. Building a small fire halfway between the lean-to and the wall will reflect the heat and light back into the shelter.
4. Wedge Hut
The wedge hut brings together the strength and insulation of the debris hut with the sun and wind protection of the lean-to. A reasonable sized tree with a y-shape split about waist high is necessary for the construction of this shelter. To begin, find a log two to four inches around and three feet longer than your height. Place one end of the log in the y of the tree on the windward side and place the other end firmly on the ground. It may seem counter-intuitive to place this facing the wind, but before construction is over you will notice the open entrance to the shelter is on the leeward side.
Collect many branches that will reach from the center pole to the ground and place them at an angle. Continue placing these branches from the support tree to the end of the support. Choose one side of the large opening as the entrance to the shelter. On the opposite side, close it in with branches. Cover the wall with leaves, grass and twigs as thick as necessary to provide adequate protection from the elements.
Written by: Patrick G. Whalen Extreme Survival May 19, 2014
Tarp shelter.

When lost, stranded, or injured in the outdoors, aside from adequate water, shelter is of the utmost concern. Shade from the sun or an escape from wind, rain and cold may often be taken for granted in our daily lives, but when disaster strikes, this essential cannot be overlooked. Thankfully, shelters can be as simple or as complex as one wants to make them.
Here, we are going to give an overview of four different types of simple shelters that can be set up rather quickly.
1. Tarp Shelters
When preparing to venture into the outdoors, it is highly recommended that some type of tarp and a few feet of rope or cord be included in your gear. The reason for this is that a tarp can be used to build simple yet effective shelter with very limited effort. Whether you are stranded in a heavily wooded area, or one that has relatively few trees or shrubs, the versatile tarp could very well aid in your survival. A tarp can be spread over rope tied tightly between two trees in order to form either a lean-to or an A-frame. Guy lines anchored at each corner will pull the shelter tight. The closer to the ground, the more it will provide protection from wind and rain.
There are some outdoors enthusiasts who pack along a sturdy poncho that can double as a tarp for shelter in an emergency. It is my opinion that it is important to carry both items.
A tarp or poncho shelter can be very effective in protection from the elements, but neither of them will accomplish this goal completely. The tarp is meant for shelter and the poncho is meant for the body, meaning that a person wearing a poncho and protected by a tarp shelter is much more likely to remain warmer and drier than one of these items alone.
2. Debris Hut

To build a debris hut, it is essential to locate it in a site that is safe from flooding and falling limbs and within an area that has plenty of leaves. Once the area has been identified, clear the ground of all debris, leaving a flat area of dirt a foot longer that your height and about twice as wide as your shoulders.
Find two branches that are about three feet long and lash them on one end at a 45 degree angle. Next, find a longer branch that is at least two feet longer than your height. Place one end in the X formed by the lashed branches and the other end on the ground in the direction of the prevailing wind. Construct the walls by leaning branches against the ridge pole until the entire length on both sides is filled in. Collect piles of leaves and other small debris that can be piled on top of the structure. The thicker the layer of debris, the more water and wind resistant it will be and the more it will retain your body heat.
For added protection, lash together a U-shaped structure and place it at the opening of the shelter. Continue to pile debris on this form which will decrease the size of the opening, further improving the protection of the design.
3. Lean-to shelter

A lean-to, as previously mentioned, can be constructed with the aid of a tarp, but in the absence of this material, the same structure can be built with branches, sticks and twigs. The soundest lean-to is constructed by first placing a log horizontally between two trees, about three feet high. These can be supported by branches or lashed securely. The wall for the lean-to should be placed on the windward side in order to adequately protect from wind and rain. The length of the wall-supporting branches should be approximately 8 to 10 feet long, but they should all be the same length. Lean six or seven of these branches against the support beam.
Next, the wall can be constructed using branches long enough to span the distance between any two of the wall supports. This “roofing” material should be stacked or lashed to the supports from the ground to the top. Once the entire wall support is covered, further insulation can be made by piling grass or leaves over the structure.
To add warmth and comfort to a lean-to, built up a stone or wood wall three feet from the open side of the structure. Building a small fire halfway between the lean-to and the wall will reflect the heat and light back into the shelter.
4. Wedge Hut
The wedge hut brings together the strength and insulation of the debris hut with the sun and wind protection of the lean-to. A reasonable sized tree with a y-shape split about waist high is necessary for the construction of this shelter. To begin, find a log two to four inches around and three feet longer than your height. Place one end of the log in the y of the tree on the windward side and place the other end firmly on the ground. It may seem counter-intuitive to place this facing the wind, but before construction is over you will notice the open entrance to the shelter is on the leeward side.
Collect many branches that will reach from the center pole to the ground and place them at an angle. Continue placing these branches from the support tree to the end of the support. Choose one side of the large opening as the entrance to the shelter. On the opposite side, close it in with branches. Cover the wall with leaves, grass and twigs as thick as necessary to provide adequate protection from the elements.


