Building question / How too?

Limitool

Gold Member
🥇 Charter Member
Joined
Jun 9, 2013
Messages
7,113
Reaction score
11,068
Golden Thread
0
Location
Middle TN. area
Detector(s) used
White XLT Spectrum E-Series
Primary Interest:
Metal Detecting
Good morning all.... I'm sure this is simple but I just haven't dealt with it before. Here's my concern:

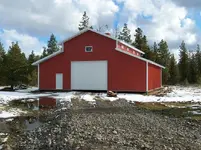
I have a new shop I just built. It's 60' x 26' x 10' high. I had the concrete pad poured and extra 8ft. wide on the South side along the entire 60' length. I'm going to build a lean to roof over it now down the entire 60' x 8' length and leave open. The 10' roof on the shop overhangs 16" above. I'm planning on dropping the lean to roof down to about 8' along the 60' length. After I attach my header board down the 60' length and finish the remaining structure (easy) here's my question:

HOW DO I "SEAL" THE NEW METAL LEAN TO ROOF TO THE SIDE OF THE METAL BUILDING? The metal siding for the wall & roof is anything but flat. I'm going to Lowe's this morning for the lumber run to start framing in this structure and I'll look around. If I find "what to do" then great... but I'm sure somebody here knows what and how to do this.

Thanks for any advise.... Brad
 

All I know is don't buy this crap... It doesn't stick to half the surfaces you spay it on even after you clean the heck out of the surface you want to seal.
 

You should cut the metal siding just above the header. Then, when the lean-to structure is done, install metal flashing up under the siding as the roof on the lean-to is installed. The flashing should extend out onto the lean-to roof a few inches. To prevent wind, and birds, etc from getting under the flashing, you can buy "closure strips" of foam that match the contour of the lean-to roofing. You lift the flashing, and slide the closure strip in (with a little caulk on it to hold it in place), and then screw the flashing down to the ribs right thru the closure strip. The rain tuns down the siding of the main building and out onto the lean-to roof and on down to the ground.
Jim

Cool Jim. This is just what I learned this week from a new roofer who is coming to replace what the old roofer did wrong on my dormer roof. No flashing under the siding coupled with a driving rain equaled wet plaster inside last fall.
 

You should cut the metal siding just above the header. Then, when the lean-to structure is done, install metal flashing up under the siding as the roof on the lean-to is installed. The flashing should extend out onto the lean-to roof a few inches. To prevent wind, and birds, etc from getting under the flashing, you can buy "closure strips" of foam that match the contour of the lean-to roofing. You lift the flashing, and slide the closure strip in (with a little caulk on it to hold it in place), and then screw the flashing down to the ribs right thru the closure strip. The rain tuns down the siding of the main building and out onto the lean-to roof and on down to the ground.
Jim


What he said---------------------------I can't think of another way.
Don't forget to hang Horseshoes.:laughing7:
Marvin
 

All I know is don't buy this crap... It doesn't stick to half the surfaces you spay it on even after you clean the heck out of the surface you want to seal.
Now i have used the flex seal on roof repairs and gutters on my out buildings and it has always done a very good job for me....
 

You should cut the metal siding just above the header. Then, when the lean-to structure is done, install metal flashing up under the siding as the roof on the lean-to is installed. The flashing should extend out onto the lean-to roof a few inches. To prevent wind, and birds, etc from getting under the flashing, you can buy "closure strips" of foam that match the contour of the lean-to roofing. You lift the flashing, and slide the closure strip in (with a little caulk on it to hold it in place), and then screw the flashing down to the ribs right thru the closure strip. The rain tuns down the siding of the main building and out onto the lean-to roof and on down to the ground.
Jim

Damn Jim.... I thought about that when I installed the metal on that 60' run... (about 1/2 through it though). I thought I'd deal with it "later". Well "later" is now here. I know about the "closure strips" but that doesn't address the wall and roof butting up "clean & sealed" without flashing present. Both end vertical corner moldings is up (screwed in / installed). While I can remove them I'd then need to "snap" a line, remove any metal siding screws in the way, install a new skill saw blade (backwards) and hopefully not run into many staples holding the horizontal 3/4" board across the 60' run.... right? Then install the 60' run of flashing under the metal wall and then re-install most screws that I could. Those I can't get a dab of silicone and the screw slightly moved... right? (there not "perfectly" in a straight line but very close). In fact with the flashing up under the wall now silicone is probably not "needed" but I'd do it anyway.

I sure dropped the ball here didn't I....??????????????? :BangHead:
 

Last edited:
Damn Jim.... I thought about that when I installed the metal on that 60' run... (about 1/2 through it though). I thought I'd deal with it "later". Well "later" is now here. I know about the "closure strips" but that doesn't address the wall and roof butting up "clean & sealed" without flashing present. Both end vertical corner moldings is up (screwed in / installed). While I can remove them I'd then need to "snap" a line, remove any metal siding screws in the way, install a new skill saw blade (backwards) and hopefully not run into many staples holding the horizontal 3/4" board across the 60' run.... right? Then install the 60' run of flashing under the metal wall and then re-install most screws that I could. Those I can't get a dab of silicone and the screw slightly moved... right? (there not "perfectly" in a straight line but very close). In fact with the flashing up under the wall now silicone is probably not "needed" but I'd do it anyway.

I sure dropped the ball here didn't I....??????????????? :BangHead:

If the metal is steel, and you cut it with a saw, it WILL rust. Also usually voids the warranty.
 

Damn Jim.... I thought about that when I installed the metal on that 60' run... (about 1/2 through it though). I thought I'd deal with it "later". Well "later" is now here. I know about the "closure strips" but that doesn't address the wall and roof butting up "clean & sealed" without flashing present. Both end vertical corner moldings is up (screwed in / installed). While I can remove them I'd then need to "snap" a line, remove any metal siding screws in the way, install a new skill saw blade (backwards) and hopefully not run into many staples holding the horizontal 3/4" board across the 60' run.... right? Then install the 60' run of flashing under the metal wall and then re-install most screws that I could. Those I can't get a dab of silicone and the screw slightly moved... right? (there not "perfectly" in a straight line but very close). In fact with the flashing up under the wall now silicone is probably not "needed" but I'd do it anyway.

I sure dropped the ball here didn't I....??????????????? :BangHead:
Well, you wouldn't be the first....LOL. When it's not something you do everyday, it's really difficult to look ahead and anticipate every possibility. So, you spend an extra day fooling with....it's not the end of the world. Better to do that than some bubble gum & baling wire approach that will give you leakage problems for years to come.
I just finished cleaning up 3 60' spruce trees I inadvertently killed when sterilizing the area around the shop two years ago. Rented a cherry picker, and topped them and dropped the branches...huge mess...took 2 days to clean it all up, and I still have to cut the trunks into firewood, and split it all. All because I did something stupid......not to mention the loss of 3 terrific tress. When I whined, the wife just said "suck it up, cowboy"....Ha!
Jim
 

Hey Jim.... We could spend all day ratting ourselves out over some stupid mistakes. :laughing7: Like a lot of us I'm a jack of all trades and a master of none. My problem is I have just enough nuggets to think I can do about 95% of anything! (wrong)

But... this mistake ranks right up there high of mistakes. I hate the idea of going that far backwards to correct it. I'd like to find some soft rubber, foam or something I could lay on the top 3/4" x 4" horizontal board next to wall and "pinch" between the wall and the new roof sheets going up. :dontknow: I'm going to a metal supplier and ask for help today also. I totally understand your flashing suggestion... but damn that's a rough way to go now!

Wainzoid... Got your PM and thanks. I'll get back with ya after I go to the supplier today and see what they suggest..... Brad
 

Good luck! The only way might be to cut wooden strips so they fit closely to the ribs, and go in between. Then cut some flat sheetmetal so it fits over and between the ribs and lays out on top of the lean-to roofing. Then a fat coat of caulk at the joint. But I think you'll wish you'd done it the right way, even if it involves some extra work. I've never seen one of those added-on jobs on ribbed steel that didn't have leakage problems.
Jim

Went to metal supplier today (needed mental help later!). Same as you said.... but I covered both ears and did the la, la, la... thing. This SUCKS!!!!!!!!!!!!!!!!!
 

If it where mine I would raise the new structure the 2 feet and run the roof under the 16" overhang. Then you could counter flash on the fascia board. Make returns on each end out of metal. You could make the pitch a little steeper to keep outside wall shorter. Just a thought.

HH, Relic Nut
 

Went to metal supplier today (needed mental help later!). Same as you said.... but I covered both ears and did the la, la, la... thing. This SUCKS!!!!!!!!!!!!!!!!!
RONFLMAO...hahahahahaha...I can easily imagine that scene. I talked to my buddy, who's a metal building erector, among other things, and he said it would probably be easier to just remove the sidewall sheets, cut them, and re-install, rather than cut them in place.
Relic's idea isn't bad, it it would work within your plans.
Jim

You know... Your buddies idea does sound a lot better. Set up the saw horses, remove each sheet, cut and reinstall the bottom piece while keeping the top pieces in proper order. Every 12' of re-installation I could then install a 12' header board (repeat 5 times). Then install flashing on wall, over roof and re-install the 2' pieces back overhead of each section.

As my late father would say..... "Nothing to it son.... just like your head!"
 

All I know is don't buy this crap... It doesn't stick to half the surfaces you spay it on even after you clean the heck out of the surface you want to seal.


Not "Sticking" up for the stuff, but if where your cleaning ever had a silicone product on it, it never will. If it's the aluminum your talking about, you'd have to use steel wool or sandpaper to be sure to get under the silicone. Just my 2 cents.
 

Limitool wrote, "HOW DO I "SEAL" THE NEW METAL LEAN TO ROOF TO THE SIDE OF THE METAL BUILDING? "

From other info in your original post, this appears to be a pole building with metal roofing and siding. Your initial question is how to seal the roof to the side of the building. Is your Lean-to going up to the eave-height of the pole building? If so, then run your lean-to roofing up under the pole building roofing to allow proper water runoff.

If you're looking to have your lean-to roof lower than the pole building roof, then you're adding more trouble and expense into the build, as well as potentially risking the warranty on your pole building's materials, and possibly on any warranty concerning the builder.

What ""I"" would do is to simply extend the pole building roof out another 10' for your lean-to. Much less likely to void any warranties, is easier to do, and will probably save you a little money. If your need to drop the roof height of the lean-to is to prevent rain/snow from blowing in as bad, then add some skirting around the top of the lean-to to reduce airflow. It would also allow for upper storage area for ladders, lumber, PVC pipe, or even empty cardboard boxes. Might could even find room to make an area for guests to stay - you know, the kind you don't want staying long!! :laughing7:

...Now to go and actually READ the rest of the thread! :tongue3:

1. Not a pole building. A 24" center stud built building (2 x 4 x 10's).

2. Wanted to drop down about 2' (+/- 2"-3") from under the high roof eves.

3. Then drop the pitch on the outsize edge of lean-to maybe 6-7" over the 8" roof span on the lean-to.

To now extend the existing roof edge another 10" would be real hard. I'd have to add additions metal under the existing roof and build a 10" box structure the entire 60' length and attach...?
 

Studs 24" on center??? Didn't know that was still allowed anywhere - except places like Hawaii. 16" OC is the norm.

"To now extend the existing roof edge another 10" would be real hard. I'd have to add additions metal under the existing roof and build a 10" box structure the entire 60' length and attach...?"
Not sure, as you say this isn't a pole building. ...At least they're called pole buildings in this neck of the woods. A pole building has a primary structure made up of heavier wood timbers (but not post & beam construction), then has 2x4's for attaching metal siding to, adding a door or window, etc. However, you say this isn't a pole building, so am not sure what to say next.

cropp0027i.webp

polebldg5.webp

Whether your construction is pole-building or not, do you have metal siding? It seems that you do, so I'll continue:

To do what you're wanting to do, dropping down some from the original eave of the building, there is no need to cut into the existing siding of the building. Follow these steps:

1) Build your lean-to onto the side of your building to whatever specs you desire. Roof and completely finish the project.

2) Get up on the lean-to roof and apply flashing the entire length of the lean-to. This flashing needs to extend 6" or more up the side of the main building, and AT LEAST 12" down the roof of the lean-to. You might can get by with less if that side of the lean-to is heavily with trees (preferably evergreens) to prevent wind from driving rain/snow up under the flashing.

3) Cut and apply another layer of metal siding over the main building's siding, on top of the flashing and to up under the eave of the main building. ...Remember to remove any original screws first as they will prevent the 2nd layer of metal from sitting flat on the first layer.

4. There are now open gaps along the length of the flashing where it sits on the lean-to roofing (assuming that roof is metal). There is a foam product that can be purchased that is form-fitted to this shape. Before attaching the lower edge of the flashing, place this foam barrier in place and then screw the flashing in place. PLEASE use appropriate screws instead of nails. Nails have a way of loosening over time, mostly due to the lumber drying out and shrinking, which can render the rubber washer useless.

Ok, there it is. No matter what kind of building you have, this "should" provide you a proper fix. No cutting, no caulk, no voided warranties, and most importantly, no leaks!!

Forgot to mention: You'll have to remove the corner pieces for the construction, then cut to length and replace as necessary. Also, going this route allows ALL of your lean-to construction components to be covered and weather-tight once the job is completed.
 

Last edited:
I'd like to find some soft rubber, foam or something I could lay on the top 3/4" x 4" horizontal board next to wall and "pinch" between the wall and the new roof sheets going up.

Not sure if this would work, but up here in RI we use self-adhered roofing underlayment to prevent water damage from ice dams. Ice forms on the edge of the roof and water builds up when it starts to melt. The dam prevents it from running off the roof, so the water creeps up and under the shingles. This underlayment stops possible water damage. Maybe you could fold it or pinch it to fit the gap. Just a thought...

http://www.homedepot.com/catalog/pdfImages/57/573ad9a7-9571-4147-9120-6ad37c12fcfd.pdf
 

Last edited:

Top Member Reactions

Users who are viewing this thread

Back
Top Bottom