What's new

flash pan works?

aka da Prof

Sr. Member
Joined
Jan 18, 2009
Messages
437
Reaction score
163
Golden Thread
0
Location
Finger Lakes, N.Y.
Detector(s) used
Garret Freedom One / Fisher 1280X / Beach Bully sand scoop/ Garret ProPin Pointer/Garret AT pro
Primary Interest:
All Treasure Hunting
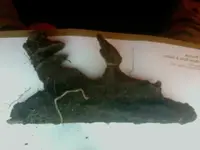
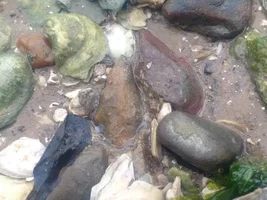
while visiting Montreal I hunted the woods on the big hill that over looks the city with just my pin pointer today( I didn't see any signs that I couldn't), I pulled up four pennies, a nickel, one a wheatie, a six inch rose headed spike, looks unused and what I suppose is some gun works. Being still in the field and not home for a few more days, I would like info on how to best clean and preserve such item, also what the age might be. I know y'all want the measurements, but no ruler or scale do I carry. That will happen this coming Saturday.
there was a real conglomerate of modern targets in that immediate area, but no more gun parts. This was just a few inches under the surface and I check hard for any more of it. Any help is appreciated, thanks, da Prof ♬♬
Also I will post better pix when I can--
 

Attachments

  • Photo on 2013-11-05 at 16.39.webp
    Photo on 2013-11-05 at 16.39.webp
    31.9 KB · Views: 234
  • Photo on 2013-11-05 at 16.48 #2.webp
    Photo on 2013-11-05 at 16.48 #2.webp
    20.2 KB · Views: 216
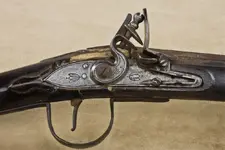
It is an amazingly complete flintlock musket lockplate assembly, from the Colonial era through the 1830s. SEEMINGLY, the only part which is missing is the flint... but we won't know for sure until we see a photo of it after it has been properly cleaned.

The best way to clean it is the Zinc-&-Lye Bath method. I'm recommending that method, because the Electrolysis method often does not work properly on an "assembly" of metal parts -- which might not be in "electrical contact" with each other. If you don't know how to do the Zinc-&-Lye Bath method, I'll post a list of the materials you'll need and the instructions for the process.
 
Last edited:
Upvote 0
Interestingly - if your images are shown correctly it is a left handed lock. Of that age it almost would certainly mean it came from a double-barreled shotgun/fowler. I don't believe there ever was a left-handed musket made; and so few rifles as to be nonexistant.
 
Upvote 0
Awesome find.....listen to CBG he's the best!...............HH
 
Upvote 0
Charlie P. is correct, if the digital image didn't get "flipped" somewhere between the photoshooting and the posting (which sometimes DOES happen here), it's a very rare "left-handed" lockplate... which as he said would most likely be from a double-barreled shotgun or fowler. Please let us know whether it actually is a left-handed lockplate or not. If so, it is quite rare, and a majorly cool find.
 
Upvote 0
That is a great find, I'm waiting to see what it cleans up like.
 
Upvote 0
AGHH! your right , Charlie, Photo Booth DID NOT auto flip, (it's a new mac to me and I had not set that app up yet), I would have reposted earlier, but the net was down in the hotel.
Thanks C.G. for the tip, I can google the method or please post here for all. Right now I have it sealed in a ziplock freezer bag to keep the moisture in, figuring that it will start flacking as soon as it dries out. Yup, sure seems complete, and I sure did hunt hard for any other parts that might have been left with it--(wish I had my 1280X with me)
As mention, I'll be home by this Saturday and can start the cleaning then and will post with better pix ---Thanks for looking and the info, folks---(on the road again)

p.s.-- the tip off was the reverse address on the hotel envelope--
 
Last edited:
Upvote 0
Thanks for confirming it's not a "left-handed" lockplate. Still a very cool find, because it's not missing its working parts. That will help us deduce its specific ID, after cleaning.

Here's the Zinc-&-Lye Bath materials-list and instructions for rust-encrustation removal:
1- Several ZINC (not aluminum) sheetmetal screw-on lids from old Mason or Ball glass canning jars. (Diggers often find those lids around old house-sites.)
2- CRYSTALLINE (not liquid) Lye drain-opener. I prefer Lewis' Red Devil Lye brand. Buy the crystalline form, because it is 100% pure lye, and you don't know what other chemicals might be in liquids like the Liquid Plumber brand.
3- a shallow PLASTIC container, wide enough to hold the relic and several lids, just deep enough to submerge the relic and lids.
4- Water.
5- Waterproof plastic gloves (such as Playtex gloves), to protect your hands from the very-caustic lye and water mixture.

The "bath" consists of a mixture of water and lye in a 10-to-1 ratio, meaning ten parts water to one part lye. For example, in a 16-ounce glass measuring cup, fill the cup with the lye crystals to the 1-ounce line, then add 10 ounces of water. Then IMMEDIATELY stir the water, GENTLY, to completely dissolve the lye. Be very careful not to splash any of the lye-water, because it is extremely caustic. Most especially, do not get any into your eyes. Remember, lye is sold to dissolve grease and hair clogs in sink drains. You might want to wear eye-protection. If any of the lye-water gets onto your skin, wash it off immediately. It won't burn your skin in 30 seconds, but you do want to wash it off right away. And of course, make sure no kids or pets can get access to the Zinc-&-Lye bath.

If the zinc lids still have the white-glass disc in them, carefully use a hammer to break up and remove all of the glass.

Scrub as much dirt off of the iron relic as possible, under running water. Don't do that in your sink, because the dirt will clog the drain -- do it outside, using a gardenhose or in a waterbucket.

Put your iron lockplate into the container, laying across the rim of a zinc lid. Put another zinc lid on top of the lockplate. Carefully pour (no splashing) enough lye-&-water into the container to submerge the lockplate and zinc lids. Let about 36-to-48 hours pass. By that time, the rust crust will be falling off the lockplate. Put on the plastic gloves and remove the lockplate from the lye-&-water bath, put it in a plastic bowl and rinse it thoroughly under running water, using a toothbrush to scrub any remaining rust-crust off the lockplate. You'll probably need to do some additional "picking" at any stubborn rust-crust with a tool like a nutpick or small screwdriver. When you've removed all the rust-crust, rinse the lockplate thoroughly again, then PAT it completely dry with a towel. Let it air-dry for 24 hours. Then apply three coats of "satin-finish" (low-gloss) Polyurethane sealant.

I prefer MinWax brand "Fast-drying Polyurethane" satin-finish formula, in a spraycan. (But you can use the paint-on version of Polyurethane if you prefer it.) Wal-Mart sells the MinWax spraycans for about $7.

To do Zinc-&-Lye Bath rustcrust-removal on larger objects, like a pistol or an artillery shell, you'll need about 6 to 10 zinc lids, depending on the size of the object you are cleaning.

You can re-use the lye-&-water mixture at least once. The zinc lids can be re-used several times, until they eventually "dissolve."

Any questions?
 
Upvote 0
Yessir - what metals should I do this on vs. electrolysis?

 
Upvote 0
Thank you, C.G.--a very well described plan of preservation--- my concern now is that I posted this on my Face Book wall and one friend who is with the Royal Fusileers of Boston is emphatic about NOT cleaning and wants her 18 century gunsmith fiance' to have a look at it first, but that is four hundred miles from my home---so--should I or shouldn't I go ahead with this professional process---opinion, please--
 
Upvote 0
I'd leave it alone for now. You can always clean it later but you can never unclean it once it is done. Tell your friend to come on over for Thanksgiving and have a close look.

Awesome find - especially with a pinpointer!

DCMatt
 
Upvote 0
o.k. D.C., how about just a quick rinse with light tooth brushing to clean it up a bit for better pictures? or would that be to much to do for right now. I am hoping to hear back from the 'Major' on his opinion--( I haven't even went to F.B. yet to see if there is a reply)

 
Upvote 0
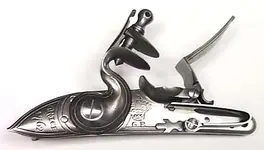
If you go ahead and clean the mud off, here are a couple of things to look for clues to a Brown Bess Lock. The lock plate isn't flat, it's rounded where most other lock plates are flat. It has kind of a unique finial on the frizzen spring, if that is still there, and note the writing on the lock plate if the rust hasn't completely cleaned it off. The picture is a Brown Bess Lock.
Brown Bess Lock.webp
 
Upvote 0
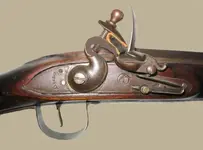
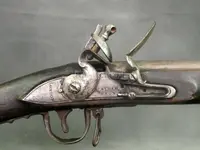
Here are some Indian Trade Musket locks. There has been plenty of books written about trade muskets. One of the dead giveaways is a sitting fox in a circle. Note that in one of the photos. There are trade muskets with rounded locks, a lot of them are very large like the Brown Bess, but not all of them. These photos will give you an idea, and if your lock is off a trade musket there won't be the crown or date on it like the Bess.
trade musket.webptrade musket1.webptrade musket2.webp
 
Upvote 0
CannonBallGuy has given you a formula for cleaning up your relic lock. I collect antique guns, and I've never used a formula like that or electrolysis on a gun. The big thing on old guns is patina, especially now with all the replicas, no collector wants to damage patina. So here is what I and other collectors do if we have a rusty antique gun. The entire idea is to get the rust off and leave the patina. Clean all the mud and gunk off until you are down to the rust. I've personally never done this on a gun that is covered with heavy flaky rust, but it works on heavy rust. Scrape the rust off using brass and oil. I use liberal amounts of 3 in 1 oil, or any light gun oil, and the end of an empty 30-06 brass, and for tight spots I hack saw an empty brass into the size strip I need. What ever you decide, the choice is yours, I've never used CBG's formula, but you can bet your booty I have it saved for possible use in the future. The choice is yours.
 
Upvote 0
For anybody here who doesn't already know:
The Zinc-&-Lye Bath method is for removing the "rust-petrified dirt" encrustation from EXCAVATED iron relics... not for removing thin rust from a (non-excavated) rusty old gun or bayonet found in grandpa's closet or barn.

The Zinc-&-Lye Bath method is similar to the Electrolysis method, except that it doesn't involve using electricity. Therefore, unlike Electrolysis, the Z&L-Bath method can clean multiple relics simultaneously in the plastic container. See my next post for additional explanation.
 
Upvote 0
Cti4sw wrote:
> What metals should I do this on vs. electrolysis?

My advice wasn't based on the type of metal... it was based on the difference in the way Electrolysis "works" and the Zinc-&-Lye Bath method "works."

As I said in a previous reply to the flintlock lockplate assembly's finder in this discussion-thread:
His EXCAVATED lockplate assembly is not a single piece of metal -- it is composed of several metal parts (the main "plate," the hammer, the hammer's flint-holding "upper jaw," the jaw-holding screw, the mainspring, the frizzen, and the frizzen-pan). Each of those parts is in PHYSICAL contact with another part, but, being in excavated condition, the parts are very probably no longer in "ELECTRICAL" contact with each other.

For clarity... that situation is similar to a car battery's corroded terminal-post and the wire-clamp attached to the post. They are in physical contact, but not in electrical contact. You turn your car's ignition key but nothing happens, because the corrosion is blocking electricity from flowing from the battery's post into the wire going to the car's starter.

The Electrolysis cleaning method uses electricity to accomplish the rust-removal. So, if you are trying to clean a excavated metal relic (usually, an iron one) which is composed of several parts, Electrolysis will only work if the relic's parts are still in ELECTRICAL contact with each other. If they aren't, your only alternative is to use the Zinc-&-Lye bath method... which accomplishes the rustcrust removal by a liquid chemical bath process, not an electrical process.

For example... I've seen a relic-digger put an excavated Revolver pistol into Electrolysis. He connected the electrical wire to the revolver's iron barrel. But the revolver's cylinder, hammer, and trigger were no longer in ELECTRICAL contact with the barrel. So, the Electrolysis only cleaned the rust-crust off the barrel, and had NO EFFECT on the rust-encrusted cylinder, hammer, and trigger. The digger then had to re-do the Electrolysis, three more times, in order to clean the pistol's cylinder, hammer, and trigger.

I've successfully used the Zinc-&-Lye Bath method on multi-part excavated relics like lockplate assemblies, pistols, and a Stand-Of-Grapeshot (which consists of 9 grapeshot balls, two flat discs, and two rings, which are all held together by a long bolt). I've also used the Zinc-&-Lye methd to clean a dozen excavated cannonball fragments at the same time in the plastic container... because that was much simpler than cleaning the fragments one-at-a-time with Electrolysis.
 
Upvote 0
aka, da Prof wrote:
> [A friend of mine] is emphatic about NOT cleaning [the flintlock lockplate] and wants
> her 18 century gunsmith fiance' to have a look at it first, but that is four hundred miles
> from my home---so--should I or shouldn't I go ahead with this professional process---opinion, please.

It won't hurt to wait a month or so until her fiance' is able to examine your excavated iron lockplate in its current "as-dug" un-cleaned condition. But I wouldn't wait for much longer than that, because excavated iron relics can begin to show "scaling" deterioration in as little as 60 days.

In the photos you posted, your excavated lockplate looks like it still has a lot of simple dirt on it, in addition to hard rust-crust. I would use a toothbrush to GENTLY scrub the dirt off, in a bucket of water (not the kitchen sink, you don't want to clog the drainpipe with dirt), to make it easier for your friend's 18th-Century gun expert to identify the lockplate.
 
Upvote 0
O.K.--- back home now and will lightly clean the dirt off and see what we have. Perhaps I can do a short video to post here. C.G., I understand about the no dirt in the sink, fer sure, (as a tile setter, that was the first thing I learned from the Ol' Dutchman that I apprenticed under). BosnMate, I would suppose when you mention using brass, that would be to 'pick' the dirt off, and I understand about the patina not being spoiled. Thanks for the photos, I sure hope to find any identifying marks on the piece, but don't expect it after 300 years in the dirt, but, hey, 'one never knows, do one'---
Right now it's still in a plastic bag to keep the moister on it and I'll attempt to work on it in the morn--( late morn)---- how would I go about not letting it start flacking after cleaning and not ruin patina, if there is any??
You folks are so helpful!! Thanks for all the tips-- da Prof ♬♬
 
Upvote 0

Users who are viewing this thread

Back
Top Bottom