Don in SJ
Silver Member
- Joined
- May 20, 2005
- Messages
- 4,937
- Reaction score
- 852
- Golden Thread
- 0
- Detector(s) used
- MINELAB SE Pro
- Primary Interest:
- All Treasure Hunting
- #1
Thread Owner
The first year or so that I started to macro photograph my coins, I went to a camera store and purchased two mini-tripods, one was more adjustable than the other. However, though the tripod was a big improvement over trying to take a Macro photo with my trembling hands, it was rather limited in the ways I could photograph a coin, button or relic. But one of my biggest complaints was the one tripod leg getting in the way of photographing and then the tripod would also tend to tip over from the weight of the camera.
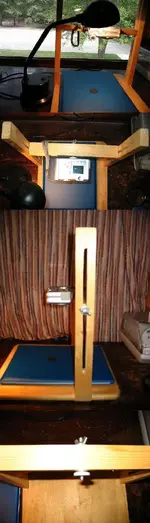
I saw an individual in Michigan on the net who was making homemade camera stands and it looked simple enough to me, so I gathered what materials I had on hand at the time and made one. I have never looked back, this type of stand IS the way to go for most of our needs in photographing our finds.
I will include some photos of my first stand I made and don't laugh, I made use of what I had laying around the house.
Instead of using a plywood platform base, I used an old kitchen cutting board!. For padding on the underside of the stand I glued on an old computer mousepad. For mounting the camera to my stand, I simply unscrewed the mounting hardware from one of my previously purchased mini-tripods, which I now have no more use for.")
What is nice about this stand is ample amount of height that can be used with this stand, I can take macro photos of a half dime or a Indian pestle! It allows ample room for the varying sizes of the object to be photographed.
PHOTOGRAPHING YOUR FINDS
DIGITAL CAMERA
2.0MP or larger
MACRO Mode!!!!
Variety of light settings
1.5 to 20”
MINI-TRIPOD
Disadvantages:
Tipover
Too close to subject
HOMEMADE PORTABLE CAMERA STAND Advantages:
Inside or Outside use
Wide range of shooting distance
Can standardize size of similar objects
Will NOT tipover onto your coin or artifact
LIGHTING
Sunshine is Great!
Indoor lighting
No Flash (as a general rule)
Camera setting for different types of light
Halogen or Incandescent Lamp
Side Lighting
BACKGROUND COLOR
Affects the color of the object
Suggested background colors
Blue –Great for Silver and Copper- Pleasing tones
Red –Similar
White – Very difficult to get proper lighting
Yellow- Fine but not preferred
Green- Never tried it.
Wood- In natural sunlight it is great
Post-its
Envelopes
Folders
Tabletops
Colored Construction Paper
HOMEMADE PORTABLE CAMERA STAND
MATERIALS:
WOODEN CUTTING BOARD 12x13” approx size
MOUSE PAD
4 FOOT SECTION OF 1X2”
3 WING NUTS
3 TWO INCH LONG PIECES OF ¼ THREADED STOCK
1 RUBBER BACKED LOCKING THUMB SCREW FROM MINI TRIPOD* or ¼” stock with washer and nut
WOOD GLUE
4 WASHER ¼”
2 WOOD SCREWS 1 3/8”
TOOLS:
SABRE SAW
ELECTRIC DRILL WITH ¼” DRILL BIT
ROUTER IF YOU HAVE ONE
PHOTO EDITING SOFTWARE:
New Computers/Cameras usually have but:
Resizing Cabability
Merging/Stitching
Brightness/Sharpness etc.
FREEWARE: IRFANVIEW.COM
IrfanView is a very fast, small, compact and innovative FREEWARE (for non-commercial use) graphic viewer for Windows 9x/ME/NT/2000/XP/2003. ...
Resize, Merge unlimited photos, sharpness, etc.
(I used Irfanview to combine the photos for this post into one photo.)
I saw an individual in Michigan on the net who was making homemade camera stands and it looked simple enough to me, so I gathered what materials I had on hand at the time and made one. I have never looked back, this type of stand IS the way to go for most of our needs in photographing our finds.
I will include some photos of my first stand I made and don't laugh, I made use of what I had laying around the house.
Instead of using a plywood platform base, I used an old kitchen cutting board!. For padding on the underside of the stand I glued on an old computer mousepad. For mounting the camera to my stand, I simply unscrewed the mounting hardware from one of my previously purchased mini-tripods, which I now have no more use for.
What is nice about this stand is ample amount of height that can be used with this stand, I can take macro photos of a half dime or a Indian pestle! It allows ample room for the varying sizes of the object to be photographed.
PHOTOGRAPHING YOUR FINDS
DIGITAL CAMERA
2.0MP or larger
MACRO Mode!!!!
Variety of light settings
1.5 to 20”
MINI-TRIPOD
Disadvantages:
Tipover
Too close to subject
HOMEMADE PORTABLE CAMERA STAND Advantages:
Inside or Outside use
Wide range of shooting distance
Can standardize size of similar objects
Will NOT tipover onto your coin or artifact
LIGHTING
Sunshine is Great!
Indoor lighting
No Flash (as a general rule)
Camera setting for different types of light
Halogen or Incandescent Lamp
Side Lighting
BACKGROUND COLOR
Affects the color of the object
Suggested background colors
Blue –Great for Silver and Copper- Pleasing tones
Red –Similar
White – Very difficult to get proper lighting
Yellow- Fine but not preferred
Green- Never tried it.
Wood- In natural sunlight it is great
Post-its
Envelopes
Folders
Tabletops
Colored Construction Paper
HOMEMADE PORTABLE CAMERA STAND
MATERIALS:
WOODEN CUTTING BOARD 12x13” approx size
MOUSE PAD
4 FOOT SECTION OF 1X2”
3 WING NUTS
3 TWO INCH LONG PIECES OF ¼ THREADED STOCK
1 RUBBER BACKED LOCKING THUMB SCREW FROM MINI TRIPOD* or ¼” stock with washer and nut
WOOD GLUE
4 WASHER ¼”
2 WOOD SCREWS 1 3/8”
TOOLS:
SABRE SAW
ELECTRIC DRILL WITH ¼” DRILL BIT
ROUTER IF YOU HAVE ONE
PHOTO EDITING SOFTWARE:
New Computers/Cameras usually have but:
Resizing Cabability
Merging/Stitching
Brightness/Sharpness etc.
FREEWARE: IRFANVIEW.COM
IrfanView is a very fast, small, compact and innovative FREEWARE (for non-commercial use) graphic viewer for Windows 9x/ME/NT/2000/XP/2003. ...
Resize, Merge unlimited photos, sharpness, etc.
(I used Irfanview to combine the photos for this post into one photo.)