West Jersey Detecting
Gold Member
- Joined
- Oct 23, 2006
- Messages
- 5,247
- Reaction score
- 1,066
- Golden Thread
- 1
- Location
- Philadelphia Area
- 🥇 Banner finds
- 1
- 🏆 Honorable Mentions:
- 1
- Detector(s) used
- Nokta Legend, Excalibur 1000/II (hybrid) , Teknetics T2 SE
- Primary Interest:
- Other
- #1
Thread Owner
I see a lot of blurry images in the forums, so I thought I would post a quick tutorial.
First you need a DECENT digital camera. Notice I did not say expensive. You will also need a tripod. I use a $9.99 model and it works just fine. Just make sure the camera has these important features.
1) Macro mode (for close-ups)
2) Tripod Mount
3) Self Timer
4) Manual Flash Control (to overide Auto Flash)
5) Zoom Control (optional, but recommended)
OK here are the steps to taking great photos. I prefer not to mess with white balance and other color controls. These can be adjusted on your computer after you upload your pictures.
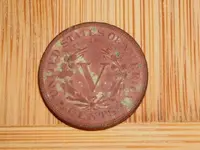
1) Place the object you are photographing on a flat surface that will contrast with the object. I like to use a natural colored cutting board. Do not use anything reflective, smooth, or clear. It will make it difficult for the camera to focus.
2) Place the digicam on a tripod about 6 inches to two feet away from the object you are photographing.
3) Turn the cam on.
4) Place the Cam in Macro (Close-up) Mode. This is usually represented by a Tulip icon.
5) Turn OFF the flash. This is usually an icon of a flash with a circle and line through it.
6) Change the file size or quality to the low setting. This is 0.3M on the Fuji Cameras.
7) Turn on the Self Timer to avoid camera shake.
8) Zoom in to the desired focal length (If available)
9) Depress the shutter HALF WAY and hold until the camera focuses on the object. If the camera will not focus you may need to move it back a bit further, or try a different background.
10) Fully Depress the shutter button and release
11) Wait for the timer to take the photo.
This should give you sharp photos EVERY TIME!
Good Luck!
First you need a DECENT digital camera. Notice I did not say expensive. You will also need a tripod. I use a $9.99 model and it works just fine. Just make sure the camera has these important features.
1) Macro mode (for close-ups)
2) Tripod Mount
3) Self Timer
4) Manual Flash Control (to overide Auto Flash)
5) Zoom Control (optional, but recommended)
OK here are the steps to taking great photos. I prefer not to mess with white balance and other color controls. These can be adjusted on your computer after you upload your pictures.
1) Place the object you are photographing on a flat surface that will contrast with the object. I like to use a natural colored cutting board. Do not use anything reflective, smooth, or clear. It will make it difficult for the camera to focus.
2) Place the digicam on a tripod about 6 inches to two feet away from the object you are photographing.
3) Turn the cam on.
4) Place the Cam in Macro (Close-up) Mode. This is usually represented by a Tulip icon.
5) Turn OFF the flash. This is usually an icon of a flash with a circle and line through it.
6) Change the file size or quality to the low setting. This is 0.3M on the Fuji Cameras.
7) Turn on the Self Timer to avoid camera shake.
8) Zoom in to the desired focal length (If available)
9) Depress the shutter HALF WAY and hold until the camera focuses on the object. If the camera will not focus you may need to move it back a bit further, or try a different background.
10) Fully Depress the shutter button and release
11) Wait for the timer to take the photo.
This should give you sharp photos EVERY TIME!
Good Luck!


")