Quinan Bear
Sr. Member
- #1
Thread Owner
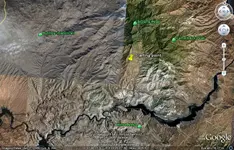
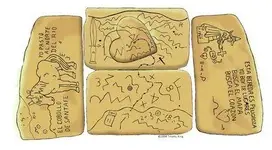
I have deciphered the Peralta Stones. Here are the location points that are on the "Priest Map".
"A" is the place where you can see the date (If you look carefully).
"B" is the (blocks) that the person is standing on.
"C" is the bottom of the "robe".
"D" is the "shoulder with the cross" on it.
"E" is the "Hat".
"F" is the "face".
"G" is the sleeve, arm and "Large Cross".
"H" is the point that you see the "Smaller Cross".
"I" is the Heart with the dot in center.
"J" is the "8"
"K" is the "N"
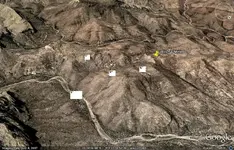
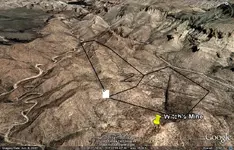
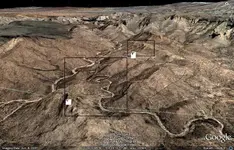
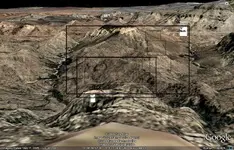
Then you go to the top of the point. From there, you should see the entrance to the mine.
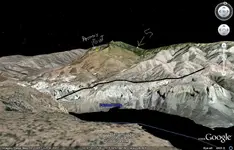
To follow the map, you start at weaver's needle, the east trail and head north by the "Blocks" and around blacktop mountain, then west through the "Bottom of robe", Then North, passing by the "Cross on shoulder" and to the back of "Hat" (where you should see a "Face" but I'm not certain of that). Then head over the hill eastward and turn back southward through steep narrow cliffs then you should see the sleeve and the cross. Continue till you come to a passage way on your right, Stop at the intersection and you should see the Small Cross and up the right pass (west then North) you will come to the Heart, then the "8", "N", and then the point, where you should see the mine.
Best of luck to you!!!, Don't forget me when your Rich!!!
The other Maps have a different starting point to them, but once you know where that place is, Then ALL reveals itself from there.
These other maps show many mines and "The Church Treasure" as well.
The "Priest" Map, is, To my opinion, "The Lost Dutchman's Mine" but the other maps show of a place that ALSO fits the description of his mine as well. In any event, If anyone goes to see if I'm right about this Map, Please let me know, It would be much appreciated. Thanks and best of luck to ya !!!
"A" is the place where you can see the date (If you look carefully).
"B" is the (blocks) that the person is standing on.
"C" is the bottom of the "robe".
"D" is the "shoulder with the cross" on it.
"E" is the "Hat".
"F" is the "face".
"G" is the sleeve, arm and "Large Cross".
"H" is the point that you see the "Smaller Cross".
"I" is the Heart with the dot in center.
"J" is the "8"
"K" is the "N"
Then you go to the top of the point. From there, you should see the entrance to the mine.
To follow the map, you start at weaver's needle, the east trail and head north by the "Blocks" and around blacktop mountain, then west through the "Bottom of robe", Then North, passing by the "Cross on shoulder" and to the back of "Hat" (where you should see a "Face" but I'm not certain of that). Then head over the hill eastward and turn back southward through steep narrow cliffs then you should see the sleeve and the cross. Continue till you come to a passage way on your right, Stop at the intersection and you should see the Small Cross and up the right pass (west then North) you will come to the Heart, then the "8", "N", and then the point, where you should see the mine.
Best of luck to you!!!, Don't forget me when your Rich!!!
The other Maps have a different starting point to them, but once you know where that place is, Then ALL reveals itself from there.
These other maps show many mines and "The Church Treasure" as well.
The "Priest" Map, is, To my opinion, "The Lost Dutchman's Mine" but the other maps show of a place that ALSO fits the description of his mine as well. In any event, If anyone goes to see if I'm right about this Map, Please let me know, It would be much appreciated. Thanks and best of luck to ya !!!


Attachments
-
 Peralta_Stone_Map.webp19 KB · Views: 1,556
 -
 Cross, Heart, 8, N, P..webp197.2 KB · Views: 724
 -
 Peralta_Stone_Map.webp19 KB · Views: 592
 -
 cross,face, hat.webp209.2 KB · Views: 568
 -
 Sleeve and large cross.webp188.4 KB · Views: 640
 -
 Witch\'s Bottom of robe.webp182.5 KB · Views: 552
 -
 1847 Witch map.webp157.9 KB · Views: 588
 -
 top view of all the person.webp149.3 KB · Views: 2,409