Hello Frank1960,
Astro has tested and refined this drop riffle design units to the point that he Does know what he's talking about. If you have the time, the wood working tools and know how to use them without removing your fingers you can make one of Astro's designs for next to nothing. If you need to purchase a ready made unit then Angus McKirk and California Sluice products are good folks to work with and they have many models to choose from, from tiny sample to production sluices. One of the larger Mckirk sluices weighs about 6 pounds while a Keene A-52 weighs about 11 pounds. These would be comparable in physical dimensions while the ABS plastic sluices are way lighter and do not use carpet or matting. I believe the California Sluice's are lower in cost than the McKirk's and way lower than the Keene's. Some of the McKirk's have two metal bars that brace the sides and allow easy positioning of a boulder to keep the sluice down in the water. Getting a sluice box up and out of the water is not as simple as it would first seem. First the water is heavy, second you do not want to tip the box as what you've just trapped could fall out and third the river bottom is usually slippery and the footing is often poor and with all of these combined a person could have several not good things going on at the same time as he's attempting to lift the box out of the water, usually the back gets pulled or a person falls and neither of these are the right thing to be doing. Hence, I added cross bars to my Keene A-52 near the flume at the top and with the cross bar at the bottom I now have two very comfortable handles to use for picking the box up.
Cross bars would be easy to add to any plastic sluice but there's a couple of tricks in making the bolt holes in the sides of the box. Cross bars are just flat strap steel with an "L" shaped bend on each end though they would be much stronger if they were made from a right-angle bar. I made mine from an aluminium right angle bar that's about 1/32" thick. Build your cross bars to fit either the inside or the outside dimension of the box (along the length of the box). Make the "L" leg about 2" long and put a 1/16" hole through the leg 3/4" up from the bottom of the leg. Now you can mark, not make, where the holes go on each side of the box. In the center of the the marks on the box start by drilling a 1/16" hole. Lets say we use a #10 bolt to hold the cross bars to the box sides. So now we drill each bolt hole in the box a little larger BUT NOT as large as the bolt. Now here is trick #2 get a nail or some metal rod that is a bit larger than the bolt, warm the nail with a torch not real hot but just hot enough that it melts the plastic and with the nail just hot enough force it through the hole and pull it back out quickly. Why? Drilling plastic leaves small rough spots around the outer edges of the hole and cracks start from these rough spots. You do not want the box to crack! Melting the plastic seals over any rough spots and it will leave a small round doughnut around one or both sides of the hole, lightly sand these off with 200-600 grit emery paper. When bolting the cross bars to the box use a "Fender Washer" between the bolt and the plastic and do not torque the nut down very hard, just hard enough to allow the lock washer to grip the nut and the metal of the washer or the "L" of the cross bar. Also, ABS plastic is fairly easy to glue together and ABS glue is carried at many hardware stores.
I started prospecting with just a small sifter and a plastic gold pan. I made my sifter from a large Tuna fish can with both ends cut off. I pop riveted 1/8" or 1/4" mesh hardware cloth to one end of the can and soldered over all the sharp edges of the hardware cloth to keep it from sticking me all the time. A sifter of some sort IS A MUST as it makes panning or sluicing go so much easier. Of course if you live near a Walmart store or any store that sells expanded metal drawer organizers, buy one of these in a size to suit your application and they will work as good as any sifter you purchased from a mining supply store.
It sounds as if you have not used either a pan or a sluice. If that is the case there are MANY "how to" sites for the beginner on the internet that teach you how to properly pan and how to properly sluice. These sites will be invaluable to you as they teach the proper methods of using these tools. I was unaware the sites existed till some of the good people on T-net stuck my face into them, what a blessing!
Panning or sluicing CAN cause your back to really ache! LONG Before you go prospecting prepare for this by exercising, yes get down on the floor and do crunches and stretch exercises. Also, as you will be walking a couple of miles to get to your site while laden with your gear, you should do some ankle exercises as spraining an ankle on uneven ground is also NOT a good thing. Being in reasonable to good shape makes any type of prospecting MUCH more enjoyable as well as safer!!
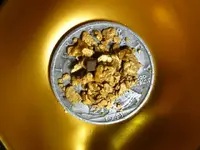
NOW, if I've chosen the correct picture here's a looks see at what I found this year via panning, a little metal detecting and sluicing. The gold is piled on top of a U.S. fifty-cent piece.
Have fun, be busy on the internet looking at videos and reading the how too's of prospecting and you will put the winter shut down to good use.
63bkpkr (PS - there's lots more gold out there)
AND One Last Note: make or buy a sluice Then purchase a bucket that your sluice will drop all the way to the bottom of the bucket Without forcing the walls of the bucket outward. My A-52 just fits into the top of a typical 5 gallon bucket but it only goes down about 4'' and starts to force the wall outwards. I cracked the wall of my bucket and with the bucket leaking it is not a good thing for many reasons.


 I'd go for the righteous Le Trap and get it on as every canyon,creek and gully is fulla water and even on P33 hill I'd bet too-John