Placer Claim Mined Out?

desertgolddigger

Bronze Member
May 31, 2015
1,054
1,966
Twentynine Palms, California
Detector(s) used
Bounty Hunter Time Ranger
Primary Interest:
Prospecting
I belong to a local club that owns a claim. This club has had this claim for many years, and acquired it after the old timers had mined it previously, and others after they commercial outfits closed up.
I walked quite a bit of the 160 acre claim, and noted that just about every wash had been worked. Most of the surface nuggets has also been detected by those with gold detectors. In other words, this place has been picked over and over and over.
But I m a stubborn type of person, and I figured, just watching how people ram their puffer and blower drywashers, that some gold was just being blown through them. maybe not much, but some small stuff that never got a chance to settle behind the riffles.
I know many of you would never go to the effort of digging for three to four hours through the tailings in these washes. Again, I'm a bit stubborn, and anyway, I just wanted to have some fun locally, instead of driving 300 miles roundtrip to something that gives a little more for less effort.
I've spent the last three weeks, digging a few times a week along about 30 yards of wash, and have recovered just about a gram of gold. That might not seem like much, but I have only dug up 5 grams, not counting this one gram in almost 20 years out here drywashing in the desert of southern California.
As you would know, things always seem to go wrong. My gas powered blower motor decided it was time for the repair shop, and haven't heard from the shop in two weeks. So I purchased a WORX WG521 corded electric leaf blower to use with my Royal Large drywasher. I'm using a portable generator to provide the power. And it actually is working better than with my old gas powered blower. I have to run the blower on the lowest speed, or I just blow everything through the riffles. Results are very good, as I am getting gold specks so small that I will have to use the Blue bowl in order to recover them.
I'm not only getting a little gold, I'm having some fun, and I am getting a good workout. I've lost 10 pounds since I started. So things are going well.
I'm still digging test holes around the old time hard rock mines in the hope I will find where the gold has drifted downhill below these mines. So far just a couple specks here and there. I figure I just have to move laterally one way or the other before I get something better Of course, I' don't really know if the old timers stripped the hillsides. Even if they have, they apparently aren't as thorough as I am. I hope that I may be lucky and find a larger piece of gold that the old timers, previous placer miners, and detectorists have missed.
Hope everyone is having as much fun as I have been having.
 

Upvote 47
OP
OP
D

desertgolddigger

Bronze Member
May 31, 2015
1,054
1,966
Twentynine Palms, California
Detector(s) used
Bounty Hunter Time Ranger
Primary Interest:
Prospecting
Was out at the club claim this morning, digging in various old timer vertical shaft mine waste piles. Each sample produced gold.

The surface old timer mines don't produce as well.

Most of the gold is the type barely can see it with a magnifying glass. I just need to classify down to 100 mesh so the dirt is richer, and more worthwhile carrying home.

I'm perfectly happy gleaning this small gold from the waste piles. It means I get something everyday I sluice, and eventually use the shaker table.
 

Last edited:
OP
OP
D

desertgolddigger

Bronze Member
May 31, 2015
1,054
1,966
Twentynine Palms, California
Detector(s) used
Bounty Hunter Time Ranger
Primary Interest:
Prospecting
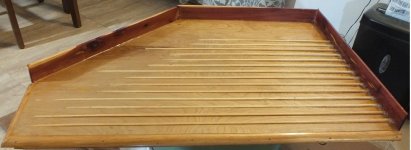
Thought I'd show my third experimental table.

It's made from 3/4 x 1 1/4 pine skeleton sandwiched between 3/16 (top) and 1/8 ply (bottom). The water barrier is Cedar. And the edges where the various materials exit is 1/4 round (again Pine).

I used clear paintable silicone to make sure the seams are sealed top and bottom.

I put three coats of spar varnish on all surfaces.

My last thing is to use my POR-15 spray paint to cover the top surfaces. I will use black, and follow up with a clear topcoat. I should get the painting done in the next few days.

I had to cut a rectangular hole in the bottom ply so I can access the feed side board to install the attachment plate that will be attached to the drive mechanism. I'll get a picture of that when I finally install that plate.

I found the DIN rails I was using on my ST #2 experimental table (24 X 48) was too long. So I had to order another set that are 24 inches long, so they won't stick out from the underside of the table.

With everything finished, the table will still be heavy at nine pounds. Hopefully Jim in Idaho, drive unit can handle that weight.

Another note. The riffles are made of 1/4 inch square hard balsa. It took me a while to figure out how to sand them down. I secured the tabletop on a galvanized steel sheet, and locked it in place with magnets. I then used various thicknesses of magnets to reach the feed end riffle height, and again used magnets to fix a sheet of aluminum to prevent me from sanding. that end lower than 1/4 inch. The outfeed end of the riffles had a very thin sheet of aluminum again held in place with magnets. I took a long narrow piece of stripped pine and affixed sticky back sandpaper to it, and used it to sand the angles. With this jig, it took my just an hour to sand the riffle angles. Unfortunately I gouged a couple of the riffles backsides due to my fingernails wandering in that direction. But I doubt those few boo-boos will make a difference.
 

Attachments

  • ST 3.jpg
    ST 3.jpg
    66.1 KB · Views: 19
Last edited:

N-Lionberger

Bronze Member
Dec 1, 2013
1,368
1,963
Arcata, California
Detector(s) used
Fisher 1212-x
Fisher Gold Bug 2
Whites 4900/SP3
Dowsing rods
Primary Interest:
Prospecting
I’m building my table top from ABS plastic. It’s easy to cut with wood working tools and glued up fast.
Thought I'd show my third experimental table.

It's made from 3/4 x 1 1/4 pine skeleton sandwiched between 3/16 (top) and 1/8 ply (bottom). The water barrier is Cedar. And the edges where the various materials exit is 1/4 round (again Pine).

I used clear paintable silicone to make sure the seams are sealed top and bottom.

I put three coats of spar varnish on all surfaces.

My last thing is to use my POR-15 spray paint to cover the top surfaces. I will use black, and follow up with a clear topcoat. I should get the painting done in the next few days.

I had to cut a rectangular hole in the bottom ply so I can access the feed side board to install the attachment plate that will be attached to the drive mechanism. I'll get a picture of that when I finally install that plate.

I found the DIN rails I was using on my ST #2 experimental table (24 X 48) was too long. So I had to order another set that are 24 inches long, so they won't stick out from the underside of the table.

With everything finished, the table will still be heavy at nine pounds. Hopefully Jim in Idaho, drive unit can handle that weight.

Another note. The riffles are made of 1/4 inch square hard balsa. It took me a while to figure out how to sand them down. I secured the tabletop on a galvanized steel sheet, and locked it in place with magnets. I then used various thicknesses of magnets to reach the feed end riffle height, and again used magnets to fix a sheet of aluminum to prevent me from sanding. that end lower than 1/4 inch. The outfeed end of the riffles had a very thin sheet of aluminum again held in place with magnets. I took a long narrow piece of stripped pine and affixed sticky back sandpaper to it, and used it to sand the angles. With this jig, it took my just an hour to sand the riffle angles. Unfortunately I gouged a couple of the riffles backsides due to my fingernails wandering in that direction. But I doubt those few boo-boos will make a difference.
I like the table shape I went with a similar design on my ABS table in progress.
 

OP
OP
D

desertgolddigger

Bronze Member
May 31, 2015
1,054
1,966
Twentynine Palms, California
Detector(s) used
Bounty Hunter Time Ranger
Primary Interest:
Prospecting
decided to run what I thought was junk ore this morning. My processing through the chain mill, big sluice, and cleanup sluice didn't give a whole lot. Probably several hundred really small specks of gold.

But I decided to try running what the chain mill couldn't pulverize to powder through my mini cement mixer ball mill for five hours.

As usual, it is a big messy job getting the results into pails, and cleaning out the steel balls.

I was kind of tired by the big messy job, but ran 1/3rd of the ball milled material. Surprise, surprise!! I got twice as much gold from the ball mill, from what I had considered junk ore.

If the last two pails containing about 2/3rds of the remaining material pays lime the first third, then I will have gotten nearly a weeks worth.

Reviewing my memory about my last try at ball milling, I believe my problem was not sluicing slow enough. Since I turned down the flow of water to the point it takes a very long time to exit the sluice, I've probably doubled my gold take, most of which is very very small.

EDITED: yes, sluicing too fast, and not realizing just how small those gold particles can be.

I finished up the material the ball mill put out, and while it's not a lot when you consider the weight, literally hundreds of those super tiny specks were released from grain sized material. The material spit out was like glue, it was so fine. Took a long time to break it up and run through the sluices.
 

Last edited:
OP
OP
D

desertgolddigger

Bronze Member
May 31, 2015
1,054
1,966
Twentynine Palms, California
Detector(s) used
Bounty Hunter Time Ranger
Primary Interest:
Prospecting
Today is an icky weather day, so I decided to remove most of my black sands from the concentrates I've been accumulating over the past several weeks. The concentrates are 120-149 mesh.

I wanted to see what the majority of the gold I get is from which mesh range. I got very little gold in this range. So I now know that most of my gold is 150 mesh and smaller.

I'll classify that gold into another mesh range (150-170), and do this test again. I believe most of my gold will be in this range.
 

OP
OP
D

desertgolddigger

Bronze Member
May 31, 2015
1,054
1,966
Twentynine Palms, California
Detector(s) used
Bounty Hunter Time Ranger
Primary Interest:
Prospecting
I finally received the shorter DIN rails. I didn't even have to drill any new holes to make the bearing blocks fit. :tongue3:

The rails rails, linear bearings and linear rails are finally installed onto the bottom of the shaker table.

I had to add two strips of wood to the bottom of the table, as my idea of just attaching things to the ribs of the table sandwich proved beyond my skills. Just epoxied it on, and used so fine wood screw to ensure they were anchored properly.

I decided to hook up Jim an Idaho's drive system, and it seemed to work. But nothing was screwed down, so I'm worried there might be a touch of binding.

I'll need to mount the rails to the middle support board, and then install everything onto the base table. Might take me a few days to get it all set up, and hopefully functioning.

When it's ready, I'll take a picture, and also endeavour to do a video on YouTube. Never done one before. I use YouTube for my TV and educational entertainment.

For most of you Guys, something like making a shaker table is probably fairly easy. For me, each step is a learning process, experimenting to see what will work. That's usually one step forward, and two back, before I manage to solve a problem.
 

russau

Gold Member
May 29, 2005
7,297
6,762
St. Louis, missouri
:tongue3: :laughing7::icon_thumleft::coffee2: YEP Welcome to the club !! most of us are in the same boat as you and enjoy reading and watching everyone's effort's in making something like this ! We all are routing for you in your achievements in making your table to enjoy !!
 

southfork

Bronze Member
Jun 15, 2014
2,318
7,541
California
Primary Interest:
All Treasure Hunting
I finally received the shorter DIN rails. I didn't even have to drill any new holes to make the bearing blocks fit. :tongue3:

The rails rails, linear bearings and linear rails are finally installed onto the bottom of the shaker table.

I had to add two strips of wood to the bottom of the table, as my idea of just attaching things to the ribs of the table sandwich proved beyond my skills. Just epoxied it on, and used so fine wood screw to ensure they were anchored properly.

I decided to hook up Jim an Idaho's drive system, and it seemed to work. But nothing was screwed down, so I'm worried there might be a touch of binding.

I'll need to mount the rails to the middle support board, and then install everything onto the base table. Might take me a few days to get it all set up, and hopefully functioning.

When it's ready, I'll take a picture, and also endeavour to do a video on YouTube. Never done one before. I use YouTube for my TV and educational entertainment.

For most of you Guys, something like making a shaker table is probably fairly easy. For me, each step is a learning process, experimenting to see what will work. That's usually one step forward, and two back, before I manage to solve a problem.
The only easy way is to buy one already built but what fun is that. I'm in the same boat all new to me I've been watching YouTube also to pick someone else's brain.
 

OP
OP
D

desertgolddigger

Bronze Member
May 31, 2015
1,054
1,966
Twentynine Palms, California
Detector(s) used
Bounty Hunter Time Ranger
Primary Interest:
Prospecting
The only easy way is to buy one already built but what fun is that. I'm in the same boat all new to me I've been watching YouTube also to pick someone else's brain.
Yes, but unfortunately, like drilling precision holes, I only have a jeweler's drill press. I even try center punching to get the hole precise, and am always a little off. Most of my work ends up being slightly off. YouTube is the only reason I started this project, other than I love challenges when it comes to making things. I just have a limited amount and types of tools, and very little space to store them.
 

OP
OP
D

desertgolddigger

Bronze Member
May 31, 2015
1,054
1,966
Twentynine Palms, California
Detector(s) used
Bounty Hunter Time Ranger
Primary Interest:
Prospecting
Tried to get the two linear rails to line up when trying to put the tabletop and support structure together. I get the feeling nothing I try will work, when Using mostly wood. These linear setups are mainly made of CNC metal parts, and fit together perfectly.

I need to try another way. I noticed in the photos that Reed posted that the table runs on one rail. But I can't figure out how it is held so that it doesn't tilt. There must be some kind of support that keeps it level.

I'm wondering if I could do the one linear rail, and off to one side, Have a short bar mounted parallel to the linear rail, resting on a cupped plastic block, as in his photos. I think I need to order these slippery blocks, and try this approach.

So we wait another few weeks until I get the parts. I already have a steel rod. I just need to figure out how to mount it.

As stated in my previous post, getting things built perfect with my skills and tools, just isn't going to happen. I need a lot of forgiveness when it comes to my building.
 

southfork

Bronze Member
Jun 15, 2014
2,318
7,541
California
Primary Interest:
All Treasure Hunting
Tried to get the two linear rails to line up when trying to put the tabletop and support structure together. I get the feeling nothing I try will work, when Using mostly wood. These linear setups are mainly made of CNC metal parts, and fit together perfectly.

I need to try another way. I noticed in the photos that Reed posted that the table runs on one rail. But I can't figure out how it is held so that it doesn't tilt. There must be some kind of support that keeps it level.

I'm wondering if I could do the one linear rail, and off to one side, Have a short bar mounted parallel to the linear rail, resting on a cupped plastic block, as in his photos. I think I need to order these slippery blocks, and try this approach.

So we wait another few weeks until I get the parts. I already have a steel rod. I just need to figure out how to mount it.

As stated in my previous post, getting things built perfect with my skills and tools, just isn't going to happen. I need a lot of forgiveness when it comes to my building.
Easy enough to say but make a frame to fit the bearing blocks and rails then mount it to the table. That's how I did it and still working after all my testing at all speeds and strokes. Plywood strips are strong and easy to drill and cut then glue maybe? your top to them after you fit to the rails.
 

OP
OP
D

desertgolddigger

Bronze Member
May 31, 2015
1,054
1,966
Twentynine Palms, California
Detector(s) used
Bounty Hunter Time Ranger
Primary Interest:
Prospecting
Easy enough to say but make a frame to fit the bearing blocks and rails then mount it to the table. That's how I did it and still working after all my testing at all speeds and strokes. Plywood strips are strong and easy to drill and cut then glue maybe? your top to them after you fit to the rails.
GEE!! I didn't think of putting the rails on strips of wood, then putting glue on the wood, and joining the mid platform. Some things just elude me.
 

OP
OP
D

desertgolddigger

Bronze Member
May 31, 2015
1,054
1,966
Twentynine Palms, California
Detector(s) used
Bounty Hunter Time Ranger
Primary Interest:
Prospecting
I finally discovered two reasons why I couldn't get my linear bearings, rails and everything else to work properly.

My measurements were fine, and the placement of the screws was just fine, but...

1) the steel DIN rails absolutely cannot be depressed anywhere. Apparently putting the screws in caused a minute dip in the center of the rails, which warped the bearing blocks slightly out of alignment.

2) I discovered the plastic bearing long blocks I thought would be as smooth as glass, were in fact themselves manufactured out of alignment. It was barely a fraction of a millimeter in each block, but the cumulative affect was that they were binding on the rail very slightly.

The two things together caused a major binding.

I removed the long blocks, and am not back to using the short ball bearing blocks. The hold down screws are backed off from firmly tight about 1/8th turn.

Result is the bearings move super smooth on the rails. I sure hope not securing those screws tightly isn't going to come back and bite me.

All this took me about a total of five hours of tinkering to finally discover the problem. I hate to say this, but a lot of what the Chinese manufacture may look good, but apparently their quality control seems to be pretty poor.
 

southfork

Bronze Member
Jun 15, 2014
2,318
7,541
California
Primary Interest:
All Treasure Hunting
I finally discovered two reasons why I couldn't get my linear bearings, rails and everything else to work properly.

My measurements were fine, and the placement of the screws was just fine, but...

1) the steel DIN rails absolutely cannot be depressed anywhere. Apparently putting the screws in caused a minute dip in the center of the rails, which warped the bearing blocks slightly out of alignment.

2) I discovered the plastic bearing long blocks I thought would be as smooth as glass, were in fact themselves manufactured out of alignment. It was barely a fraction of a millimeter in each block, but the cumulative affect was that they were binding on the rail very slightly.

The two things together caused a major binding.

I removed the long blocks, and am not back to using the short ball bearing blocks. The hold down screws are backed off from firmly tight about 1/8th turn.

Result is the bearings move super smooth on the rails. I sure hope not securing those screws tightly isn't going to come back and bite me.

All this took me about a total of five hours of tinkering to finally discover the problem. I hate to say this, but a lot of what the Chinese manufacture may look good, but apparently their quality control seems to be pretty poor.
The rails I purchased rest on an aluminum bracket the whole length for added strength no flexing. But the bearings might be another story time will tell.
 

OP
OP
D

desertgolddigger

Bronze Member
May 31, 2015
1,054
1,966
Twentynine Palms, California
Detector(s) used
Bounty Hunter Time Ranger
Primary Interest:
Prospecting
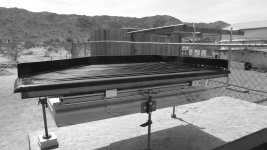
I thought I had everything ready do go, and as you can see in the picture, the legs will interfere with the movement of the table. The problem is that I made the central unit too small, not understanding the legs provided by Jim in Idaho would be a problem. The problem is the legs are six inches too long for this table, possibly eight

I think I'll build a third middle section which the rails are attached to, and use what Orophilia used on his table, threaded knob setup the is a push-pull system. That'll get the table about eight inches lower, so I don't need a step ladder to work it.

I'll save Jim's legs for whenever I can figure out how to drive that big table I made.
 

Attachments

  • ST3 Mock Setup.jpg
    ST3 Mock Setup.jpg
    237.9 KB · Views: 12

southfork

Bronze Member
Jun 15, 2014
2,318
7,541
California
Primary Interest:
All Treasure Hunting
I thought I had everything ready do go, and as you can see in the picture, the legs will interfere with the movement of the table. The problem is that I made the central unit too small, not understanding the legs provided by Jim in Idaho would be a problem. The problem is the legs are six inches too long for this table, possibly eight

I think I'll build a third middle section which the rails are attached to, and use what Orophilia used on his table, threaded knob setup the is a push-pull system. That'll get the table about eight inches lower, so I don't need a step ladder to work it.

I'll save Jim's legs for whenever I can figure out how to drive that big table I made.
Those rails are like my setup they don't flex but need a little weight on then to move smoothly. I thought my setup was binding but I pushed down on the table and smooth as glass.
I thought I had everything ready do go, and as you can see in the picture, the legs will interfere with the movement of the table. The problem is that I made the central unit too small, not understanding the legs provided by Jim in Idaho would be a problem. The problem is the legs are six inches too long for this table, possibly eight

I think I'll build a third middle section which the rails are attached to, and use what Orophilia used on his table, threaded knob setup the is a push-pull system. That'll get the table about eight inches lower, so I don't need a step ladder to work it.

I'll save Jim's legs for whenever I can figure out how to drive that big table I made.
Those legs look pretty nice maybe just cut them a little shorter?
 

Last edited:
OP
OP
D

desertgolddigger

Bronze Member
May 31, 2015
1,054
1,966
Twentynine Palms, California
Detector(s) used
Bounty Hunter Time Ranger
Primary Interest:
Prospecting
Those rails are like my setup they don't flex but need a little weight on then to move smoothly. I thought my setup was binding but I pushed down on the table and smooth as glass.

Those legs look pretty nice maybe just cut them a little shorter?
I sure would like to modify them to be shorter, but keep the same function that Jim built into them. But, as I've said many times previously, I don't have the tools and equipment to work with metal. It's fairly obvious you can do things like this, but please understand, I don't have the tools or equipment to do so.

All I can do is ship these back to Jim, and have him lop off 2/3rds of the length.

Meanwhile I made a third middle section. If I'm enthusiastic, I may have another mockup ready. I decided to do a modified version of what Orophilia made. I'll jus have four corners with threaded knobs, and then place shims until I have the correct tilts, then tighten the four corners down. It's as simple as I can come up with, that I might actually be able to make and have work.

Now, if I can only figure out why my camera made a B&W picture.
 

OP
OP
D

desertgolddigger

Bronze Member
May 31, 2015
1,054
1,966
Twentynine Palms, California
Detector(s) used
Bounty Hunter Time Ranger
Primary Interest:
Prospecting
Did my second test of my super concentrates gathered during the past few weeks.

The first was mesh 120-149, which produced very little.

This test was mesh 150-179, and I was figuring this was the range most of my gold would be in. That didn''t pan out this evening. It was about the same results for my first test.

Next will be 180-199 mesh, and I won't even speculate as to the results. Will let you know whenever I manage to prepare the material for panning.
 

OP
OP
D

desertgolddigger

Bronze Member
May 31, 2015
1,054
1,966
Twentynine Palms, California
Detector(s) used
Bounty Hunter Time Ranger
Primary Interest:
Prospecting
I did my third test on the super concentrates. This time it was mesh 180-199. Results were much better than the first two. Total was about twice what I got for the first two added together. But apparently the majority of the gold is in the next batch mesh 200-299. Wish I had another one or two between those mesh sizes, but I've already got too many sieves with no room to store them. Will let you know the results of the last batch.

On the shaker table side of the house, I got the leveling system made. I just need to take everything back outside, and attach everything to my base table. A quick test seems to indicate my shim system will work.
 

Top Member Reactions

Users who are viewing this thread

Latest Discussions

Top