I live in Japan and enjoy hitting the beaches for a workout. Three hundred or more coins in a hunt is quite common, not to mention an assortment of trash and of course bling. In all, I can dig 400 to five hundred targets in a 4 hour hunt. Obviously, my arms and back began complaining.
I would love a well built stainless scoop that I see many of you using but to get one sent here would be expensive....almost double the price. So I did some thinking and a couple years ago built a scoop based on the workings of a bucket on a mechanical shovel. The effortless way the bucket goes into the ground then extracts the fill was an idea I could use at the beach. A few days ago, my prototype scoop, after two tough years of use, needed other day replacing so after about 40$ and a couple hours, I was up and running. I wanted to share the making of this scoop with its improvements for those interested in a good substitute to the high end models.
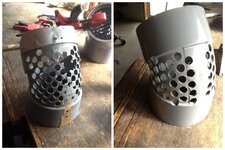
In the first picture of the prototype, you can see how the honeycomb on the bottom of the scoop finally buckled under digging stress. This happened over a year ago and I got by by riveting a strip of aluminum flat bar from the digging edge to where the handle attached. This transferred the load nicely and worked well until the aluminum bare failed the other day due to use.
You can see in the improved scoop that the aluminum bar has been replaced by the strip of solid PVC running up the spine of the elbow. A 15mm (5/8") drill was used to create the honeycomb.
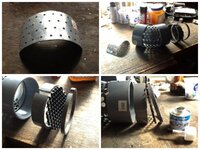
So the basic components of the scoop are a 6" 45 degree PVC elbow, a pice of metal for a digging edge, some kind of sieve material for the back, and some scrap 6" PVC used to cut a collar and retaining ring to hold the sieve.
I was able to find a small steel plate pre drilled exactly to the rivet size I used. Stainless would be best but I just didn't have any laying around.
For the sieve, I bought a plastic paint roller screen cut a piece to fit the inside of the elbow. Then I cut the collar and retaining ring from some scrap flange I had using a table saw set at about 1/8 inch and slowly rotating the flange against the fence. PVC cement was used to secure the back end. The retaining ring was clamped and left overnight for the cement to harden.
The edge plate was formed by hammering over a 4" pipe. Then the corners were rounded and using a grinder the edge was sharpened.
The plate was fastened using the largest stainless pop rivets I could find here (~1/8").
Then the top part of the elbow was cut back using a jigsaw.
Finally, I attached the handle and the step ( previously used on the old scoop). The step also transfers the force of the handle downwards to the digging edge.
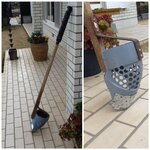
The finished scoop!!
Notes:
1. All hardware and metal should be stainless for a professional look.
2. I use a 1 1/2" step which is slightly too narrow. Sometimes my foot slips off while digging.
3. The inside collar adds strength to the handle attachment so don't be stingy with the cement.
4. This scoop digs like a dream. Due to its design, it goes straight down into the sand and cups the fill allowing a clean hole with little handle work. I get a depth of ~8" per scoop.
5. Works great in dry/wet sand and shallow surf but probably best to stick with the surf scoops if that is where you hunt.
*************************
It is two years ago since we got hit hard by the great earthquake. I was actually hunting a beach when it hit. If any of you saw that picture of the huge whirlpool off the beach, that is where I was. You can see pictures of my house above but what you can't see is the cracked foundation or the hundreds of popped screws and broken nails throughout the house. We were lucky but the damage to north eastern Japan was incredibly huge. The reconstruction effort is immense and ongoing and the ability of this country to deal with adversity is inspiring.
About half way through writing my little scoop story we heard that distinct rumble followed by the shaking as a rather small M4.3 gave us a start. It came and went fairly quickly but it was centered offshore only about 10 km away. For a second it "had the feel" and as I jumped up heading towards the door the blanket of the foot warmer table (kotatsu) lassoed my feet and I crashed to the floor. The goose egg and small cut i now sport above my eye add punctuation to the jumpiness and perceived fear of another major event happening in the near future. You can bet you know which way the car faces when parked at the beach!
Speaking of which I will be off to tomorrow to break in the new & improved scoop.
Happy Hunting everyone!
Ian
I would love a well built stainless scoop that I see many of you using but to get one sent here would be expensive....almost double the price. So I did some thinking and a couple years ago built a scoop based on the workings of a bucket on a mechanical shovel. The effortless way the bucket goes into the ground then extracts the fill was an idea I could use at the beach. A few days ago, my prototype scoop, after two tough years of use, needed other day replacing so after about 40$ and a couple hours, I was up and running. I wanted to share the making of this scoop with its improvements for those interested in a good substitute to the high end models.
In the first picture of the prototype, you can see how the honeycomb on the bottom of the scoop finally buckled under digging stress. This happened over a year ago and I got by by riveting a strip of aluminum flat bar from the digging edge to where the handle attached. This transferred the load nicely and worked well until the aluminum bare failed the other day due to use.
You can see in the improved scoop that the aluminum bar has been replaced by the strip of solid PVC running up the spine of the elbow. A 15mm (5/8") drill was used to create the honeycomb.
So the basic components of the scoop are a 6" 45 degree PVC elbow, a pice of metal for a digging edge, some kind of sieve material for the back, and some scrap 6" PVC used to cut a collar and retaining ring to hold the sieve.
I was able to find a small steel plate pre drilled exactly to the rivet size I used. Stainless would be best but I just didn't have any laying around.
For the sieve, I bought a plastic paint roller screen cut a piece to fit the inside of the elbow. Then I cut the collar and retaining ring from some scrap flange I had using a table saw set at about 1/8 inch and slowly rotating the flange against the fence. PVC cement was used to secure the back end. The retaining ring was clamped and left overnight for the cement to harden.
The edge plate was formed by hammering over a 4" pipe. Then the corners were rounded and using a grinder the edge was sharpened.
The plate was fastened using the largest stainless pop rivets I could find here (~1/8").
Then the top part of the elbow was cut back using a jigsaw.
Finally, I attached the handle and the step ( previously used on the old scoop). The step also transfers the force of the handle downwards to the digging edge.
The finished scoop!!
Notes:
1. All hardware and metal should be stainless for a professional look.
2. I use a 1 1/2" step which is slightly too narrow. Sometimes my foot slips off while digging.
3. The inside collar adds strength to the handle attachment so don't be stingy with the cement.
4. This scoop digs like a dream. Due to its design, it goes straight down into the sand and cups the fill allowing a clean hole with little handle work. I get a depth of ~8" per scoop.
5. Works great in dry/wet sand and shallow surf but probably best to stick with the surf scoops if that is where you hunt.
*************************
It is two years ago since we got hit hard by the great earthquake. I was actually hunting a beach when it hit. If any of you saw that picture of the huge whirlpool off the beach, that is where I was. You can see pictures of my house above but what you can't see is the cracked foundation or the hundreds of popped screws and broken nails throughout the house. We were lucky but the damage to north eastern Japan was incredibly huge. The reconstruction effort is immense and ongoing and the ability of this country to deal with adversity is inspiring.
About half way through writing my little scoop story we heard that distinct rumble followed by the shaking as a rather small M4.3 gave us a start. It came and went fairly quickly but it was centered offshore only about 10 km away. For a second it "had the feel" and as I jumped up heading towards the door the blanket of the foot warmer table (kotatsu) lassoed my feet and I crashed to the floor. The goose egg and small cut i now sport above my eye add punctuation to the jumpiness and perceived fear of another major event happening in the near future. You can bet you know which way the car faces when parked at the beach!
Speaking of which I will be off to tomorrow to break in the new & improved scoop.
Happy Hunting everyone!
Ian


Attachments

Upvote
0

") Lots of room for improvement.
Lots of room for improvement.