Made my own Miller table

flyadive

Bronze Member
🥇 Charter Member
Joined
Jun 11, 2012
Messages
2,214
Reaction score
1,571
Golden Thread
0
Location
NJ
Detector(s) used
Whites
Primary Interest:
Metal Detecting
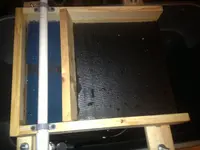
I made this Miller Table using Garlock gasket material for the Matt . My first run I only found 1 speck after panning pay dirt two times. I think I have to run it again after I rough up the Matt some!
What do you girls and guys think? ImageUploadedByTreasureNet.com1459049332.983496.webp
 

Upvote 0
Did you get that speak I mean speck in NJ?
 

If you put some scotchbrite type pad in the section that holds the spray bar it will diffuse the water evenly.

[ ATTACH=CONFIG]1290762[/ATTACH]
 

Attachments

  • IMG_5201 - Copy.webp
    IMG_5201 - Copy.webp
    325.8 KB · Views: 185
The gasket material is too hard and slick, for $12 you can get a self-repairing cutting mat from a hobby shop. I have made a few now and they work excellent
 

The gasket material is too hard and slick, for $12 you can get a self-repairing cutting mat from a hobby shop. I have made a few now and they work excellent


ImageUploadedByTreasureNet.com1459555842.531662.webp

Is this it?
 

That would be it. Like was mentioned before, you would also scuff up what you're using now. Just make sure to scuff side-to-side only, using a coarse sandpaper. Doing this will make teeny tiny riffles that will help catch the heavies. As all of your material is classified down very small, this should work very well.
 

I got a slightly textured mat at harbor freight for $3. It was tool box liner I think 18 x 18. It is soft enough when it is wet that I take the artist brush I use to move the sands around with and use the handle to press and pull a line crossways near the top of the flow next to the wall. I then scrape my gold into that slot which lasts for about twenty minutes and then the mat reforms.
 

If using chalkboard paint...should you "scuff" up the surface?
And, does it matter if it is wood, aluminum (sluice box blank) or ABS? (which I can't find...)
 

Wood was good in the old days, but they had nothing else. Now there are MUCH better materials. In the end it's what you will accept for your project and how much $$ you're willing to invest. It need not be expensive to work great!
 

If using chalkboard paint...should you "scuff" up the surface?
And, does it matter if it is wood, aluminum (sluice box blank) or ABS? (which I can't find...)

Chalkboard paint dries to a rough to the touch texture (sort of like already used sandpaper). It probably adheres better to wood but wood raises when wet as the individual fibers absorb water and expand. I think the first miller tables were just made of well sanded wood and took advantage of the fact that, when wet, the fibers still expanded microscopically and created just enough drag to allow the table to work well. As a side note; a common woodworking practice is to first sand then lightly wet and let dry and then resand to smooth off the now slightly raised wood fibers before applying the finish coats.
 

Last edited:
If scuffing a cutting mat, use 400 grit as a minimum! 220 grit will make heavy scrapes that you may not be able to brush the gold out of.

6500 deg (daylight) LED clamp lights work great for making gold "POP" on the table. I now run 2 on my table. (available at Lowe's ~$19 ea) I may try LED strips on the sides of my next table. Cross lighting from the sides really helps to spot the tiniest specks.

IMG_2810.webp
 

On the lighting, here's how well the gold shows with the lights on each side of the table. (shot without flash and with water running)

They really stand out!

IMG_2832.webp
 

might run a wire brush over that gralock if its the type im thinking it is from the pictures it will grove it up pretty good.
 

The gasket material (assuming it is what I am imagining) has a waxy surface. This is by design to help seal water jackets but it is not what you want for a table as it will repel gold.
One of the best and cheapest materials I have found is a section out of a old school neoprene wetsuit. The smooth black rubbery ones, not the cloth lined ones. Available at most any thrift store for cheap. This is the same type material used in a Black Magic cleanup sluice.

Another trick with this is to find or make sort of a riffle tray for it like it were a regular sluice but wit about 1" spacing. Store the table with the riffles lying on the neoprene with a bit if weight. When you take it out to use it, remove the riffle tray and set it aside. It will have left some indentations in the neoprene that work like tiny drop riffles. The neoprene has a memory and the indentations will last for several hours before the rubber relaxes and becomes smooth again.
 

The gasket material is too hard and slick, for $12 you can get a self-repairing cutting mat from a hobby shop. I have made a few now and they work excellent

The shelf covering azviper used in his plans is also a great surface for a Miller table. And it is cheap; and needs no special roughing up, etc. See Azviper's plans.
 

You can check out AZviper's plans using the rubber mat here...http://www.treasurenet.com/forums/g...ng-miller-table-using-rubber-mat-surface.html.
The scotchbrite does a great job of smoothing the water and removing bubbles. As a bonus, it traps a lot of fine dirt. You do not want to run dirt through your pump. My water recirculating system runs through three sediment traps before returning to the pump. I am going to check out the clamp on LED lamp even though overhear florescent lights seem to work well.
 

Top Member Reactions

Users who are viewing this thread

Back
Top Bottom