Kelly get two pieces of 1"x 4"x 8ft. and cut them at 45degrees on each end at total distance 20 inches. Create 8 of those 45'ed on each end. Once that is done lay the boards flat and on the side of the board take tape measure and mark off the edge on the flat surface 3/16" and 5/16" and another set at 2-3/4" and 2-7/8". Make sure you do this at both ends then take a straight edge and place it on both of those marks to create a straight line down the length of the board. Do this to all the boards on the one side. You should have a line down the length of the board that is 1/8" wide. Take the tape measure and go to the opposite side of the board but same side as your line and then place a mark again both sides at 3/16" and 5/16" and one solid line at 3/4" do the same thing with the straight edge and create the same lines. Now clamp those boards down on one side, then take a circular saw and adjust the blade to only go in the board at the most 1/4" preferably less if you can. Once that is done cut the clear area out between the pencil lines for the 3/16" and the 5/16" and 2-3/4" and 2-7/8" marks. Then the opposite side in between 3/16" and 5/16" cut that out. YOU ARE ONLY CUTTING OUT THE CLEAR AREA between the lines. If you have a table saw for your final cut cut the 3/4" mark all the way through so you have 3/4" x 20" micro rips with the channel down them that you already pre cut. Make sure you cut all 1/8" wide channels out first which is the area between your 3/16" and 5/16"marks and the 2-3/4" and 2-7/8" marks. Now paint the wood whatever color you want. You will need to purchase plexi-glass that is less or at 1/8" in thickness. Get a 4'x8' piece of the plexi-glass and one piece of finish grade paneling(luann). You will need to purchase four hinges and 2 latch mechanisms. Then purchase a two lights that are either led or a small light bulb. You will need foam and if you cannot find the right color for what you are looking to do then just get the foam and spray paint it the color you want. Let this all air dry.
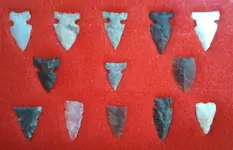
Now it's time to put it all together. Create your 4 sides. Lining the channels up on all 4 sides. Nail just the bottom part both sides on the corners. Cut the Luann finish board to size it would be roughly 19-1/2" on all sides but make sure of this. Take clear silicone and run a little micro bead of silicone down the channels on all 4 sides. Slide your finish board into the channels. Make sure it is all square. Then at the 2-3/4" and 3" mark, silicone and slide the plexi glass into place. Place the top board on and nail that together. That is the bottom now complete. Drill a hole in the back paneling to size for the light and install. Now to do the top take your 3/4" micro rips and put the bottom together and nail it and then take a piece of plexi glass cut to size and silicone the channels again cleanly so you do not make a mess and then slide the plexi glass into place. Nail the top down. You have just created your lid. Lay the lid on top of the bottom portion and install the hinges and latch. Place the foam in place and place your arrowheads to the design you want on the foam. Once that is done take that razor knife and outline every point in the foam. Remove the points and now cut out those outlines. Once that is done and you set your points in there spots they will not move with the pressure of the lid and foam. Shut the case and turn on the switch.........Now you have a shadow box display that will light up the translucency of your points.
All you need is:2 pieces of 1"x4"x8', 1pc. of 4'x8' finish paneling, 1pc. of 4'x8' piece of plexi glass, trim nails, foam, paint, 4 hinges and 2 latches and small lights or led lights. You can get it all at home depot and it would cost you less the 75$ and you will be able to create 2 twenty inch shadow boxes with this in less then a hour of working.


")