Help with a small pan American pulse jig build

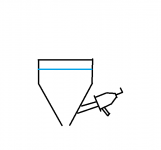
A few things I am starting to recall about the jig. One is it was found that the diaphragm worked better when it was below the water level
unlike the pic in post 15 ours was constructed similar to my drawing here. jig.png
Another thing that i recall is using a pressure regulator, it has garden hose threads and I think can be bought at a hardware store. I will see if I can get more info on that later the jig will work without it.
I am curious where you got your plans for the jig that you have made so far?
 

Honestly thank you so much! this input is invaluable for me!!
 

I got the plans from the US patent online and I just tried to replicate it.
 

Do you mean that the diaphragm worked better below the top level of the pulse valve? Or the water level with which part?
 

I think I did it right this time! I used epoxy as well on the inside and outside to the water outlet so it would be smooth and sure no leaks.


I hope this is okay


IMG_2604.JPGIMG_2604.JPGIMG_2606.JPGIMG_2606.JPGIMG_2606.JPGIMG_2601.JPGIMG_2601.JPGIMG_2603 2.JPGIMG_2602.JPGIMG_2602.JPGIMG_2603 2.JPG
 

Do you mean that the diaphragm worked better below the top level of the pulse valve? Or the water level with which part?

The pulse valve is below the overall water level like what is shown in pic on post #22. The blue line being the water level.
 

yes got it. The new design was better correct? I just need to make the shaft with the washers and awaiting the rubber.
 

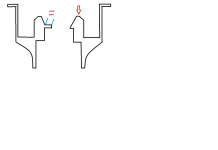
Here is a cut away profile view of your part. The left hand side shows the lip or step that you made. [blue lines] Ours looks like the right hand side.
I have no idea if this will affect it or not. I say try it and if it is not working right you could drill that out.
The red arrow is the surface that the rubber washer will contact, so as long as that is smooth and makes a good seal then yes that should work.water outlet.png
 

is my new design better?
 

I just saw this, thank you! I will change that!
 

Okay here is the update.

1. I drilled out the water outlet so there is no lip
2. I tried my best to get cut the rubber plunger
3. Still getting tiny leakage drops from the plunger area because its not a perfect circle and closing the gap perfect, I tried to show in images.

Frustrated at this point.

IMG_2812.JPG
IMG_2814.JPG
IMG_2815.JPG
IMG_2816.JPG
 

Maybe I should have done this first, but I thought we were on the same page. Does this make sense?
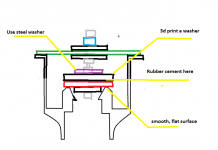
You will need a larger steel washer and make a larger rubber washer.water outlet.png
 

Makes much more sense. Thank you. After I drop my son off to school I am going to make this happen. I can't thank you enough. When I find my diamond on my lands I want to send you a piece of rough for your help. Do you have a P.O box or address ... Thanks so much
 

Great. Please keep me updated on the rest of the build if you don't mind. I like the idea about the rough, the closest I have ever come to having a diamond is when I found a tiny piece of Topaz.
I am curious about your general location? pm me if you want.
 

Ill PM you those details now and get your address, I am sending you a rough diamond. running out now to go get bigger washers so I can cut the rubber circle and get this jig pulsating. I am sitting on a bunch of diamonds and gemstones I just need the hardware.
 

Have you tried it that way yet? I think you will need a hard washer the same diameter as the rubber washer, I also think we rubber cemented the rubber washer to the hard or steel washer so it wouldn't get get sucked back into the hole.
You could make a washer with your printer and then also use the steel washer that you already have for support.

water outlet.png
 

Top Member Reactions

Users who are viewing this thread

Back
Top