poor mans gold n sand dredge

Jeff95531

Silver Member
Joined
Feb 10, 2013
Messages
2,625
Reaction score
4,094
Golden Thread
0
Location
Deep in the redwoods of the TRUE Northern CA
Detector(s) used
Teknetics Alpha 2000
Primary Interest:
Prospecting
I started a project this week and I wanted to post what's happened so far...before the FOG syndrome sets in. :icon_scratch:

OK, so last year I buy a shrimp gun from a local going outta business hardware store for half off ($20). Modify it for 5 bucks to collect gold. It handles like an Army Bazooka but first time using it, I find a .045 gram picker!!:headbang: It's my first and I'm sold! So...now...I want to take it to the next level. Like pumping without losing anything. Like pumping into an in-stream sluice, a bucket or a pan directly via 1 inch hose...would be so much easier. But first...a little background.

Performance of original configuration of shrimp gun as adapted for gold recovery:

Pros: 6' overall length. 1 inch intake for deep cleaning. Quiet. Crayfish hunting is a definite alibi. Disturbs only what I want, where I want and water is instantly returned as it flows out of the Super Sluice pan for con collection. Reaches where I can't.

Cons: Dumps rapidly at the end of each stroke as no check valve..at all. Adapt by pulling less and raising sooner but still a PITA. An angled intake (45/90) would help but still a major PITA (and not in direct point of contact with bottom as you can rarely see while operating it anyway. Also, the last most precious thing you sucked up will be the first thing to dump out on the ground on it's way to the pan or bucket soooo. And the same thing as a pro is a con as I had to shorten it to 5'2" as new hardware made it as tall as me! 6"2. Did it work? At first. With 2 check vales and straight water? You could flood a place real quick. BUT...Kinda no too. Suction is provided by a wafer Styrofoam-like freeze plug style (obviously need to upgrade it to a leather "seat cushion" wrap around...maybe even chamois?.) IDK???

With both styles of check valves (cone @ intake with 1/2 pound spring pressure and a HD flapper valve at exhaust...and if I work up a sweat... it pulls some...with valves partially blocked open with -1/2" rocks...ugh. :BangHead:

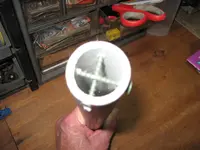
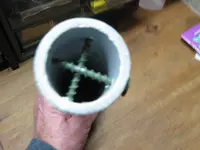
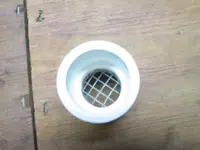
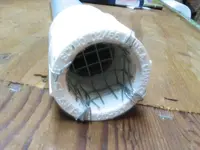
Here's some pics as I stumble my way thru the process. I have 2 types of check valves. A flapper for the exhaust to the bucket that I connected so as to expel all water but retain heavies but alas, -1/2 intake was MUCH too BIG for them as both valves opened, stuck and failed. So...1/8 inch screened before entering is much more realistic. Which means...I gotta come up with a shot glass style end for the intake to filter out all cept for -1/8. Or an X with a couple of bolts in the 1 inch intake ???

Results were less than spectacular. I mean, once I got the second (exh) check valve in place, it pumped water out like a fire truck. Solids tho? Not so much. How do I know this? Watching them in a clear hose race back and forth as I stroked. And nothing but black sand in the recovery bucket. Already $50 into it. ::) More as this story develops...

001.webp 002.webp 003.webp 004.webp

005.webp

The second check valve made all the difference...till I added rock to the slurry...

001.webp 003.webp 004.webp 005.webp

006.webp A bigger badder bucket and my poor mans BGT which the gun WILL eventually feed.
 

Last edited:
Upvote 0
Top candidate for the 1/8" intake screen (so far). TH Marine Stainless Steel 7/8 Inch Boat Pump Strainer Screen AS-2 1-8 | Great Lakes Skipper

Intake is currently 1". Using the above, an 1/8" picker or less would be cleared from the hole (which are elusive here, at least for me) and what remains (from previous experience) is when the gun stops working...it's either plugged or what remains in the hole is +1". Remove and inspect remaining rock and discard. Resume dredging. Any other 1/8 inch small scale units out there???
 

always thought it would be a good idea to make the catch bucket work like a gold trap/fluid bed.
the tip I use most just has a bolt across it to classify and keep from getting clogged up.
 

always thought it would be a good idea to make the catch bucket work like a gold trap/fluid bed.
the tip I use most just has a bolt across it to classify and keep from getting clogged up.

Two drywall screws that I have on hand and placed thru the intake (X style) is one quick and easy fix and I should have said, is at the top of my list. Thanks!
 

gold dangit! duplicate post edit..

on here about 4min it shows the tips and at 5min it shows the one with the bedrock cleaning screen tip;
https://youtu.be/NUHq-h3MYyQ
 

Last edited:
Here's another thought how about a hand powered bilge pump? Kind of the same idea but the seals might be better?

I tried one of those years ago. The valves only tolerate water. Gravel jams em up very easily. Worked on sand but not much more :(
 

Part two. New intake prototypes.

Went into Ace a couple days ago to see what they had to offer to fix the plugging problems I was having with the two different check valves. Based on what I found during testing, the -1/2 was too big but 1/8" seemed to do ok. So I grabbed some 1/8" hardware cloth and misc parts to make up three prototypes for testing and field work.

First, the tried and true X with screws. (1" intake for all btw...guessing -1/4" intake with this version.) 012.webp

Second, a stainless steel 1 5/8" sink strainer. I glued it into place several times using two glues (you can see the tabs I left facing out but it's retained with the rubber slip union) 003.webp

I added the rubber union to assist in keeping the screen in place even if the superglue/Gorilla Glue Adhesive fails. 002.webp

And a spare threaded/slip. 004.webp

And my favorite. An 1/8" hardware cloth cut to fit inside a threaded 1 inch slip union. First attempt with the cloth was way too small. Doubled the size and used a shallow 13/16" std socket and hammer to set it in place then glued it all up.

More testing after everything dries. Up to $50 now. Definitely gonna have to count this one as another gift to myself. :icon_thumright:

Intake (not pretty) 005.webp (inside view of suction side...mmm)
 

Attachments

  • 009.webp
    009.webp
    106.9 KB · Views: 85
  • 011.webp
    011.webp
    507.9 KB · Views: 82
  • 006.webp
    006.webp
    442.4 KB · Views: 81
  • 007.webp
    007.webp
    481.7 KB · Views: 75
  • 008.webp
    008.webp
    48.6 KB · Views: 80
Last edited:
If you were working a dredge in the same area Jeff, would you use a 1" hose? Of couirse not, becasue of all the rocks you would have to toss by hand. Same principle apples to hand dredges.
 

I have experimented with intake sizes and it loses a lot of suction as the intake size increases. (Possible culprit is the foam like adjustable piston mentioned earlier.) That was when I first got it and now 2 check valves restrict the material intake. BTW after working this one, it's definitely as big as I can handle alone.
 

Testing results

Finishest the first phase of testing just now. For a baseline, I tested as is and the gun moves 5 gallons of clean water in one minute, including the 15 seconds or so to prime it...so happy with that. I took a 5 gl bucket water of water and added 2 cups of 1/2" gravel and 2 cups -20 black sand/gravel. The clear hose showed (in spite of the flapper valve) I was losing 50% volume due to length Vs suction gun length (thanks NH and others) so I cut it down to 5'. The first reduction I tried was at the tip using the X screws. This made it considerably harder to stroke as I was classifying @ the tip. To further complicate things, I found (later) that the check valve in the intake (needle and seat style) is way out of it's class for this kind of use and plugged open. On the other hand the intake with X screws (1/4") never plugged.

Found:

Gun is working better as it recovered 1/5 of the fine cons I added (which was almost all black sand and noticeably heavy) and did so with one blocked open intake check valve. The flapper also gathers crumbs in it's seat, but it does not incapacitate it. So...gotta get another (but cheaper) flapper valve @ HD and mate it to the gun for the intake before additional testing. I think I may be able to remove one of the two screws to allow Lima bean size to enter the intake.

More to come...
 

I have worked side by side with prospectors using a gold n sand, and another time one of the other ones. I was using my 3" super gold sucker, and sometimes my 2". I easily moved more material than either of the other prospectors. Once you get use to using a super gold sucker, they are very easy to use, and you do not lose much. If I get down to cracks and crevices, and need a smaller nozzle, I use the 2" with an adaptor that lets me use either a 1", 3/4" or 1/2" nozzle. If you are trying to classify with a small nozzle, you are going to be hand tossing a lot of rocks. The first 3" I made, I made for Chuck Lassiter. I tested it out, and was so impressed witht he amount of material it could move, I made myself one and usually used it, as I had a lot less rocks to toss by hand compared to when using a 2".

And I do not have any on sale now, so it is not a sales pitch. I have been taking a break since Oct.

I've been following this thread with interest, as I may be planning a trip where some type of PVC sucker would be beneficial.

I took a look at your Super Gold Sucker design, and one of the key things that stood out to me is that it doesn't have a bucket feed. So, a single charge per use. Based upon what I've noted with these devices, this means it must be operated at a relatively steep angle, while you're bent over at the waist. Sure, a 2" or 3" opening will grab more material, and larger pebbles, but using something like this all day would be exhausting for even someone in the best of shape.

Granted, the check valves have compromises, but because of those valves, it's difficult to make a direct comparison between your design and Gold 'n Sand, or Fissureman's design, for example. For a 30-minute test comparison, the larger diameter of your design would obviously come out on top in volume moved, but for a day-long (or longer) operation, a bucket-feed would most likely be more practical, and can be operated in a more upright manner. The tortoise beats the hare...

I think the most important feature for a gold sucker is fluid velocity, for removing gold from underwater crevices or tight spots, or even heavy material laying flat on the bottom, that can't be scooped with a shovel. I think a narrower nozzle has the advantage in this respect. Not enough velocity, and the gold will just lay there, smiling up at you! Do as much work as you can with the shovel first, removing all the chunkier stuff, then clean up the area afterwards with the sucker. Maybe what we need to do is evaluate under what circumstances a sucker device is to be used, and when a shovel is better, and then don't be tempted to try to substitute one where the other is a better choice. The key is to move the most material in the most efficient manner, and I think a long-handled transfer shovel beats any PVC device, hands down, under most conditions.

The other factor to note, is (at least in most gold-bearing streams and rivers I've seen) the material gets finer the closer to bedrock. There are cobbles to deal with, yes, but in general, the grade of material is such that it should pass OK through a 1" nozzle. If you're trying to move bigger pebbles with the sucker device, maybe you're still at a layer where the shovel is more useful.

The disadvantage of the shovel is when the current will wash the material off the spade as you're lifting it to the surface. With a little planning, you can move cobbles just upstream of your position to block the flow of current, and continue to use the shovel. Even a small tarp weighed down with rocks...and maybe a stake or two...can assist in redirecting the flow of water to help increase the efficiency of your work site. It's all about using the right tool for the job.

Another difference between the Gold 'n Sand and your design -- I think -- is a leather seal vs. the adjustable drain plug. The tighter the seal, and how well it slides against the PVC, will make the better suction. I don't have enough experience to lean one way or the other here.

Your experience and suggestions are welcomed! Maybe we can help Jeff come up with a winner! :hello2:
 

The 2" and 3" both have plenty of velocity to pick up just about anything that will fit through the nozzle. Reed lUkins has some good videos using a 3" with a 5' barrel.

The creeks that I have worked before have coarser cobbles and boulders on the bottom above bedrock.

A shovel works great for dry material, but as soon as you get it wet, and lift it out of the water, you start losing gold. That is why many times the old timers would just shovel in until they hit the waterline. They knew they would be losing gold. With my 3", I can suction up material faster than a sluice can process it. I have a classifier set right at the head of the sluice, so the suctioned material goes into the classifier. I found it wrks better if you have 2 people, one to work the classifier, and one to suction up material. And the 3" will suck up about a 1/2 to 3/4" 14" gold pan of material per suction stroke. I usedmine no problen when I wa sin my mid to late 50s.
 

I bumped up test I did with the 3".
 

from deserdog..."I found it wrks better if you have 2 people".

Amen buddy and a big part of my problem. While I often go with a buddy, it's usually each on his own once we get there. I don't mind that at all and not bothered with the restraints of a one man show but it does limit what can be done.

Reed Lukins has some good videos using a 3" with a 5' barrel."

The 5'2" cannon I have is currently mated to a 1" system that could be expanded to a 2" barrel with no check valves.

001.webp

Thanks for the ideas all. :icon_thumleft:

I got the other flapper valve and parts and after I got it all together...didn't like the 9" distance between the intake valve and the exhaust so back to R&D.

I have my poor mans BGT sluice that EVENTUALLY one day I hope to feed it with this gun. I also hope it works underwater when I test it in the river next fall. (snorkel no tank.)
 

Last edited:
And here is the final final prototype. How do I know it's a final? Cuz I've done everything wrong that can be done and what works is what's left. Here's what I've learned so far...with help from others too so tyvm.

Just say no to needle /seat check valves. Flappers only. Why? The others plug way too easily and you cannot classify it down small enuf to make it work. Not only fail but too much work to pull next to nothing samples thru. It works, but barely.

Latest version is my best shot and will test later with an open one inch intake, in and out. Hand clearing of rock should be reduced and overall recovery should increase. Changes I made today maxed the minimum distance between check valves and 5'2" overall length. Best quess but testing will tell and I've done all I can. Below is pics of latest.

View attachment 1388272 View attachment 1388273
 

Last edited:
Mission accomplished.

Just finished up testing in the driveway with a 5 gallon bucket of water mixed with 1 gallon of -1/2" gravel all the way down to black sand. 100% recovery and transfer with zero clogs. It did go thru 10 gallons of water to get it and if I did more, I could of made it that orange bucket spotless.

Should it clog in the field with the 1" tip, I already have a reducer to a 1/2" (single screw thru a one inch.)

Anyways...if you have been following along, you now know how to do it right the first time and not bother with any of the fails along the way. You can PM me for anything specific. Merry Christmas!

Transferred all material using 10 gallons of water. 001.webp

Is a project ever done? Not yet. The catch bucket is fragile and the intake currently consists of a 1" double ended ribbed union attached on the inside by a closet pole retainer. It is important that it swivels freely thru the side, so any better ideas are encouraged. For now, I have to remember:
attach hose to bucket
attach lid to bucket
fill/submerge bucket completely in water and secure with rock inside (or preferably out on lid)


002.webp

003.webp 004.webp 005.webp
 

Top Member Reactions

Users who are viewing this thread

Back
Top Bottom