Punch Plate Template or Stencil?

DizzyDigger

Gold Member
Dec 9, 2012
6,347
12,869
Concrete, WA
Detector(s) used
Nokta FoRs Gold, a Gold Cube, 2 Keene Sluices and Lord only knows how many pans....not to mention a load of other gear my wife still doesn't know about!
Primary Interest:
Prospecting
In the process of making a new, top mounted classifier for my
Gold Cube. Key part of it is a 6" section of 1/8" punch plate,
but I can't find a pattern or template on the web, anywhere. :dontknow:

Any ideas on a drill pattern for this? I know some of you have
drilled out the holes for your trommels, so how did you figure
out what pattern to drill by?
 

Upvote 0
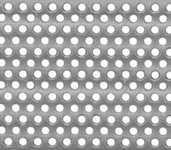
here is a place you can buy perforated metal instead of drilling 1000 plus holes... McMaster-Carr

9255t131p1-c01cl.png
 

Dizzy, hit me up with a PM, i might have something for ya from here at work.....
 

Thanks all for the help!

Duckwalk: I decided it would just be easiest for me to make
3/16" wide lines across the metal, and then just drill away.
I'll try to stagger the holes a bit, but it'll definitely be looking
like Swiss cheese when I'm done. Should pass all the -1/8 material
just fine.

Once it gets done, and IF it works as planned, I'll make a thread
so others can see how to build one. It's simple to make, very low
cost and should increase production about to the level of feeding
a Bazooka with unclassified material.
 

Dizz I have 19 server rack full of punch plate doors that I can get for free and cut to any size you want. Keeps you from drilling and it's free!
 

Dizz I have 19 server rack full of punch plate doors that I can get for
free and cut to any size you want. Keeps you from drilling and it's free!

Thanks DW, but in this case I've only got to do a 4" X 12" section, and the
material flow from one end to the other needs to be seamless. After you
mentioned the server rack covers I realized that I had a piece of metal plate
(punch plate) that was a shelf in a rack my wife bought. Checked the holes
and they were 5/32, but if I had mounted it to the classifier sluice there would
be a bump there where the material transitioned from the sluice bed on to
the punch plate, and a lot of material would get hung up there.

The gold up here can be very small, and in order to move
more material I don't want to spend time brushing the tiny stuff over that
edge, so, the holes are drilled right into the classifying sluice.

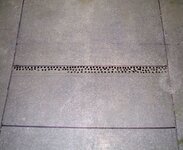
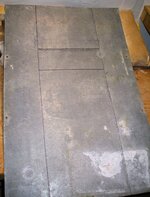
This piece of galv. steel was the shelf part of a rack, and I'm just getting
going on forming it into what I need. Don't have any of the good tools
that some guys have, so I do the best I can with tin snips, drill, hammers
and chisels, which are used to help start a straight bend on an edge. It
may not be pretty, but I could care less so long as it performs the function
I built it for.

classifier 001-2.jpg

classifier 002-2.jpg

Couple of the holes ran together on me, but for the most part
I'm pleased with how it's coming along. Now that I've got clear
lines to follow, I just need to be careful and try to stay within
the lines. I truly do my best, but sometimes my best ain't so
good.....:laughing7:
 

Thanks DW, but in this case I've only got to do a 4" X 12" section, and the material flow from one end to the other needs to be seamless. After you mentioned the server rack covers I realized that I had a piece of metal plate (punch plate) that was a shelf in a rack my wife bought. Checked the holes and they were 5/32, but if I had mounted it to the classifier sluice there would be a bump there where the material transitioned from the sluice bed on to the punch plate, and a lot of material would get hung up there. The gold up here can be very small, and in order to move more material I don't want to spend time brushing the tiny stuff over that edge, so, the holes are drilled right into the classifying sluice. This piece of galv. steel was the shelf part of a rack, and I'm just getting going on forming it into what I need. Don't have any of the good tools that some guys have, so I do the best I can with tin snips, drill, hammers and chisels, which are used to help start a straight bend on an edge. It may not be pretty, but I could care less so long as it performs the function I built it for. <img src="http://www.treasurenet.com/forums/attachment.php?attachmentid=1005359"/> <img src="http://www.treasurenet.com/forums/attachment.php?attachmentid=1005360"/> Couple of the holes ran together on me, but for the most part I'm pleased with how it's coming along. Now that I've got clear lines to follow, I just need to be careful and try to stay within the lines. I truly do my best, but sometimes my best ain't so good.....:laughing7:
dizz you can run up to my place here. i have everything you could need. but if your bound and determined try printing out a grid of dots with your hole spacing. then tape it to your metal, then take a punch and punch and punch each dot. that way you will have a fixed position without your drill wandering. or drill one row worth of holes in a thicker piece of metal then use it as a drill guide sliding it down each row. or. come on up and we can do it in my shop.
 

dizz you can run up to my place here. i have everything you could need. but if your bound and determined try printing out a grid of dots with your hole spacing. then tape it to your metal, then take a punch and punch and punch each dot. that way you will have a fixed position without your drill wandering. or drill one row worth of holes in a thicker piece of metal then use it as a drill guide sliding it down each row. or. come on up and we can do it in my shop.

Thanks for that great offer Stephen, but after a bad bout of
vertigo earlier this week I'm pretty much restricted to driving
to the local store and back. Gonna be a few days before I'll
feel stable enough to drive more than a couple miles. As Dirty
Harry used to say: "Man's got to know his limitations", and
a full blown vertigo attack hitting while driving 70mph down
the freeway is about the most terrify scenario one could ever
experience.

This is, essentially, a prototype unit, and I do have the materials
for making a couple more. Like a lot of guys, I tend to "pack-rat"
stuff with that "I can use this for something, someday" attitude.
Now that money is so tight I've got all kinds of materials I can recycle
into more useful stuff. Not fancy built, or new, but it'll sure
get the job done.

A metal brake would come in handy, but I've learned to do it
the old fashioned way with a hammer and straight edge. Might look
a bit "redneck" when done, but if it works well I'll bring up the
other material I've got and we can make one for your Cube too.

I've finished off a couple more rows of holes, and it's starting to
look much better. Won't be as uniform as punch plate, but nothing
that is -1/8 is gonna get across it without dropping through.
 

Yeah, the stuff i have is 3/16" holes punch plate. oh well, if anyone need some let me know.
 

Last edited:
Seems its on its way and you can have it by friday!
Punch plate tracking..jpg
 

Last edited:
Couple of the holes ran together on me, but for the most part
I'm pleased with how it's coming along. Now that I've got clear
lines to follow, I just need to be careful and try to stay within
the lines. I truly do my best, but sometimes my best ain't so
good.....:laughing7:[/QUOTE]

Use a center punch at the intersections, then use a small drill like 1/16" or so, don't lean on it too hard so as to break it. Then go back with the size you want the holes to be, and drill it out. The big drill will follow the small hole. That is the kind of stuff I did for 47 years.
 

Couple of the holes ran together on me, but for the most part
I'm pleased with how it's coming along. Now that I've got clear
lines to follow, I just need to be careful and try to stay within
the lines. I truly do my best, but sometimes my best ain't so
good.....:laughing7:

Use a center punch at the intersections, then use a small drill like 1/16" or so, don't lean on it
too hard so as to break it. Then go back with the size you want the holes to be, and drill it out.
The big drill will follow the small hole. That is the kind of stuff I did for 47 years.

Hi Jimmy, IF I'm ever stupid enough to do this again, I'll be sure to take that
advice. The classifier is done now, and all I need to do is build some back legs for it.

If I can try it out today, I'll post a thread on how it all came together.
 

Top Member Reactions

Users who are viewing this thread

Back
Top