Building a slate miller table

Gold4Mike

Full Member
May 10, 2017
230
718
Mount Vernon, Washington
Detector(s) used
Angus Mackirk Foreman
Grizzly Goldtrap Explorer
Gold Hog Piglet highbanker
Home made slate miller table
Primary Interest:
Prospecting
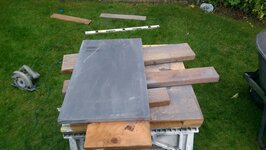
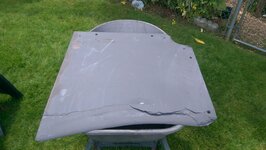
I have a friend who rebuilds pool tables. After reading about slate slabs being used for miller tables I happened to ask him if he had any slate pieces destined for the garbage bin. He did! So I scored a broken up piece of 1" thick slate. I cut it down to about 15" by 24" to eliminate cracks and other damage. I will be attempting to build my own miller table with it. I have read quite a bit and have some ideas based off of the knowledge, skills, testing, etc of many people so I think I can come up with something that works pretty well. My question is on the setting of the slate. I've read quite a few comments and threads where those using miller tables have said it is not necessary to have long surfaces, and possibly better to have a wide surface with shorter slope. I am thinking I will run my piece as 24" across the top and 15" slope rather than the other way around. I was wondering what people think and if one way would be better than the other? IMAG0323.jpgIMAG0325.jpg
 

Upvote 0
Longer is better!
My DIY table is 8X32. Generally the gold appears right where I drop the cons and does not travel. However sometimes I see a roundish piece that rolls down the table and I have to try to stop it. you don't want them to get away! I built the AZviper design and am quite happy with it.
 

I found (with building my own versions) (slate ,calk board paint and the drawer liner that AZ uses) that I prefer the real slate for it's tooth and wider VRS. the shorter. reason being, If you screen it all and ONLY run specific size cons SLOWLY ,you will capture the fine gold together towards the top . Some will slip by if your not attentive . Also prior to using this Miller table , I like to scrub it's surface to clean off Anything that was left from prior use ,I.E. fine clay sediments and really fine organics. and NO dish washing detergent and only a very small amount of Jet Dry is needed (a couple of drops!). I don't like using any valve on mine to slow the water down. I prefer slowing the bilge pump down electrically electrically. I run off a 12v battery and keep my battery charger running. and always (if you have clay sediments) take your bilge pump apart every now and then to clean off the screen/filter IF it has one. Some people don't do this and think the pump is shot and pitch them..........I know someone that likes these free pumps! I'm assuming that you plan to use this Miller table at home and NOT bring it into the field with you to use...1" slate is heavy! Mine was 3/8 and as a F.O.G. I cut it down smaller because of the weight. I only brought it out to another state 1 time and that was enough for me ! I also like to run my super cons over this table at different angles to double check my runs (kinda over kill BUT..............) Good luck on your project and keep us posted with pictures and the fine gold your getting!
 

I have an old blackboard that I could build one with. 3'x5'x 3/8-1/2".

Build with a valve inline and adjustable gate, so you have total control of both flow and water depth. For my cutting board table, I use a 120V 180 GPH fountain pump, which is more than enough for a 10" wide table. You could probably go 12-15 inches with that pump.
 

Yes, it is definitely heavy russau, for home use only, lol. I think I may try it wider and shorter. I was left after cutting this piece, with two narrower but longer sections I could use as well. Russau, what did you use for scrubbing the surface? This one does have some sort of discoloration in one section.
Nemo, I was looking at a couple of 200 gph pumps on Amazon that I was hoping would do the trick. They are pretty inexpensive, which I like! I saw pictures of someone else's slate table where they used what looked like 1 1/2 inch aluminum for the sides and top wall so I think I will try that.
 

I would not use a twenty four inch wide "anything" for fine gold recovery. I doubt that you could spread your cons out over that two foot area, but on the other hand never tried one that wide. Smaller units require less "snuffer bottle" sucking. Have you pondered using a piece of pipe insulation for the "water dam" ? And I've got a question that probably is a bit to techie....Does slate have a directional grain to it?
 

I would not use a twenty four inch wide "anything" for fine gold recovery. I doubt that you could spread your cons out over that two foot area, but on the other hand never tried one that wide. Smaller units require less "snuffer bottle" sucking. Have you pondered using a piece of pipe insulation for the "water dam" ? And I've got a question that probably is a bit to techie....Does slate have a directional grain to it?

Yeah, I've been rethinking that again. Keep going back and forth. If I screw this one up, luckily I have access to more slate. I was going to use scrubbies for the water dam, but pipe insulation would probably work too. I'll probably try several things and see what works best.
As for the grain question, I'm not sure. I'll take a look at it closer and see. All I noticed were the markings from when it was cut.
 

This is my DIY miller table. Maybe it can give you some ideas.DIY miller table.JPG
 

Slate should be totally non directional since it is composed of tiny individual clay sized particles.* The sharp edges of individual ground off/flattened particles and the gaps between the particles is what gives slate "tooth".

Keep your table level side to side and water flow will be even from top to bottom. Make sure you can pretty much micro adjust the angle since different mesh feed will probably need a slightly different angle to run properly.

Good luck.

*Slate is a fine grained and foliated type of metamorphic rock. It owes its fine grained texture to its parent rock, shale. Shale, a type of sedimentary rock, consists of dominantly clay-sized particles (in geology, clay is a reference to particle size, not a reference to any resemblance to artist's clay), which create a smoother, finer grained texture when exposed to low grade metamorphic conditions. Slate can occasionally form as a result of metamorphism in volcanic ash deposits, although this is not as common as the shale-derived rocks. It also exhibits foliation, or layering, which again, is a result of the parent rock being subjected to metamorphism
 

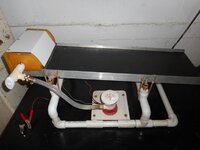
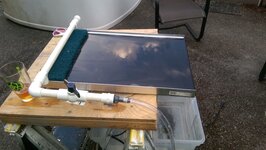
Well I finally finished my miller table, or at least got it to the point I can use it and make changes to it. I ended up using 1 1/2" aluminum pieces for the sides and top. Plenty enough height for the water depth. I bought a 400 ghp adjustable fountain pump and ran tubing to 3/4" pvc that I had on hand. The water is adjustable at the pump and also at a ball valve I placed inline. I fabricated a cheesy mount for the drip tube out of 3/4" open pvc t's and drilled 1/8" holes across the drip tube using brillo scrubbies for a diffuser. It seemed to work well and I was able to squeeze out a few more small pieces of gold from the +20 to -50 and the -50 concentrates my wife and I had already panned. I actually had a small amount of -100 that I had saved and found a couple small pieces in that too! It's pretty amazing to start recognizing the gold as opposed to other shiny things and also to recognize the way gold acts. I actually tried to get the small gold pieces to wash down by dropping more sand on top of them, only to have them reappear after the lighter stuff had washed away.:headbang: Still more testing to do on it.

Total Cost:
Pump $21
Aluminum siding $13
Assorted pvc pieces $13
Scrubbies $3
Slate Free
Bins and other pvc free

Total about $50IMAG0368.jpgIMAG0373.jpgView attachment IMG_0314 (2).jpg
 

Looks great!

Want something better than spooning cons on the table? Try a squirt bottle! I use an 8oz applicator bottle from Harbor Freight with the tip cut off.
 

Looks great!

Want something better than spooning cons on the table? Try a squirt bottle! I use an 8oz applicator bottle from Harbor Freight with the tip cut off.
OR make your own auto-feeder ! and position the holes that feed the water to the table straight up and keep the water pressure down and it'll give you a even flow of water to smooth out ANY chevron of the water flow and it'll keep the material from forming "corn rows".... BUT you made a nice Miller Table!
 

Wow, both great ideas!
 

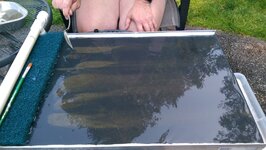
I see from the pics where you have placed 5 scoops of material on the table. You may not have enough pitch on the table. The first scoop should be nearly gone before you can deliver the second. I run about 5 degrees on the table and use the brush to help the movement of the material. The gold will stick to the bed. Some times I get roundish pieces that roll down the table and have to re-run at a lower pitch to capture them. You do not need a lot of water. Only enough to maintain that smooth sheet of water.
 

I see from the pics where you have placed 5 scoops of material on the table. You may not have enough pitch on the table. The first scoop should be nearly gone before you can deliver the second. I run about 5 degrees on the table and use the brush to help the movement of the material. The gold will stick to the bed. Some times I get roundish pieces that roll down the table and have to re-run at a lower pitch to capture them. You do not need a lot of water. Only enough to maintain that smooth sheet of water.

Ha, I had been putting material on the table all day and learning as I went, but my wife came home from work and I threw her in the hot seat for a picture.:laughing7:
Thanks for the tips, the learning curve is steep right now and we are definitely learning each and every day from our experiences and from suggestions and tips from those of you who having been doing this a while. :notworthy: We are excited thinking about having all summer to keep practicing and getting more gold!:goldpan:
I'm not sure what 5 degrees looks like, but I've seen that angle mentioned several times. I did use a level and found a slight downward angle just from the concrete pad it was sitting on and started with that. I was trying different water flows to test how the material ran and figure I can then add changing angles to see what works best. The best part is the gold did stick (hopefully not losing anything visible) and was easy to spot! Today I found a container of concentrates that I forgot about, ran that through the table, and found another small flake!
 

Last edited:
If you have a smart phone there is a free app for a level and I believe it will register all different angles.

Good luck.
 

If your table is stopping the gold, you must be in the zone. Another thing... I always had trouble with the snuffer bottle. Being that there is not enough water on the table to properly snuff the gold and the gold seems to remain in the tube. Going for the next recovery, the gold would fall out. I then installed the gold well as AVviper did to sweep the gold into. problem solved.
 

If your table is stopping the gold, you must be in the zone. Another thing... I always had trouble with the snuffer bottle. Being that there is not enough water on the table to properly snuff the gold and the gold seems to remain in the tube. Going for the next recovery, the gold would fall out. I then installed the gold well as AVviper did to sweep the gold into. problem solved.

Yes, but putting a hole in that 1" slate won't be nearly as easy as on a AzViper table. :)
 

Yes, but putting a hole in that 1" slate won't be nearly as easy as on a AzViper table. :)
Yeah, I certainly am considering that hole. I think that drilling it will be fairly easy with the right bit. I will be researching that before I do it. I did struggle a bit with the snuffer bottle. The gold did not want to release from the table, which I guess is good as long as I keep an eye on it.
 

Using the right size masonry (cap O.D. ) bit while keeping a slight stream of water on the process and at a slow speed will get it done for you! This is how I did mine!
 

Top Member Reactions

Users who are viewing this thread

Back
Top