I'm looking for some plans to building a dredge heater for some winter diving. Anyone have any good plans?
You are using an out of date browser. It may not display this or other websites correctly.
You should upgrade or use an alternative browser.
You should upgrade or use an alternative browser.
Dredge heater plans
- Thread starter mazzy74
- Start date


omnicron
Bronze Member
OMG...I have nightmares of building a dredge heater...I really hope you have better luck then me!
Here's my thread on my fails... What I have learned from this....I'm going to buy a portable on demand water heater..
http://www.treasurenet.com/forums/dredging-hi-banking/377689-heat-exchanger-wetsuit.html
If you go the route of a manifold type check out this link:
Hot Water Heater For A Gold Dredge Photos by Rod1874 | Photobucket
Pay attention to photo #9..look inside very carefully... I think that's the trick.
okbasspro
Hero Member
Contact member MikeMike he just did one has 94 deg water at his suit it is like the gold hog one using a paint can.


omnicron
Bronze Member
Mike, how about some details...I really have no idea why what I built isn't working. What's going on inside your can. Does the pipe go to the other end and if so do you have holes drilled in the pipe? Are you able to run full flow into heater? How many feet of copper....God I feel like putting a bullet into my head as I guess I'm too stupid to get one to work...
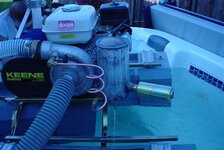
With the advice and suggestions from Jordan, OKBASSPRO and Gold Hog and other forum members here. This is what we did....
50 ' of 1/4" o.d. copper
Used a dole pineapple can to make the inner coil, then a piece of 4" pvc to make the outer coil. One piece of copper.
Used 1/4" od compression unions for copper ends so that I can use ice maker lines to move the mixing can around till I decide to mount it.
Used 3/4" GH (garden hose) by 1/4" od compression fittings at the pump. With two splitters. Again to be able to use ice maker lines to move the mixer around.
Made bulk head fittings with o rings
1/4" compression by 1/4" MIP into 1/4" Fm bushing by 1/2" MIP. Then oring. Thru lid of can. Then another 0ring, then I used standard faucet nuts and washers to secure to can lid for ice maker lines.
I have one IM line from pump TO Heat Exchanger. One line FROM Heat Exchanger to mixer can. One line (cold water) FROM pump to mixer can.
On bottom of mixer can, make similar bulk head connections to be able to attach to the diver hot water supply.
I used an old air line from another project.
I only put the supply in about 15"-18", in the front...so that I can pull it out with ONE yank !
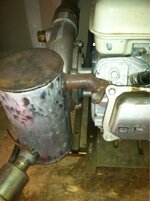
Took muffler off, then cut it off of header just below welds (engines don't like metal fillings in them).
Used 3/4 copper fittings and pipe. I had to round the muffler pipe with the 3/4" copper fittings. 1: 3/4" Street 45, 1: 3/4 45 (regular). Pipe was long enough to clear engine and go to end of can about 10" ish or so. Drilled 3/32" holes 1" apart AND staggered around pipe. Put 3/4" cap on end of pipe....If you can't solder then drill pilot hole and use small screw to hold on pipe. I bolted a 1" copper cap in middle of bottom of can to slide pipe into to help keep can centered and have better stability. Drilled about 7 3/16" holes on bottom half of end for exhaust to leave and help trap the heat in the can. Also, insulated can with 1" fiber glass.....sides and ends....I could keep my bare hand on it.
50 ' of 1/4" o.d. copper
Used a dole pineapple can to make the inner coil, then a piece of 4" pvc to make the outer coil. One piece of copper.
Used 1/4" od compression unions for copper ends so that I can use ice maker lines to move the mixing can around till I decide to mount it.
Used 3/4" GH (garden hose) by 1/4" od compression fittings at the pump. With two splitters. Again to be able to use ice maker lines to move the mixer around.
Made bulk head fittings with o rings
1/4" compression by 1/4" MIP into 1/4" Fm bushing by 1/2" MIP. Then oring. Thru lid of can. Then another 0ring, then I used standard faucet nuts and washers to secure to can lid for ice maker lines.
I have one IM line from pump TO Heat Exchanger. One line FROM Heat Exchanger to mixer can. One line (cold water) FROM pump to mixer can.
On bottom of mixer can, make similar bulk head connections to be able to attach to the diver hot water supply.
I used an old air line from another project.
I only put the supply in about 15"-18", in the front...so that I can pull it out with ONE yank !
Took muffler off, then cut it off of header just below welds (engines don't like metal fillings in them).
Used 3/4 copper fittings and pipe. I had to round the muffler pipe with the 3/4" copper fittings. 1: 3/4" Street 45, 1: 3/4 45 (regular). Pipe was long enough to clear engine and go to end of can about 10" ish or so. Drilled 3/32" holes 1" apart AND staggered around pipe. Put 3/4" cap on end of pipe....If you can't solder then drill pilot hole and use small screw to hold on pipe. I bolted a 1" copper cap in middle of bottom of can to slide pipe into to help keep can centered and have better stability. Drilled about 7 3/16" holes on bottom half of end for exhaust to leave and help trap the heat in the can. Also, insulated can with 1" fiber glass.....sides and ends....I could keep my bare hand on it.
Last edited:
I didn't get a chance to use my blaster (garden hose with long fireman noozle),
While running the heater.....so be careful and test, test, test !
At the SLIGHTEST inclination of the temperature rising DROP everything and yank the line out. Hooser, I think, has some pics and stories of friends getting SEVERELY SCALDED and HOSPITALIZED !
While running the heater.....so be careful and test, test, test !
At the SLIGHTEST inclination of the temperature rising DROP everything and yank the line out. Hooser, I think, has some pics and stories of friends getting SEVERELY SCALDED and HOSPITALIZED !
russau
Gold Member
Omni, without going back and looking at all the threads and pictures,is your heater installed upright or horizontal? upright would give you the most time for the water to heat up. also is your water in at the lowest part of the heater? maybe try switching the water in to the water out port. see if that will give it a boost..........
chupacabra
Jr. Member
- Jul 23, 2013
- 77
- 74
- Primary Interest:
- All Treasure Hunting
omnicron
Bronze Member
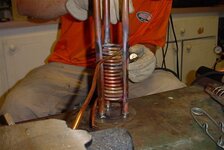
Rus, I have tried it every direction, up, down, and all around. I tried the water in on both sides of the coil. I just don't get it...maybe this...could my coils be to close to each other? I tried to space the coils apart from each by like 1/16" or so...just guesing on it. My inner coils are wound at about 2" and my outer coil is wound at about 2.5 or so inches. My coils are about 1/4" from the 1" steel pipe. The heater is about 3" from the exhaust port on the head. I'll take a few pics later and post.
russau
Gold Member
Omni those copper coils need to be right up against the steel pipe to capture/transfer its heat.and the water inlet needs to be at the lowest point and exit at the highest point. yep a picture would help a lot!
Didn't I mention posting pics earlier 
Just saying....
I do not have my copper coils touching the 3/4 pipe in the heat exchanger.
The inner coil is about a 3" diameter the outer coil was wrapped around 4" pvc.
I'm getting 94 degree water (up to 105 - after 105 it likes to steam)
Just saying....
I do not have my copper coils touching the 3/4 pipe in the heat exchanger.
The inner coil is about a 3" diameter the outer coil was wrapped around 4" pvc.
I'm getting 94 degree water (up to 105 - after 105 it likes to steam)
Last edited:
Bnugget
Full Member
- Oct 17, 2013
- 152
- 399
- Primary Interest:
- All Treasure Hunting
omnicron
Bronze Member
Sorry for the delay guys, things have gone from bad to worse here...I really need to find a job...
Here are pics of the outside. I will have to cut the end off for you to see the inside but it's really not much to see...my coils are less the 1/4 or so away from the metal pipe with holes from the exhaust. I have a cap welded on the end of that.
Bnugget - Looks good, I may try that style. Does the exhaust just dump into the emt and exit the other end or is there a pipe that goes down the center with holes and capped on the end.
omnicron
Bronze Member
I'm using 1/4OD and I have about 34 feet inside. The inside of the can is also lined with 1/4 belted rubber but the exhaust end isn't.
Last edited:
Top Member Reactions
-
 2161
2161 -
 1038
1038 -
 979
979 -
 960
960 -
 865
865 -
 808
808 -
 804
804 -
 700
700 -
 587
587 -
 571
571 -
 464
464 -
 453
453 -
O
452
-
 448
448 -
 446
446 -
 435
435 -
 427
427 -
 377
377 -
 376
376 -
 367
367
Users who are viewing this thread
Total: 3 (members: 0, guests: 3)