Hey everyone, Longgun here.
I have watched a lot of gold prospecting videos and read many books on the subject but never seen anyone demonstrate this particular panning technique. This "Back Panning" technique is a very helpful skill plus it saves a lot of gear cost and gets high recovery. The standard panning method that is mainstream works great and is much faster in most circumstances except when it comes to finishing heavy black sand concentrates. If you have a lot of flour gold and black sand in your pan then you very quickly get to a point where panning off surface material leads to gold loss even with a lot of agitation and care. This is where you stop the standard method and switch to back panning.
There are many methods and gizmos to get concentrates and make them into super concentrates, but once you get them you are still left with something to pan. I have found this method to be incredibly useful and even with highly efficient gear it is still the final step of my cleanout. Back panning converts these concentrates into nearly 100% clean gold (minus impurities in the gold itself) with close to 100% of visible gold recovered. You won’t get every dot (unless you go overboard) but you will only leave behind a few cents with a bit of care.
Below I demonstrate this “back-pan” method on unclassified material below 20 mesh (using classified [evenly sized] material will HUGELY speed this process.):
The method mirrors the action of a Miller table or waves naturally lapping against a beach… which actually leads to the accumulations in many areas like Nome.
This should allow you to get approximately 99%+ recovery with only a gold pan and a little practice.
The major drawback of this method is that it is slow especially with large volumes in the pan. You do get near full recovery but it takes a long time and can be a bit tedious after several hours. I think it should be primarily used to process the final super concentrates of a cleanout or to check pans with lots of flour gold that may otherwise escape. To convert your concentrates to super concentrates a time saving intermediate like a Devin Gold VDR mini sluice is recommended because it reduces the amount of total material to be panned. (here’s how it cut our fine gold cleanup times from ~8 hours to 45 minutes or less! )
This is a finishing technique for black sand and fine gold, so use where appropriate. Before beginning get your material ready as well as a discard bucket with water, and of course your gold pan (plus maybe a comfy chair in the sun). Be sure to wash your hands thoroughly as oil and floating gold will make this more difficult. You may use a degreasing agent like dish soap or jet dry (or similar agents) to clean the material and add to the pan. You don’t need much, be careful not to over saturate or bubbles will block your view.
The basic steps for back panning:
1 Add concentrate or pan off light material with the regular panning method until you get down to super concentrates.
2 Dump, tap, and pool the concentrates on one side of the pan (For Garret pans, gather the concentrates at the riffles - this is important because if you do it the other way around it will be difficult to discard barren material).
3 Thoroughly tap and agitate the material with an emphasis on the area around the gold.
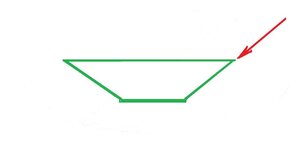
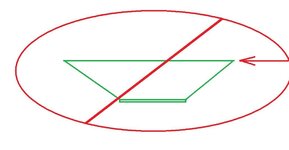
4 Add a small amount of water until you can get an even wave motion (front to back, reminiscent of a wave lapping at a beach) when you rock the pan. If material still moves around a lot and accidental waves really spread your gold and black sand beyond the top third then you have too much water. The idea is to add just enough that you have full control over the field in the center and top of the pan. You want enough water to easily move a black sand unit while leaving the gold behind. The water is your hands so you want maximum dexterity.
5 Slowly, and with care, begin to rock your pan and send the lightest material to the back of your pan (opposite the lips).
6 Keep the middle ground clear at all times for max visibility. This allows you to spot small particles of gold that are migrating away with the black sand. Since the black sand is much lighter than the gold, it will get pulled down first but the gold will still move too, just generally slower. You should have a chance to use your finger to push any migrators to the top of the pan. This allows you to filter only waste material to the bottom of the pan.
7 Once you’ve built up a decent amount of barren material that it starts to interfere with your middle ground, use a cup of water to rinse and cast off the barren material into your bucket.
8 Continue the rocking and discard process, using more care and tapping more frequently as you get into the layers where gold sits on top of black sand. Tapping and agitation should force it to sink and allow you to slowly erode the surface black sand layers, leaving you with a perfectly clean pile of gold to snuffer up at the end.
9 The “discarded” concentrates should be kept and rerun through your finishing system. Keep the black sand concentrated but not the light sand and clay.
The main idea can be conveyed just watching the demonstration. There is a feel to it; once you get it it’s easy. The light materials can be swiftly moved off while gentler motions will be necessary as you get down to the black sands especially if there is mixed sizes of material in the pan.
Anyway, I hope you learned an essential panning skill for free.
I’d like to credit Prospector Chuck P. For teaching me this method! I was honestly shocked and a bit embarrassed when he showed me how easy this is… and that a simple gold pan can often outperform hundreds of dollars of expensive finishing gear. If I was restarting learning to prospect again I would teach this technique in class one with the mainstream method simply because it allows you to do a lot with very little.
Knowledge is power my friends, use it to benefit yourselves and the people in your lives!
Thank you for reading!
-TMLonggun
Upvote
1


 , and BAM back on track


